Incident history means a set of data with all details of an incident, documenting the history of the incident from occurrence to resolution, including original report, investigation, conclusions, remediation, verification of completion of remediation, and assessment of the resilience of improvements achieved.
Step-by-step process on “view history and in-depth analysis on incident’s” in Zsuite, Quick and Easy with this video.
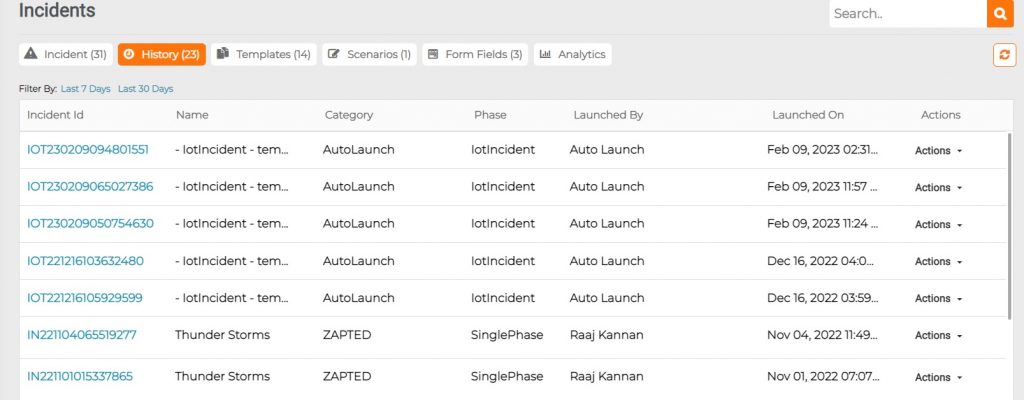
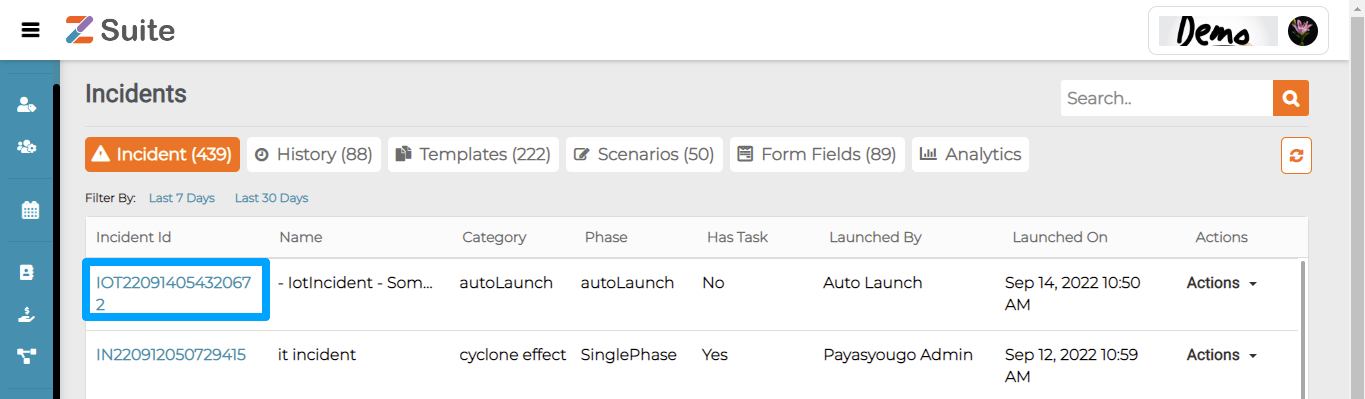
Here you can find the details of all the previous incidents.
Viewing an Incident History:
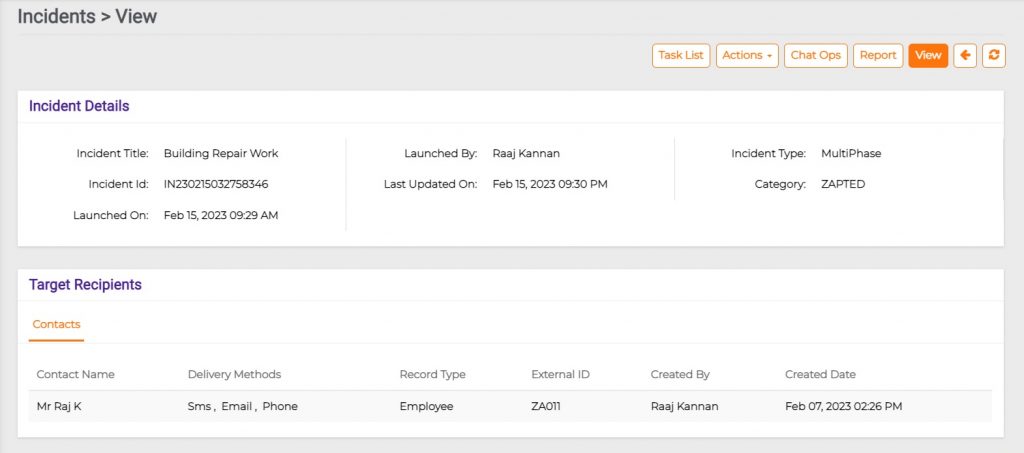
Click on the Incident Id to view the respective incident details like Incident title, Incident type, Launched by, Launched date and time, Last updated Date and Time, Target recipients.
Incident view include details of broadcast settings, incident phases and operator notes.
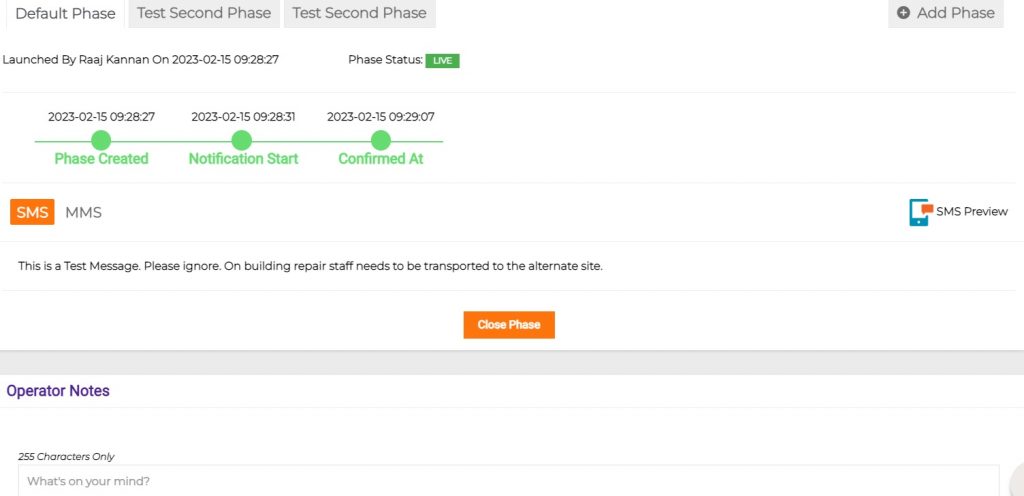
Incident Management can have multiple phases like Reduction, Response, Relocation, Recovery, Resumption, Restoration, Returning to Normal.
In incident phases you can see when the incident is created, when the notification has started, when the notification response was confirmed and when the incident got completed.
Major Incident Management Terminology
Major Incident Management Terminology
Incident: An occurrence due to unforeseen circumstances, which, if not handled duly, can turn severe to disrupt or deteriorate organization’s assets and services. Personnel Absence, Power Outage, Network Failure, Transport Disruption.
Major Incident: A major incident is a mass emergency outage or loss of service. The definition of emergency-level varies across organizations. Examples: Earthquake, Wildfire, Floods, Hurricanes, etc.,
Incident management: Incident management is a sequence of response, recovery and restoration steps taken to identify, analyze, and resolve critical incidents, which could impact an organization if not managed. Incident Management helps to restore normalcy by minimizing impact to operations and to maintain quality.
Incident phase: The Incident phases are the various phases involved in an Incident management like Identification, Containment, Eradication, Recovery, Restoration, etc.,
Incident task: The incident is an unplanned interruption and creation of the incident task is used when a particular incident requires specific organizational teams to get involved in their respective Incident response, recovery, restoration areas to collaboratively resolve a particular incident.
Incident history: Incident history means a set of data with all details of an incident, documenting the history of the incident from occurrence to resolution, including original report, investigation, conclusions, remediation, verification of completion of remediation, and assessment of the resilience of improvements achieved.
Form fields: Dynamic form fields are fields that change in real-time as user fill them out. They guide the user to easily complete a form. While creating IM templates the user can create dymanic form fields that are data-driven and responsive to user inputs.
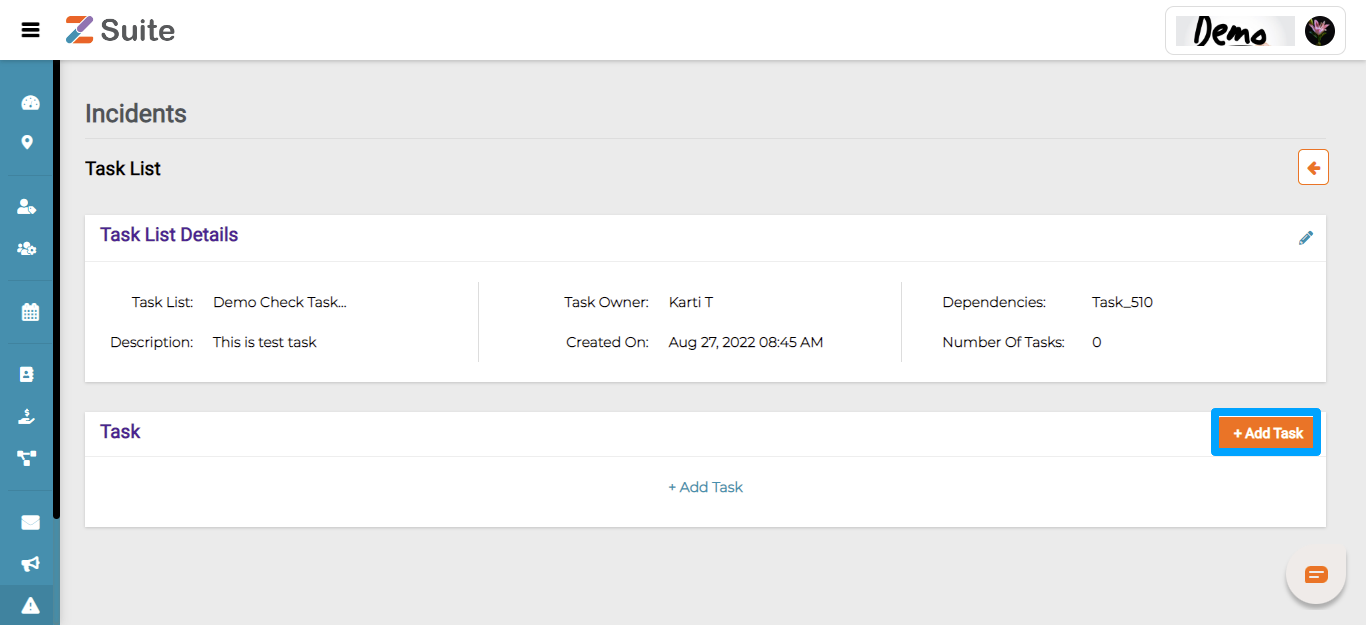
Task List
Task List
An incident task list is a prioritized set of activities that are needed to do to respond, resolve, recover and restore during an incident. A task list contains specific tasks assigned to respective task owner and when the task needs to be done.
The incident task list is created when a particular incident requires a sequence of tasks to be assigned and executed through responsible members or teams to respond, resolve, recover, restore, etc.,
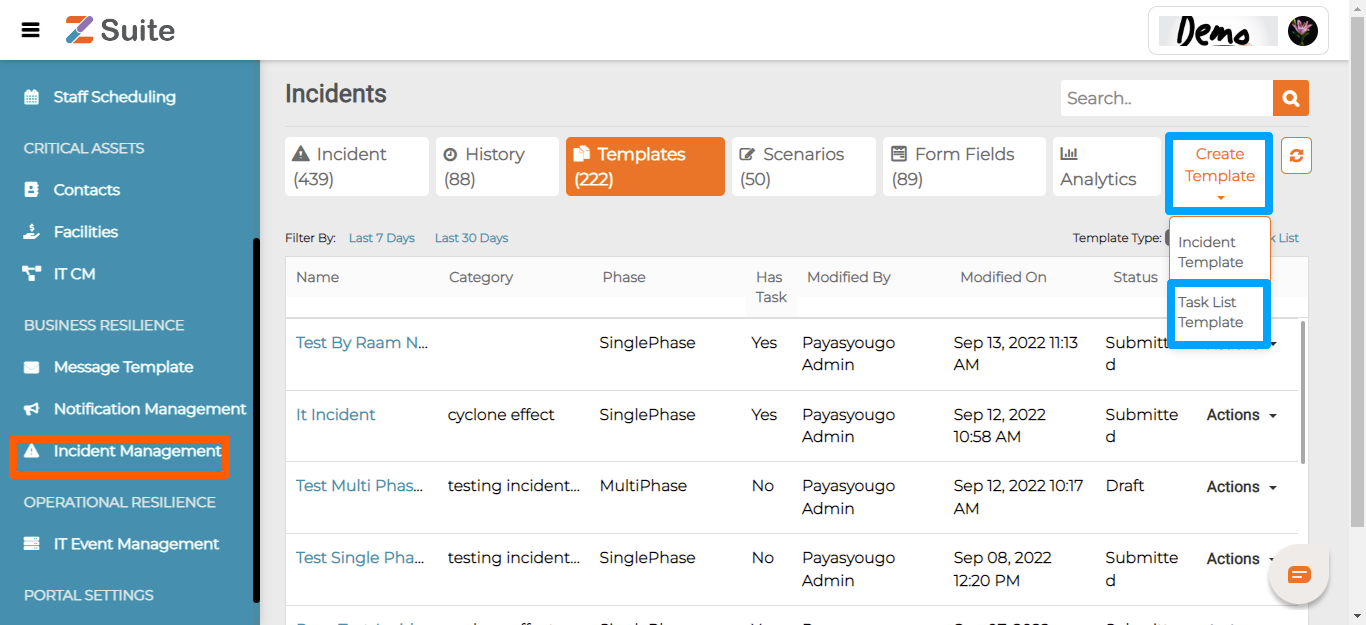
Task List Template Creation
Task List Templates can be created by clicking on “Create Template” dropdown and “Task List Template” on the top right.
Note: Latest list of Task Templates can be refreshed using the Refresh button next to Create Template.
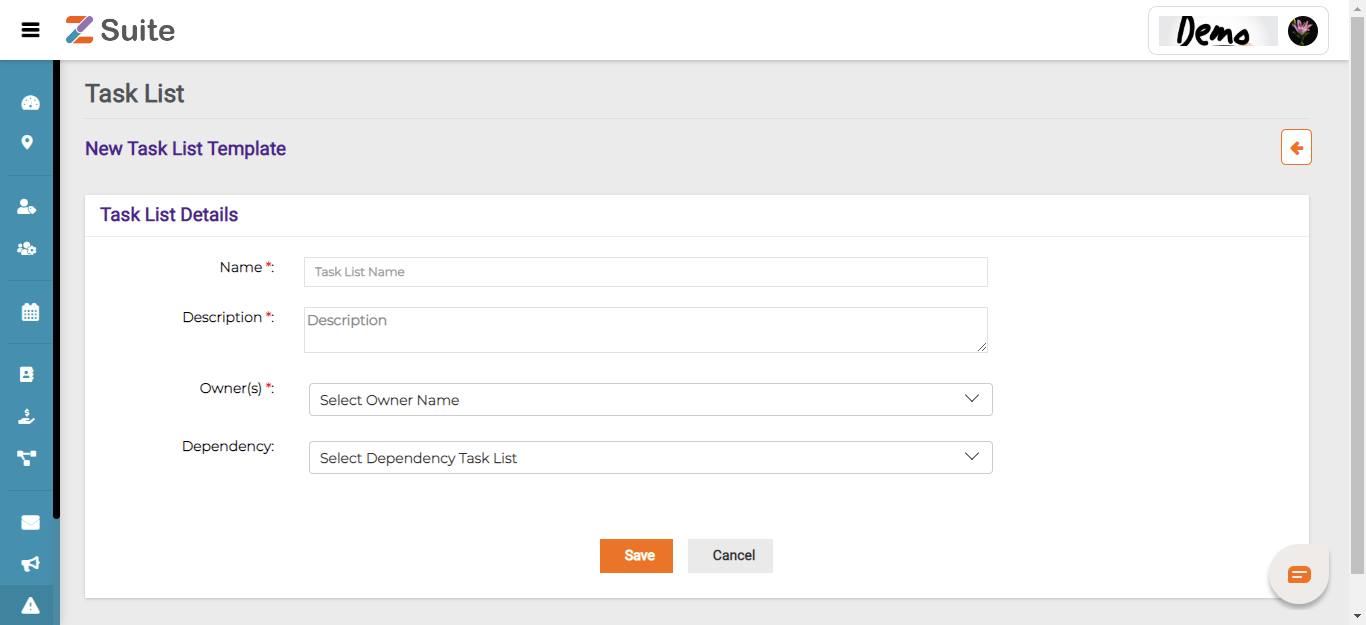
On “Task List Template”, the user needs to fill in the Task Name, Description, Owners and Dependencies.
New Task List Template Creation
Name: Enter the Task List Name
Description: Enter the Task List Description.
Owners: Select the Task List Owners from the dropdown list.
Dependencies: Select Task List dependencies from the dropdown list.
Click on “Save” after filling in all the mandatory data.
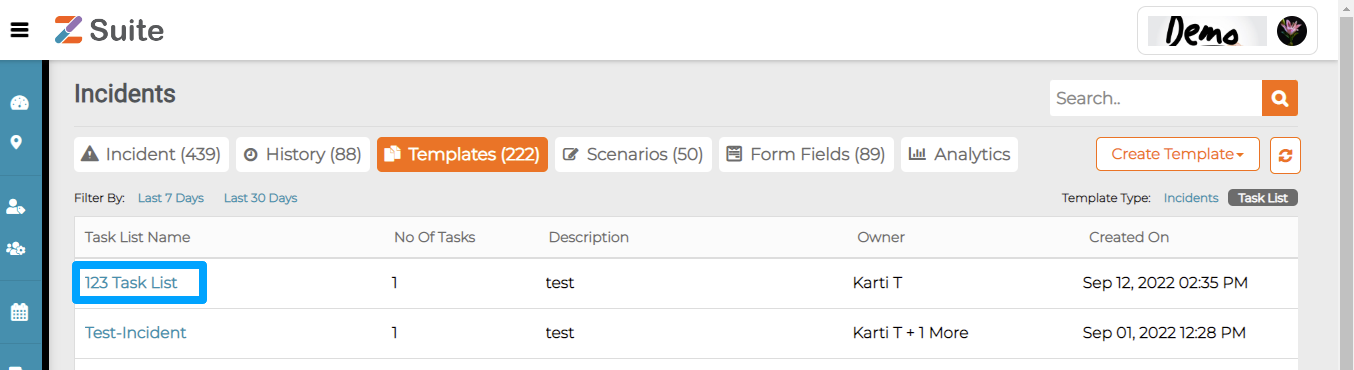
Edit Task list Template
Click on “Task list Template Name” and click on “Edit icon”.
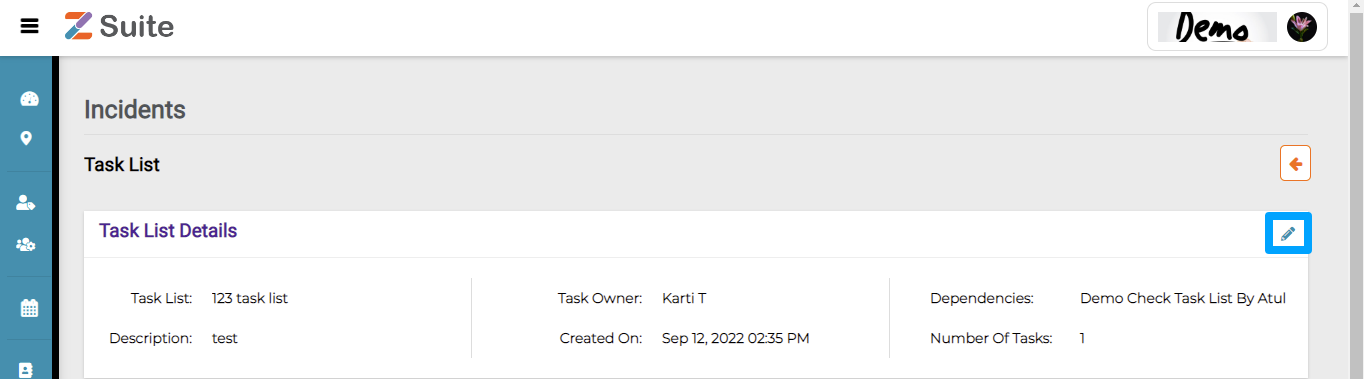
The user will be redirected to the “Task List Template details” page.
The user can edit the changes and click on “Update”.
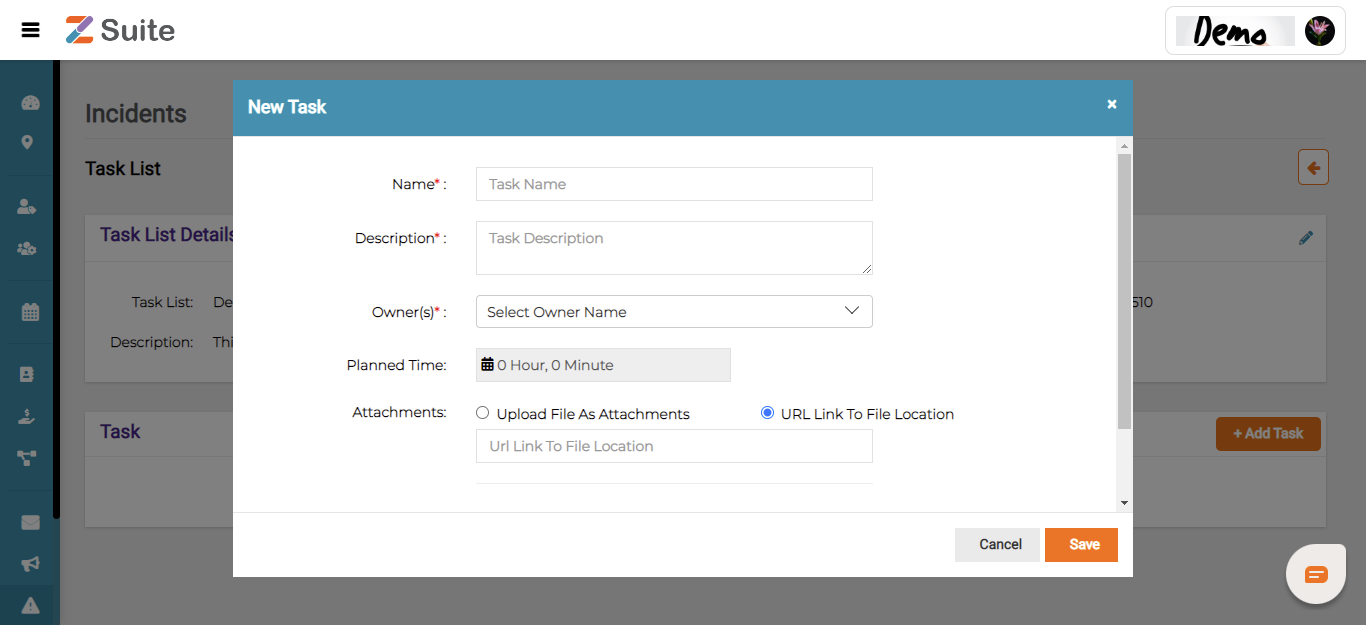
Add Task
After creating a new Task list template, click on the name of the Template.
Click on “Add Task” to create a Task to the existing template.
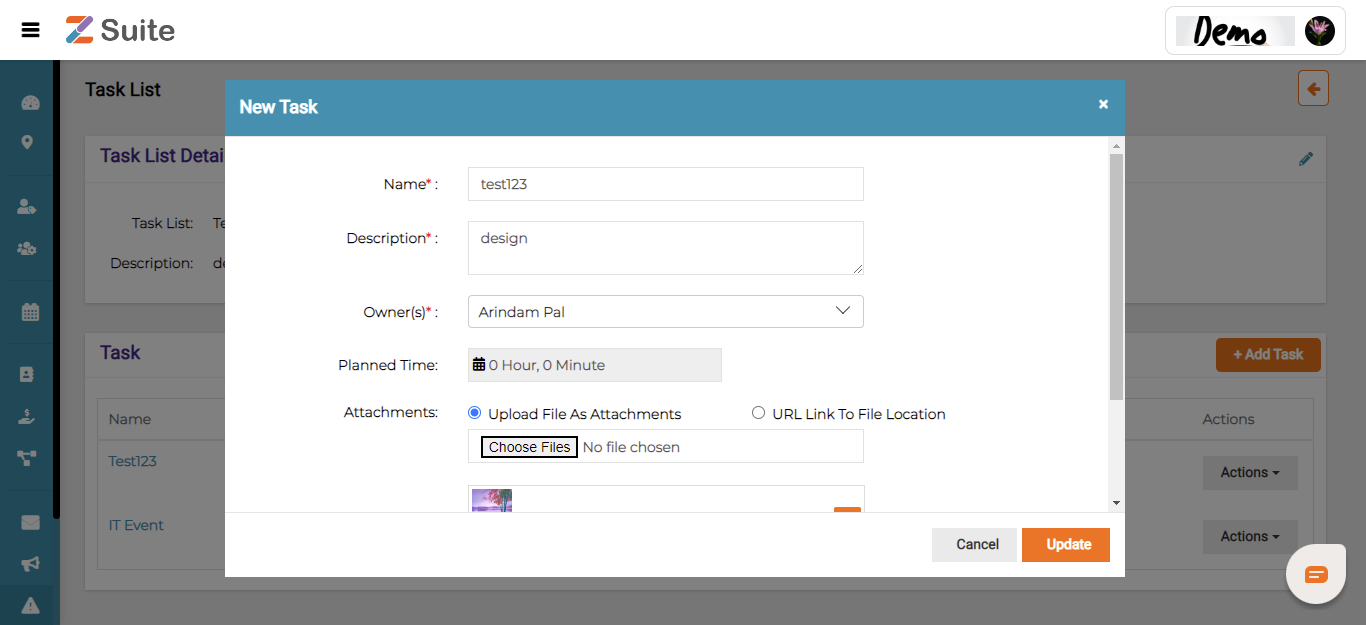
Name: Enter the Task Name
Description: Enter the Task Description.
Owners: Select the Task Owner from the dropdown list.
Planned Time: Select the Task Planned Completion Time.
Attachments (Optional): Select “Upload File as Attachment” or “URL Link to File Location” from the radio buttons (if any).
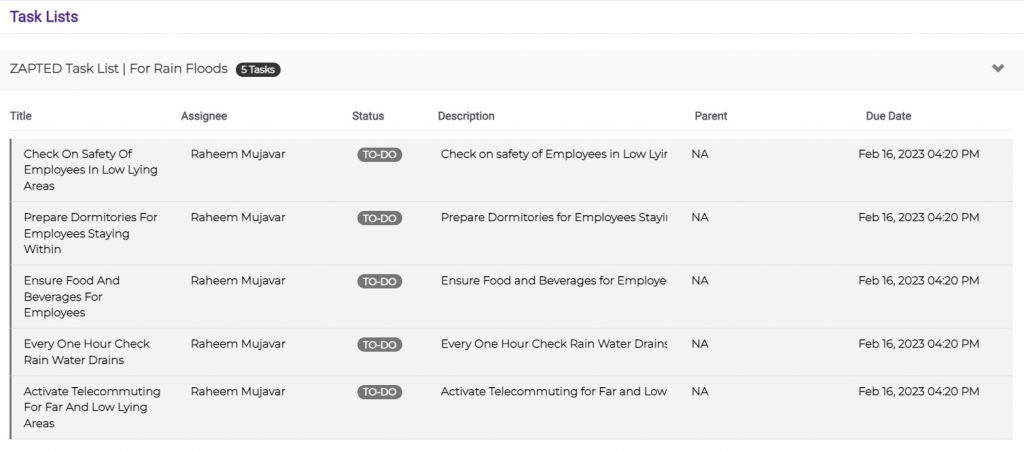
Example: Monsoon Preparedness Task List
Check On Safety Of Employees in Low Lying Areas.
Prepare Dormitories For Employees Staying Within .
Ensure Food And Beverages For Employees.
Every One Hour Check Rain Water Drains.
Activate Telecommuting For Far And Low Lying Areas.
After filling all the mandatory fields click on the “Save “ button.
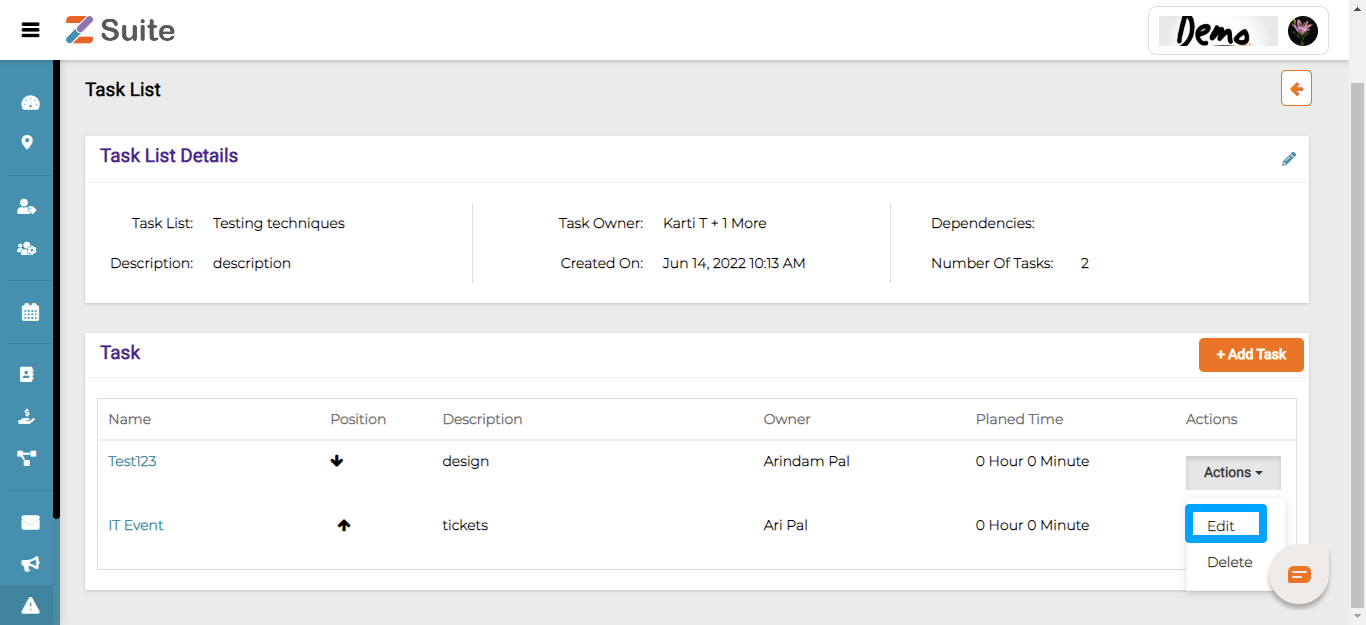
Edit Task
Click on the name of the Task list.
then the user will be redirected to the “Task list details “ page.
Click on “Edit”.
The user can edit the changes and click on “Update”.
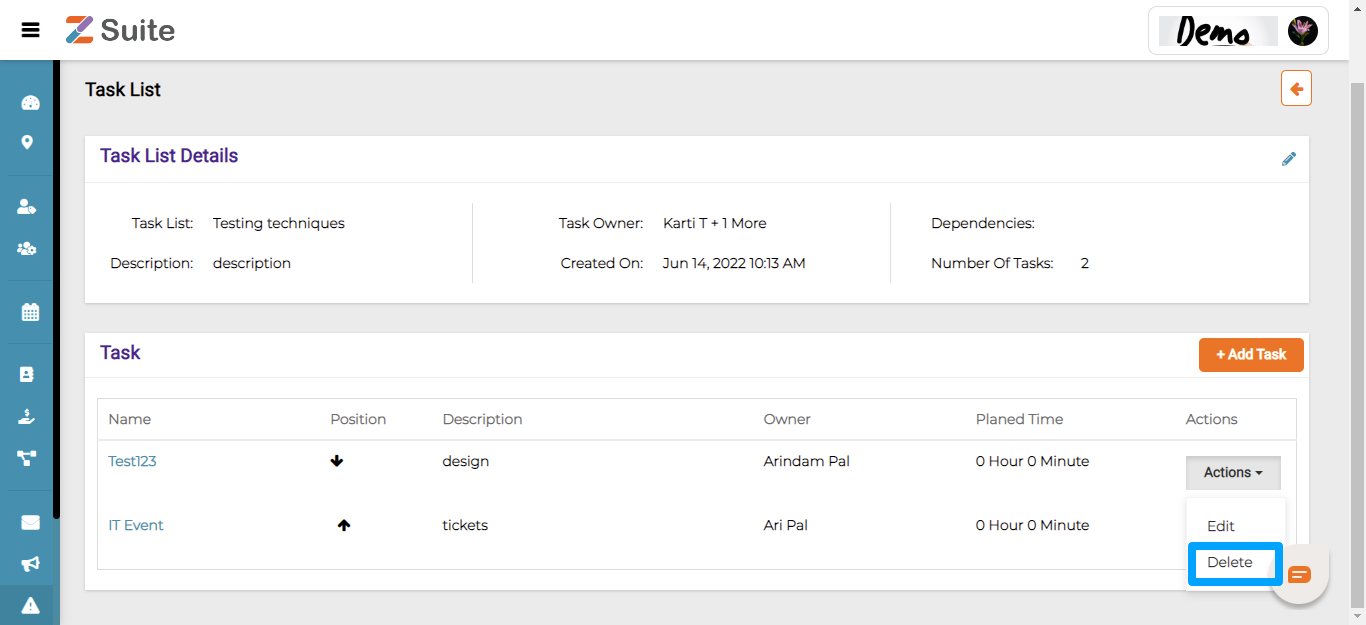
Delete Task
Click on the name of the Task list.
Then the user will be redirected to the “Task list details “ page.
Click on “Delete”.
Who Can Access Major Incident Management Features?
Who Can Access Major Incident Management Features?
Incident Manager : Incident Manager is the one who is authorized to respond, coordinate and manage Incidents to minimize its impact on operations.
This role will have full access permissions on all Entities belonging to Incident Management .
Incident Operator : An Incident Operator is the one who is authorized to act and operate on Incident Management incidents that can affect the Incident Management service quality disrupting or deterring the dependent business operations. They register Incident Management incidents to assign the same to the appropriate support group.
Incident operator can launch Existing Incident Templates or Create New Incident Management Incidents or View Alerts or View Integration & Analytics .
Incident Responder : Incident responders will receive notification either as SMS or E Mail or Voice Call or Push Notifications. For which each Incident Responder is created as a Contact in Z suite, so that the contact details and respective staff scheduling calendar for Incident notifications are available.
Incident Responder is the one who is responsible to fix the underlying issue with the Incident . Incident responders will receive notification either as SMS or EMAIL or Voice CALL or Push Notifications. Each Incident Responder must be first created as a Contact in Zsuite, so that Staff Scheduling and contact details for Incident related Notifications are available during Broadcast. In case, if the Organization is using Zapoj Workspaces , then contact will be generated as Workspace Member for Team Communications & Collaborations . Additionally Incident responders will have access to Zsuite to monitor incoming Alerts , Metrics , Incident status etc .
Incident Responder role users, can only View Incident , Alerts, Analytics and Integration flows. Incident Responders can add notes to Open Incidents.
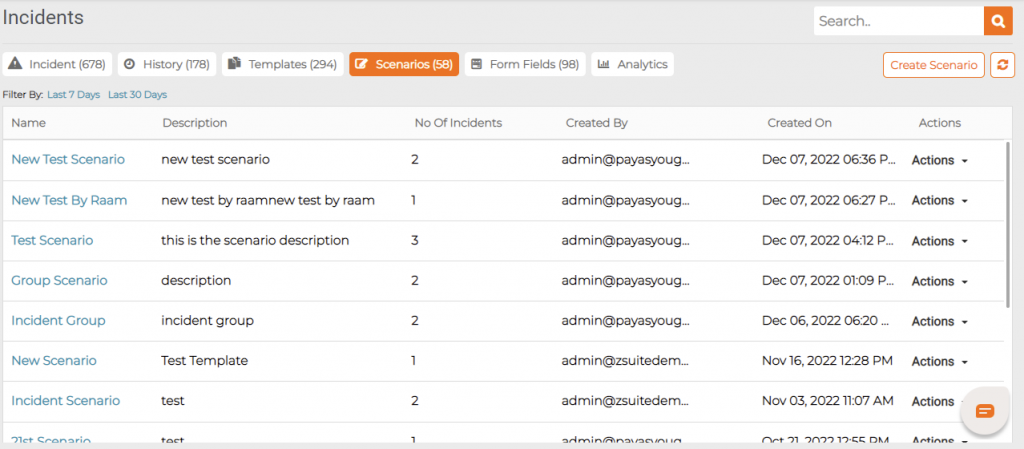
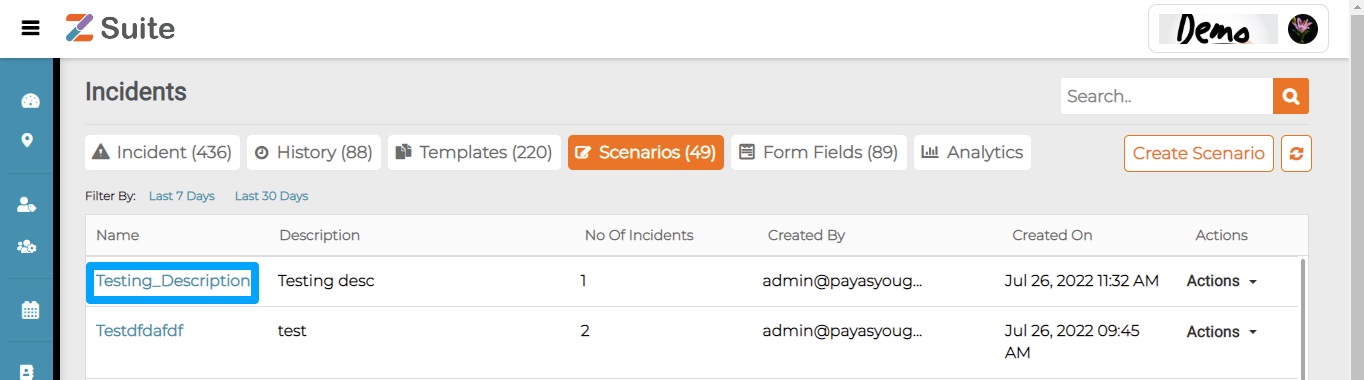
Scenarios
Scenarios
Scenarios can be of various type and intensity like Prolonged Power Outage due to Regional Grid Failure, Pandemic Wave infecting more than 50% of population, Road blockades and Traffic Disruption on persistent Heavy Rains, Building cracks or damage due on multiple Tremors.
Step by step process on “How to create and understand scenarios as templates” in Zsuite, Quick and Easy with this video.
Each of these Scenario can have multiple Incident templates and each Incident template can have multiple phases like Response phase, Recovery phase, Restoration phase, etc.
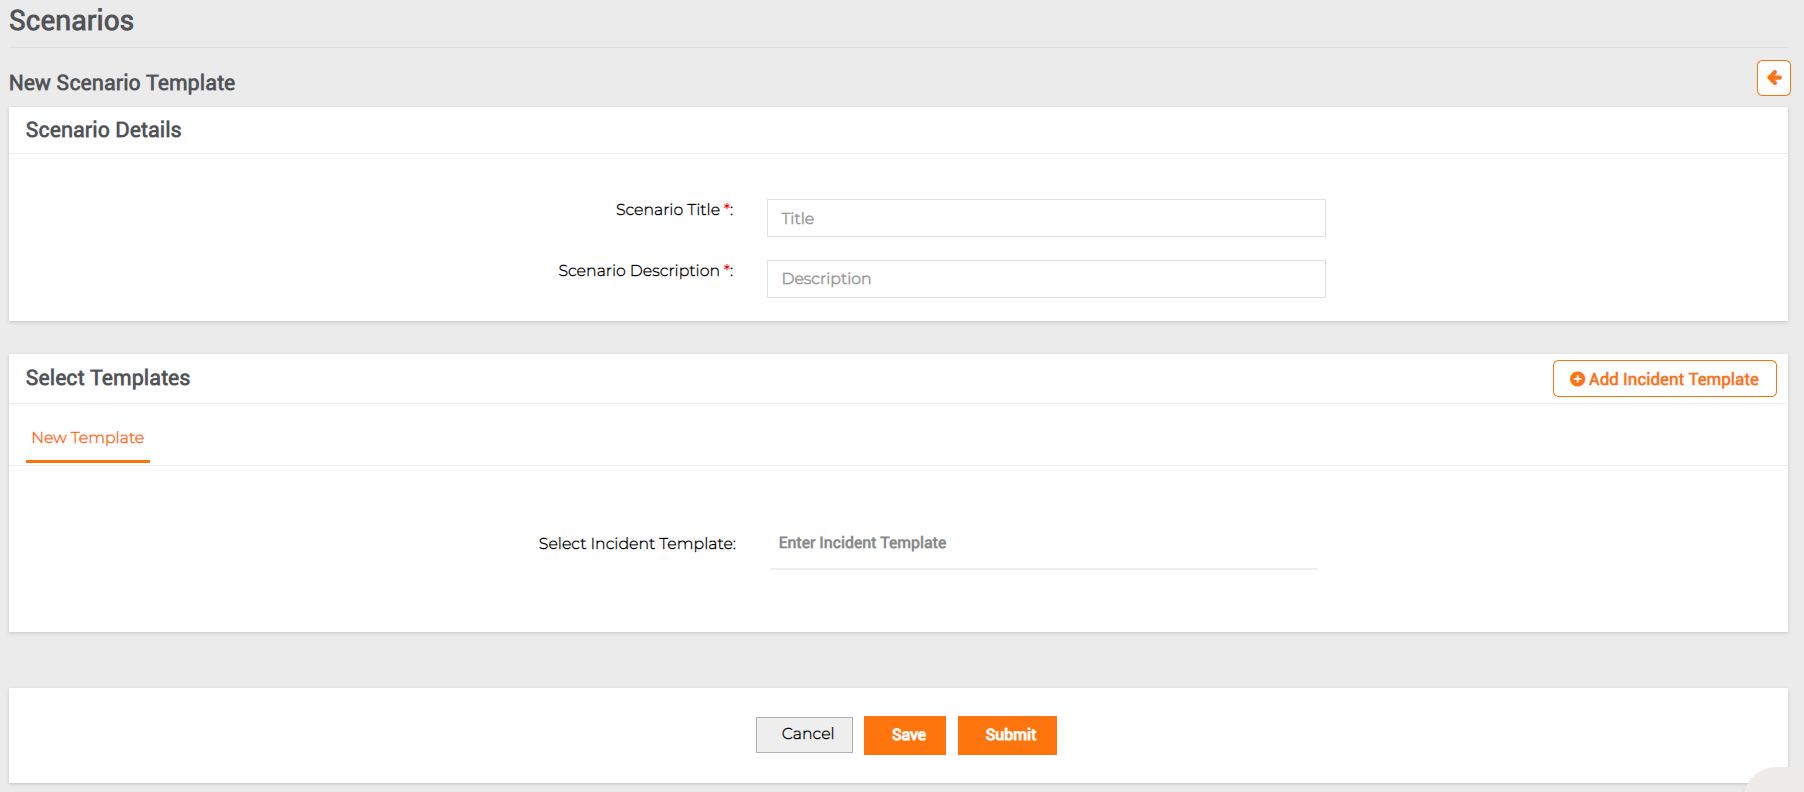
Creating a Scenario:
Scenario is a combination of Incident Templates. Here we can add different Templates for each Scenario. Click on Create Scenario to create the same.
New Scenario Template Creation
Scenario Title: Enter the Scenario Name. Example: Power Outage due to Regional Grid Failure.
Scenario Description: Enter the Scenario Description.
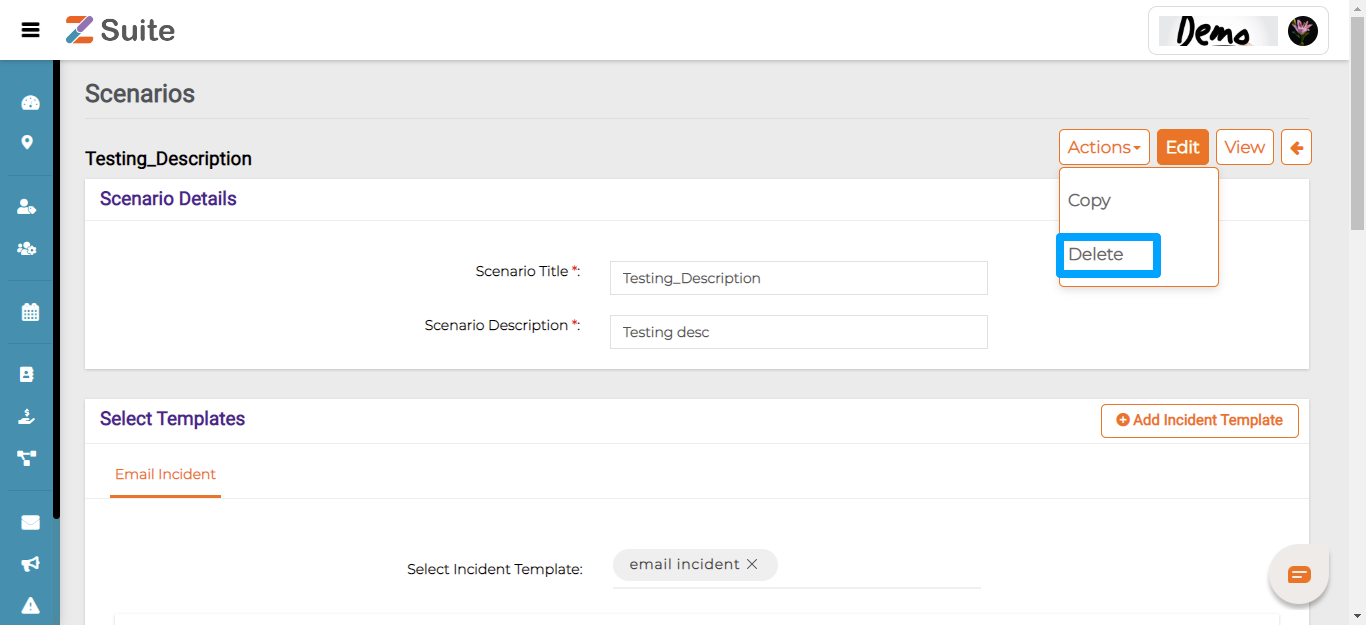
Select Templates: By entering the name of the Template, the user can Select from the list of pre-created / pre-existing Templates. Example: Power Failure Response template.
The user can also create a new Template by clicking on “Add Incident Template”.
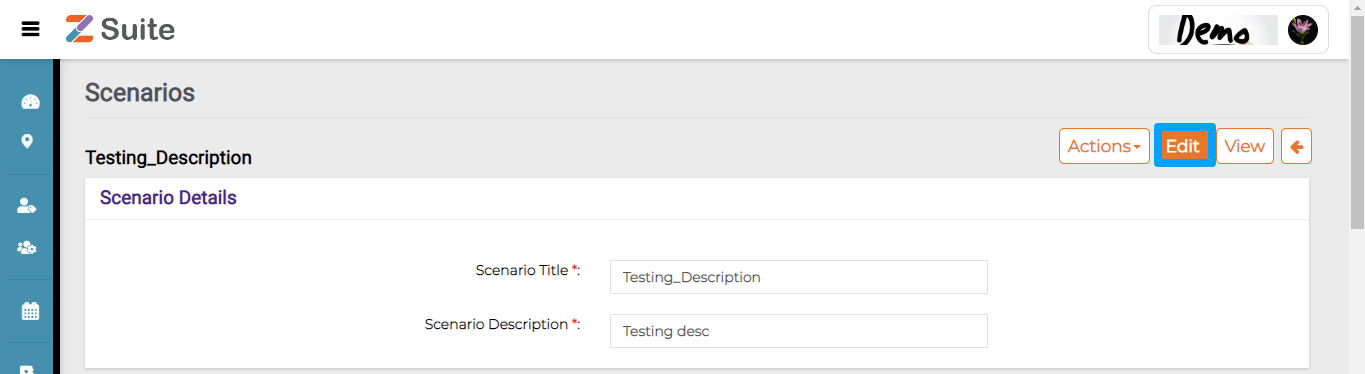
Viewing a Scenario:
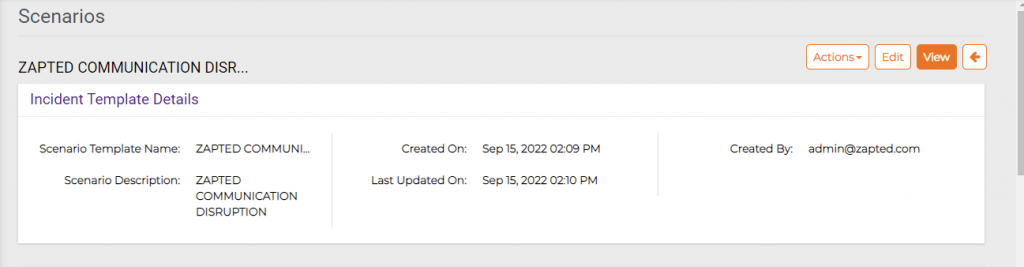
Click on Name of the Scenario to view the details.
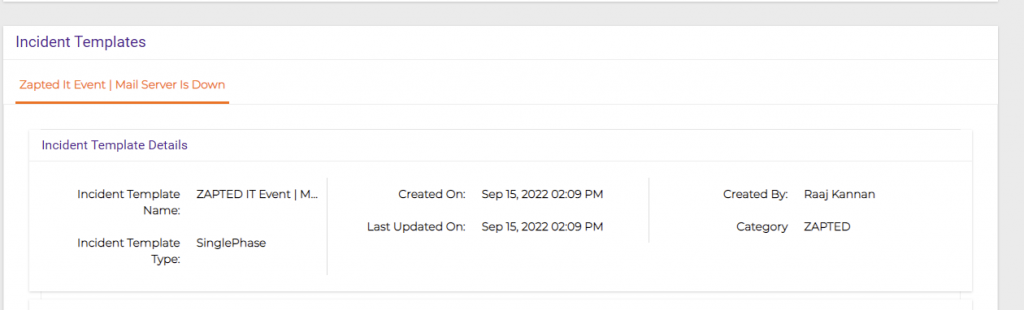
Incident Scenario Details: Here you can view the Scenario Template Name, Scenario Description, Scenario Category, Created on, Created by and Last Updated On.
Incident Template Details: Here you can view the Incident Template Name, Incident Template Type, Incident Category, Created On, Created By and Last Updated On.
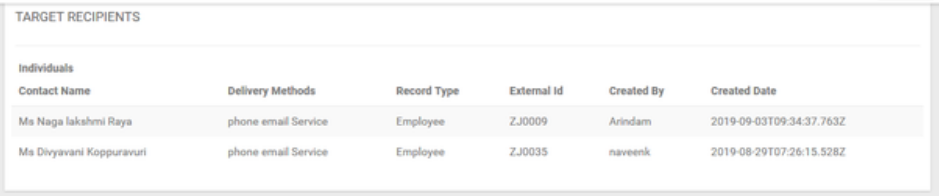
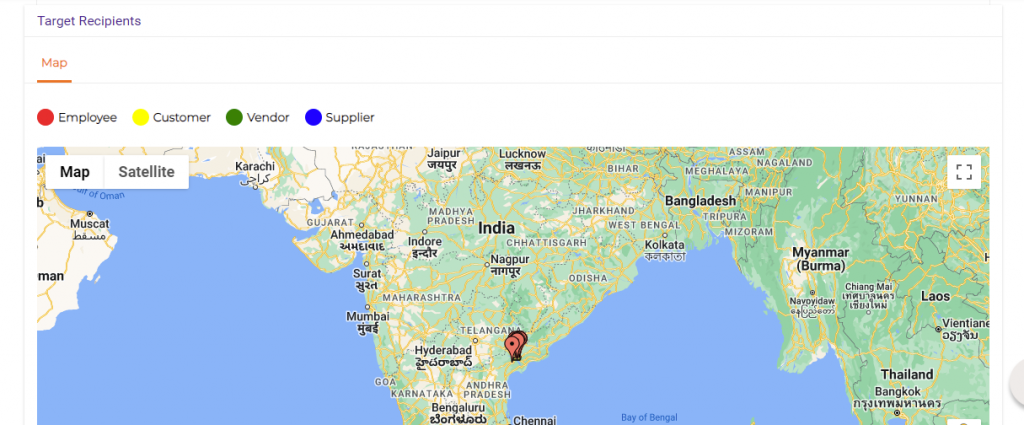
Target Recipient Details: You can also view the Target Recipients details like Contact Name, Delivery Methods, Record Type, External Id, Created by, and Created On.
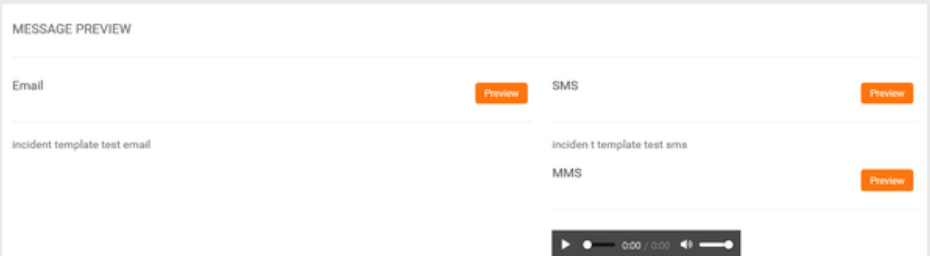
Message Preview: Here you can view the Email Preview, SMS Preview, Incident template test Email Preview, Incident template test SMS Preview and text to speech.
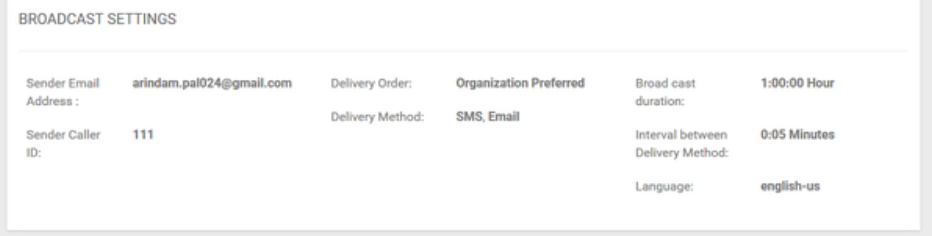
Broadcast Settings Details: You can also view theBroadcast Settings details like Sender Email Address, Delivery Order, Organization Preferred SMS, Email, Sender Caller Id, Delivery Method, Broadcast Duration, Interval between Delivery Method and your preferred Language.
Edit Scenario:
Click on “Scenario Name” and click on “Edit”.
The user will be redirected to the “Scenario details” page.
The user can edit the Scenario changes and then click on “Submit”.
Delete Scenario:
Click on the “Scenario Name” and the user will be redirected to the “Scenario details page”.
Click on “ Actions” and then click on “Delete”.
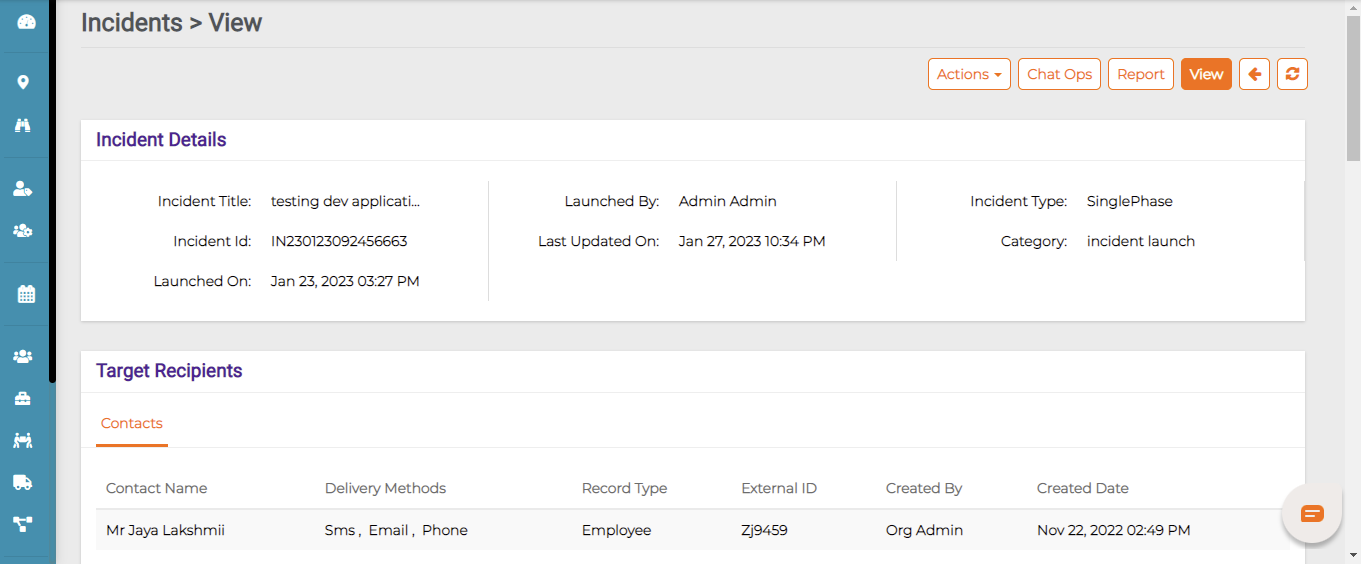
Incident view
IncidentView
An incident can be defined as an occurrence or condition that has impacted or could impact the vital assets of an organization like people, premises, process and providers.
Incidents can disrupt the service availability, product quality, value delivered to end customers and even harm the brand reputation.
Step-by-step process on “How to view and close an incident” in Zsuite, Quick and Easy with this video.
Incident management is managing the impact of incidents as they occur. This include any disruptive events that has business impact. Incident management implements quick fixes to resolve an incident and restore operations as early as possible.
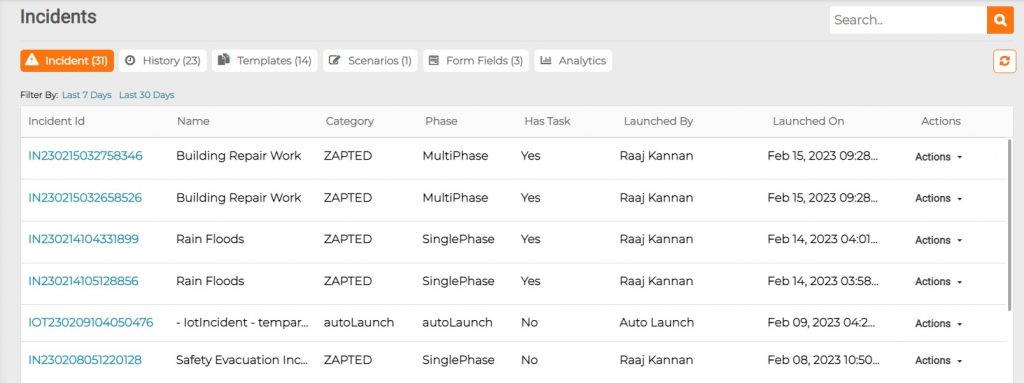
On clicking Incident management you can view the Incidents that are already created.
Viewing an Incident:
Click on the Incident Id to view the respective incident details like Incident title, Incident type, Launched by, Launched date and time, Last updated Date and Time, Target recipients.
Incident view include details of broadcast settings, incident phases and operator notes.
Incident Management can have multiple phases like Reduction, Response, Relocation, Recovery, Resumption, Restoration, Returning to Normal.
In incident phases you can see when the incident is created, when the notification has started, when the notification response was confirmed and when the incident got completed.
Close Template
By clicking on the Incident ID, users will be redirected to the Incident view page. To close an Incident click on Actions and then select Close from the dropdown.
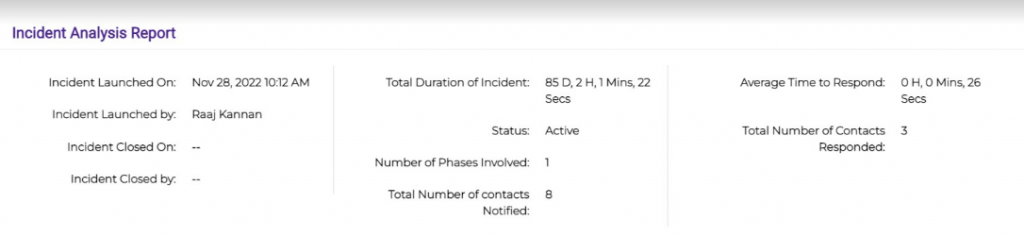
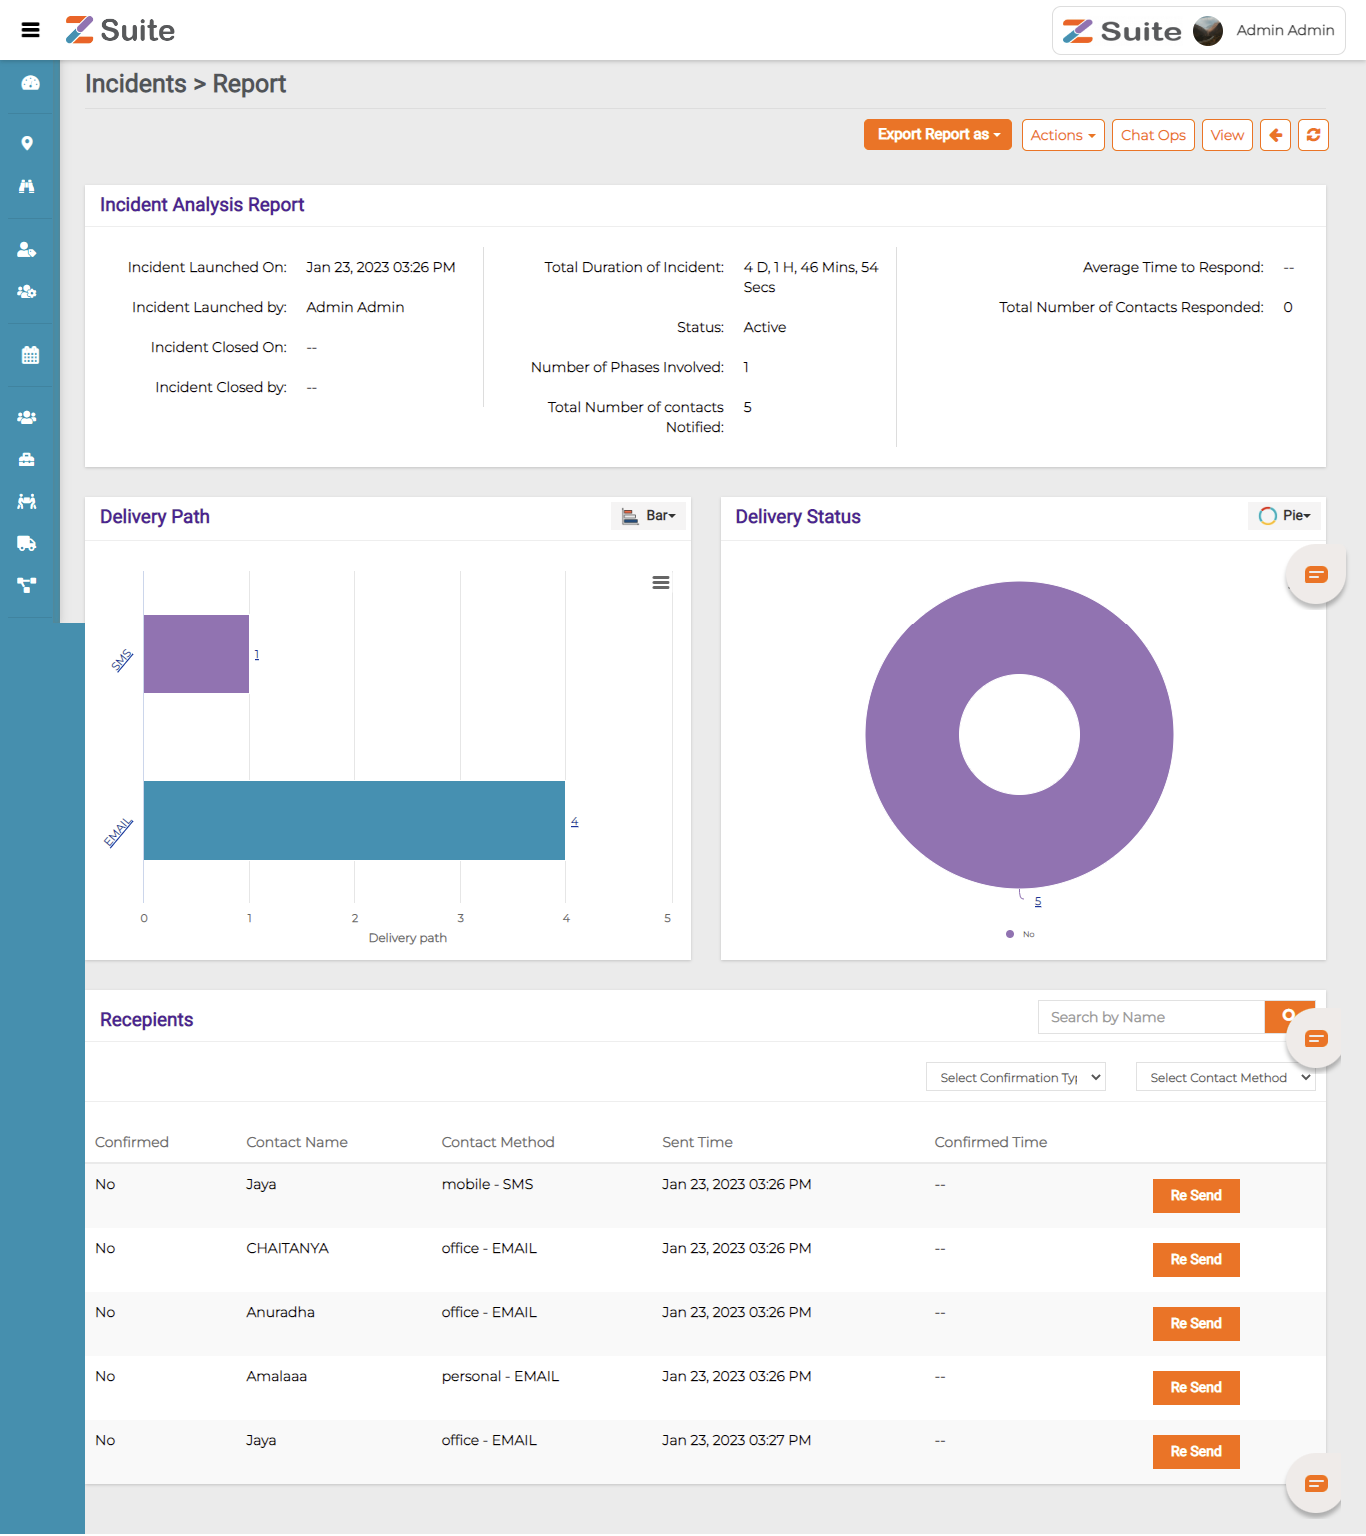
Report of an Incident:
Here you can see the complete report with Incident analysis, Delivery paths and Recipients. Report is segmented into multiple sections. Every section show the respective details such as details related to incident creation, launching date and time.
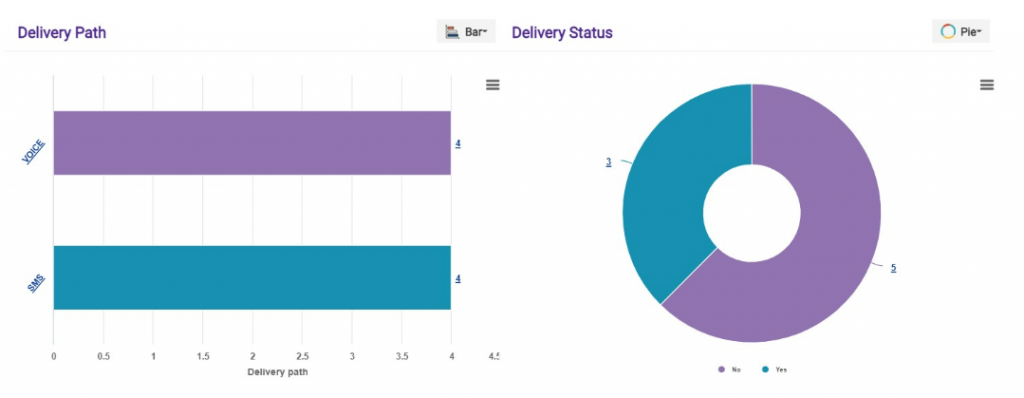
In this section, it shows the details related to delivery paths and delivery status in a pictorial representation.
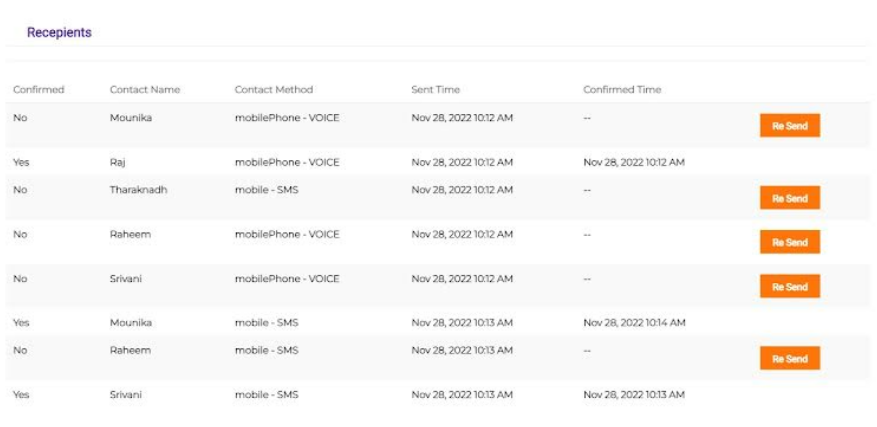
In this section, it shows the details related to recipients used for notification and their respective delivery method, sent time and confirmed time.
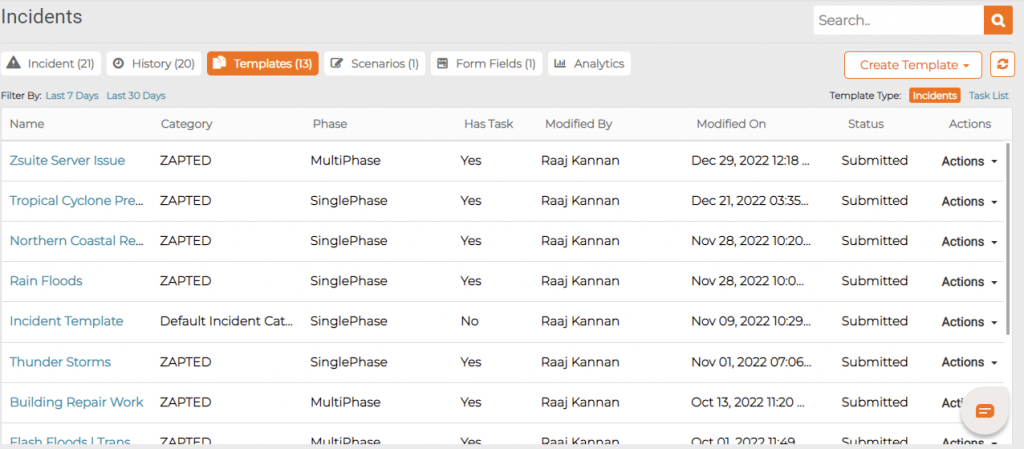
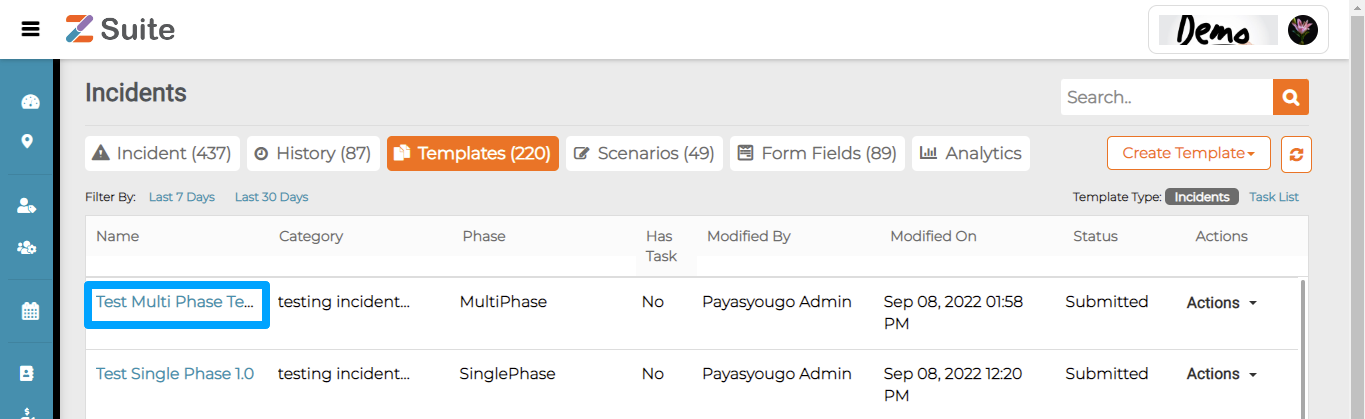
Templates
Templates
During incidents to save time and simplify the user input process, pre defined incident templates are used. These templates contain predefined data that populates when the template is applied to it, eliminating the need to manually reenter this data.
Step-by-step process on “How to create incident templates” in Zsuite, Quick and Easy with this video.
Incident Templates are pre defined template formats that can be reused when needed. This allows an organization to customize the template with dynamic form fields, organize incident messages with media (file/audio/video) and add task list for respective task owners.
Click on the create template button on top right.
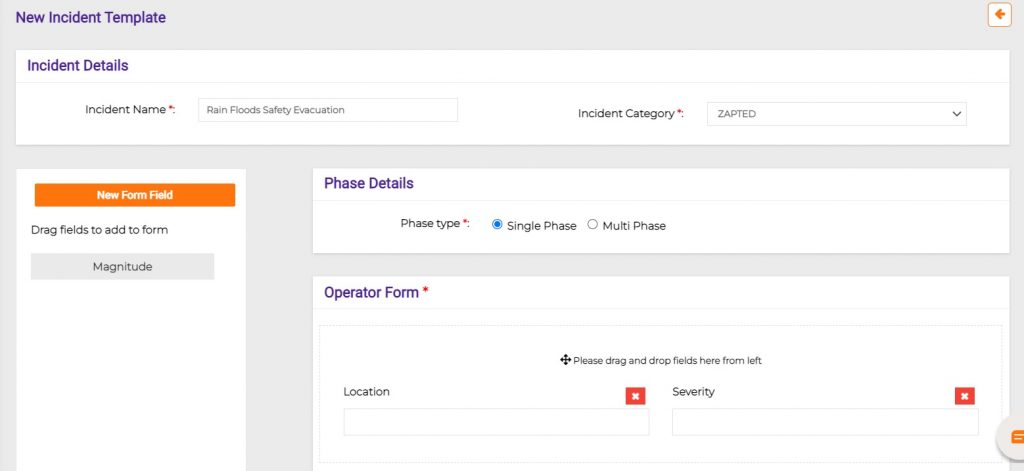
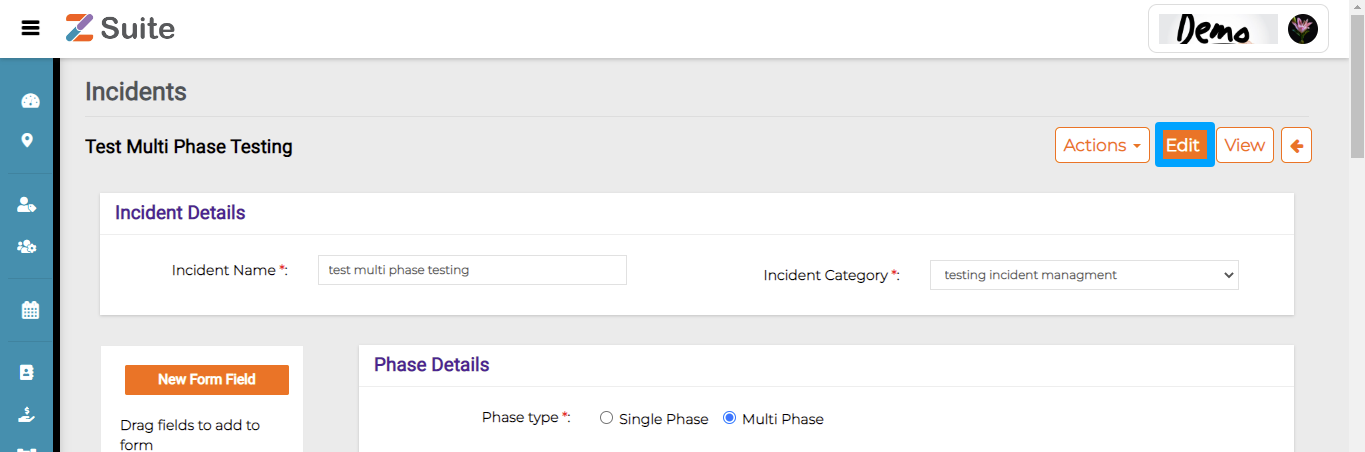
New Incident Template Creation
Incident Name: Enter the Incident Name.
Incident Category: Select the Incident Category from the dropdown list.
Phase Type: Select the Phase Type as Single Phase / Multi Phase from Radio buttons.
Operator Form: Drag and drop the Operator Form and the user can also create Form Field by clicking on New Form Field.
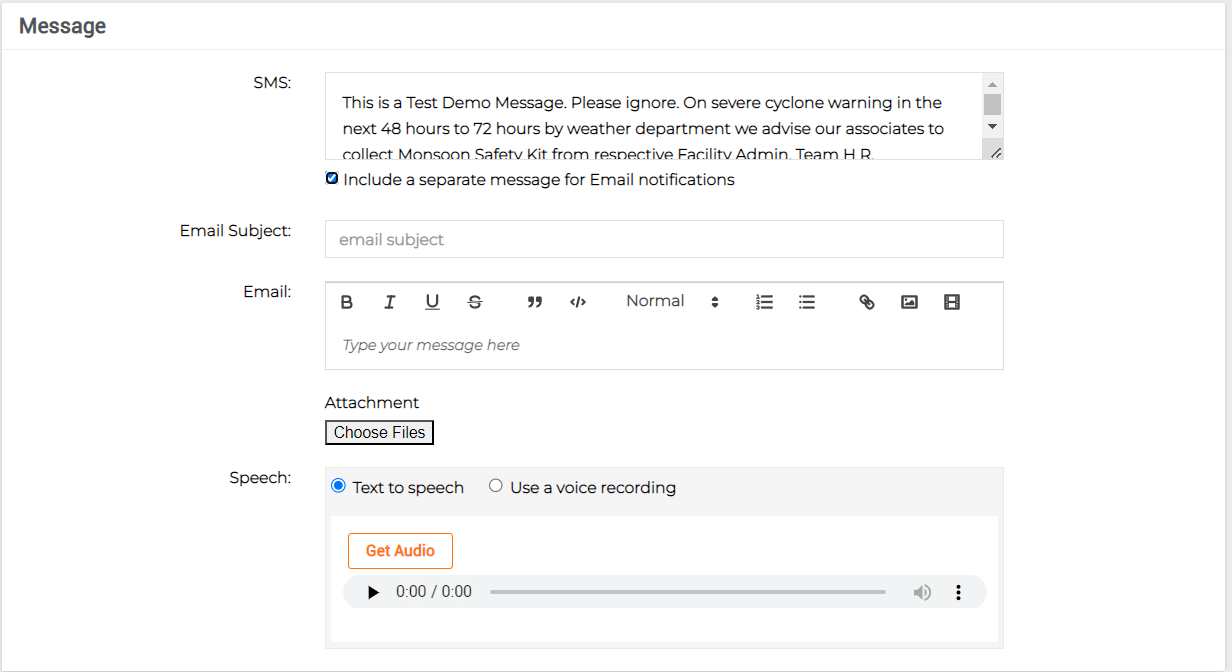
Message: Enter the incident message in the Message box.
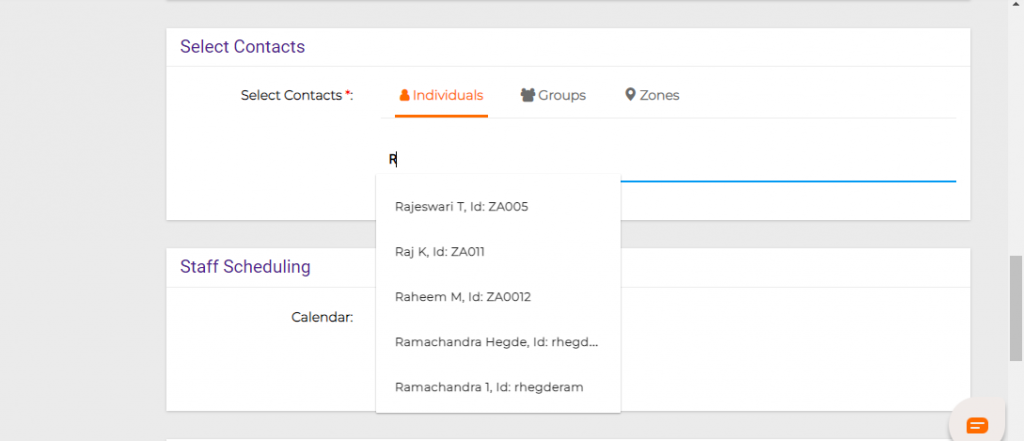
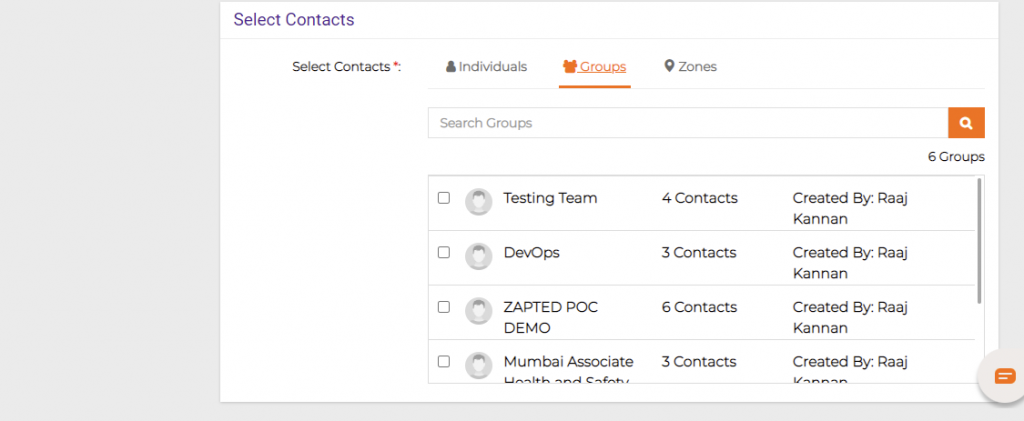
Select Contacts: Select Contacts as Individuals / Zones / Groups.
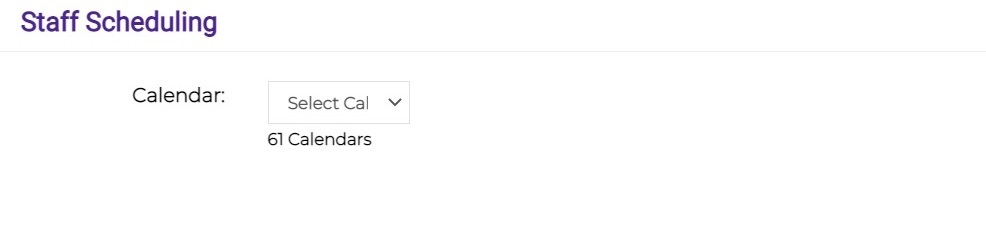
Staff Scheduling: Select the Calendar from the dropdown list.
Task List: Select the Task List from the dropdown list.
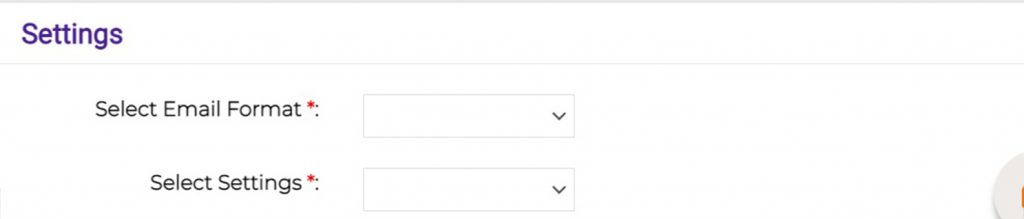
Settings: Select Email Settings and Format from the dropdown list.
You have to fill Incident details like Incident Name, Category, Phase type, Form Fields, Message.
Phase details and Operator form: Incidents can be single and multiphase. Operator form is where you can create dynamic form fields for an Incident and drag and drop those fields as appropriate.
The above are the Phase details and operator form. There are two phases like single and multiphase. Operator form is where you can drag and drop the fields you have already created in form fields.
Message: Here you have to type the message you wanted to communicate on the Incident.
Example: IT Outage Incident Template
Subject: Mail Server Temporarily Down
Message: We are currently experiencing a service outage for our mail server. IT team is working to restore the service as quickly as possible.
We will update you with more details as we have them, you can check out our status page for the most up-to-date information.
If you click on Include a separate message for Email notifications, there opens an message box so that you can give your message there.
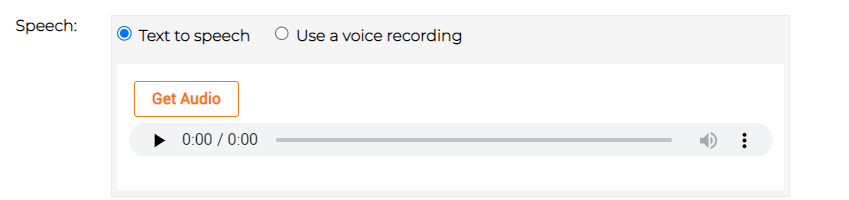
Text to Speech: This converts your message to Speech.
Use a voice recording: Here you can select an audio clip or record an audio to send a message.
If you can select None.
Select contacts: Here you have options to select from individual contacts, groups, zones i.e., based on locations and staff scheduling.
Individuals: Click on “Individuals” tab to select the individual contacts.
Groups: Click on “Groups” to select the preferred group from various organizational Groups.
Zones: This is used to select the zone i.e specific place, so that the message reaches the Users present in that area.
Staff Scheduling : Select the appropriate Staff Calendar from the dropdown .
Task List : Select the appropriate Task List from the dropdown .
The incident is an unplanned interruption and creation of the incident task is used when a particular incident requires specific organizational teams to get involved in their respective Incident response, recovery, restoration areas to collaboratively resolve a particular incident.
Settings : Select the appropriate Email Format and settings from the dropdown .
Click on “Save /Submit” after filling in all the mandatory data.
Edit Template
Click on “Template Name” and click on “Edit”.
The user will be redirected to the “Template details” page.
The user can edit the changes and click on “Submit”.
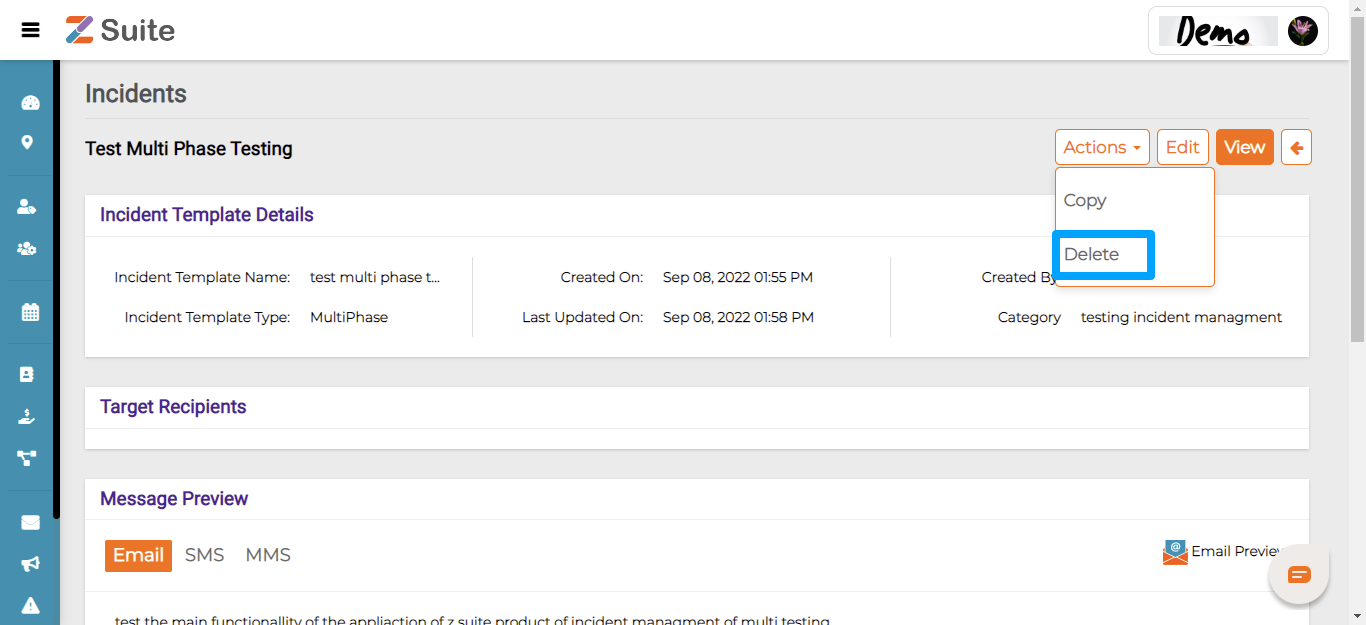
Delete Template
Click on the “Template Name”
The user will be redirected to the “Template details page”, click on “Actions” and click on “Delete”.
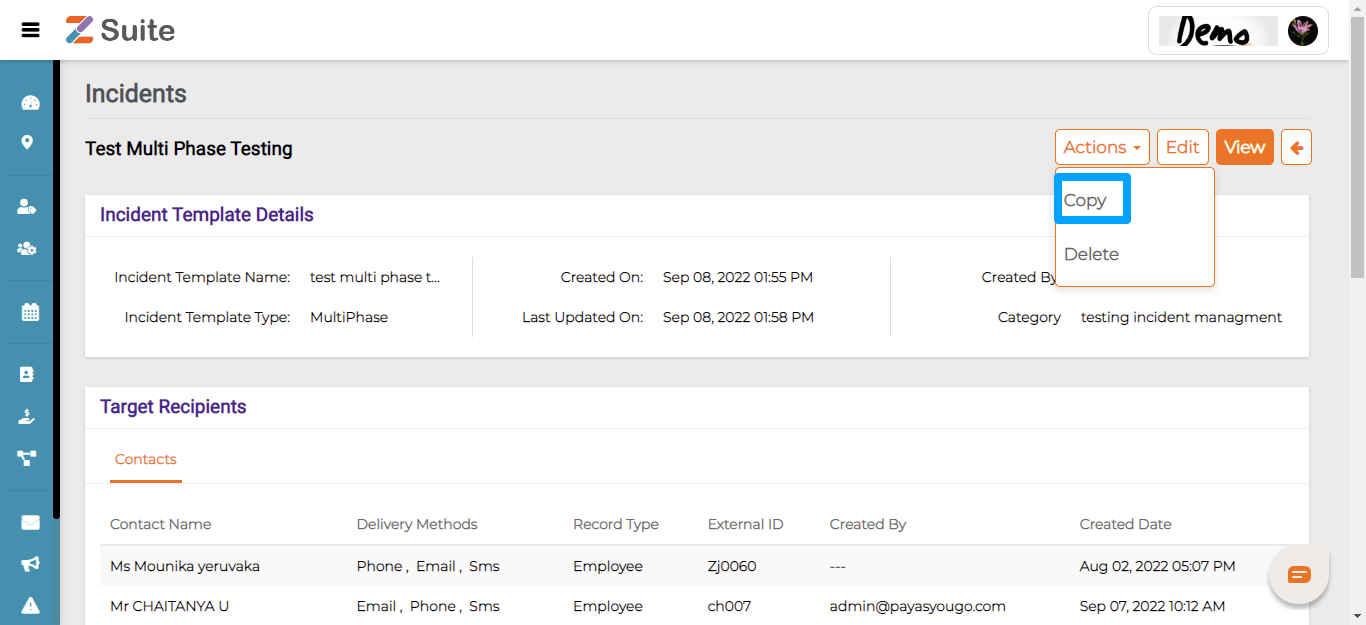
Copy Template
Click on “Template Name”
The user will be redirected to the “Template details page”, click on “Actions” and click on “Copy”.
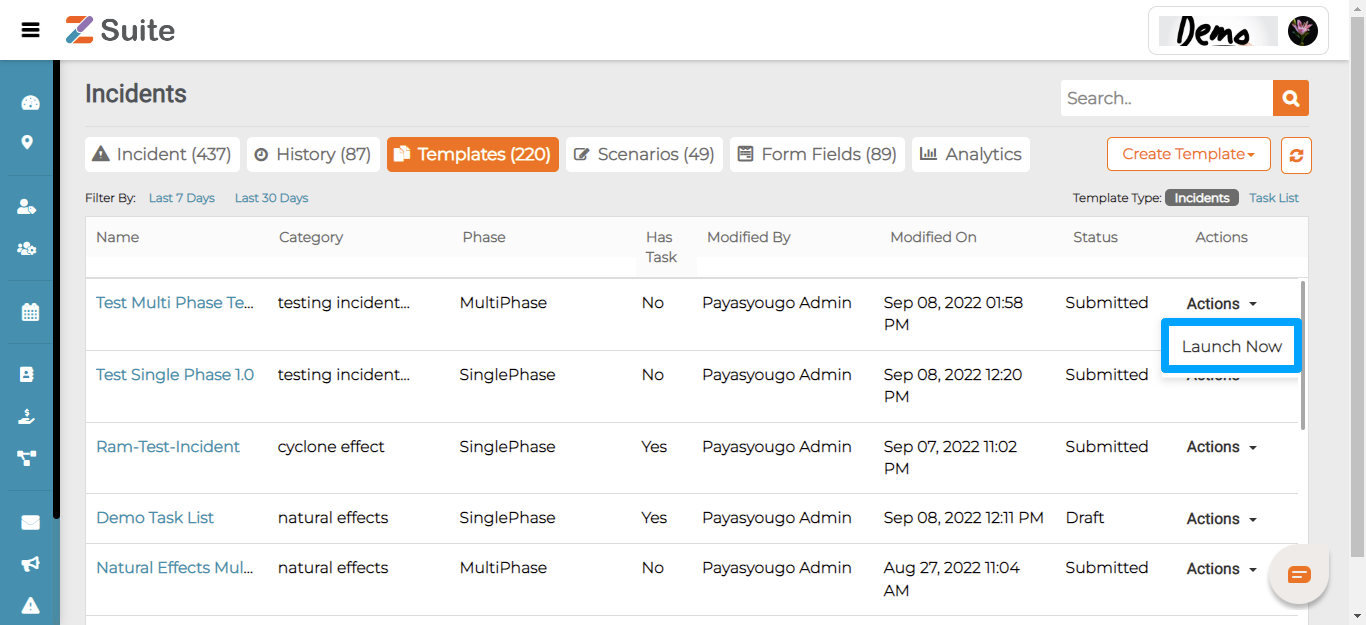
IncidentLaunch:
Click on the “Actions” dropdown and Click on “Launch” .
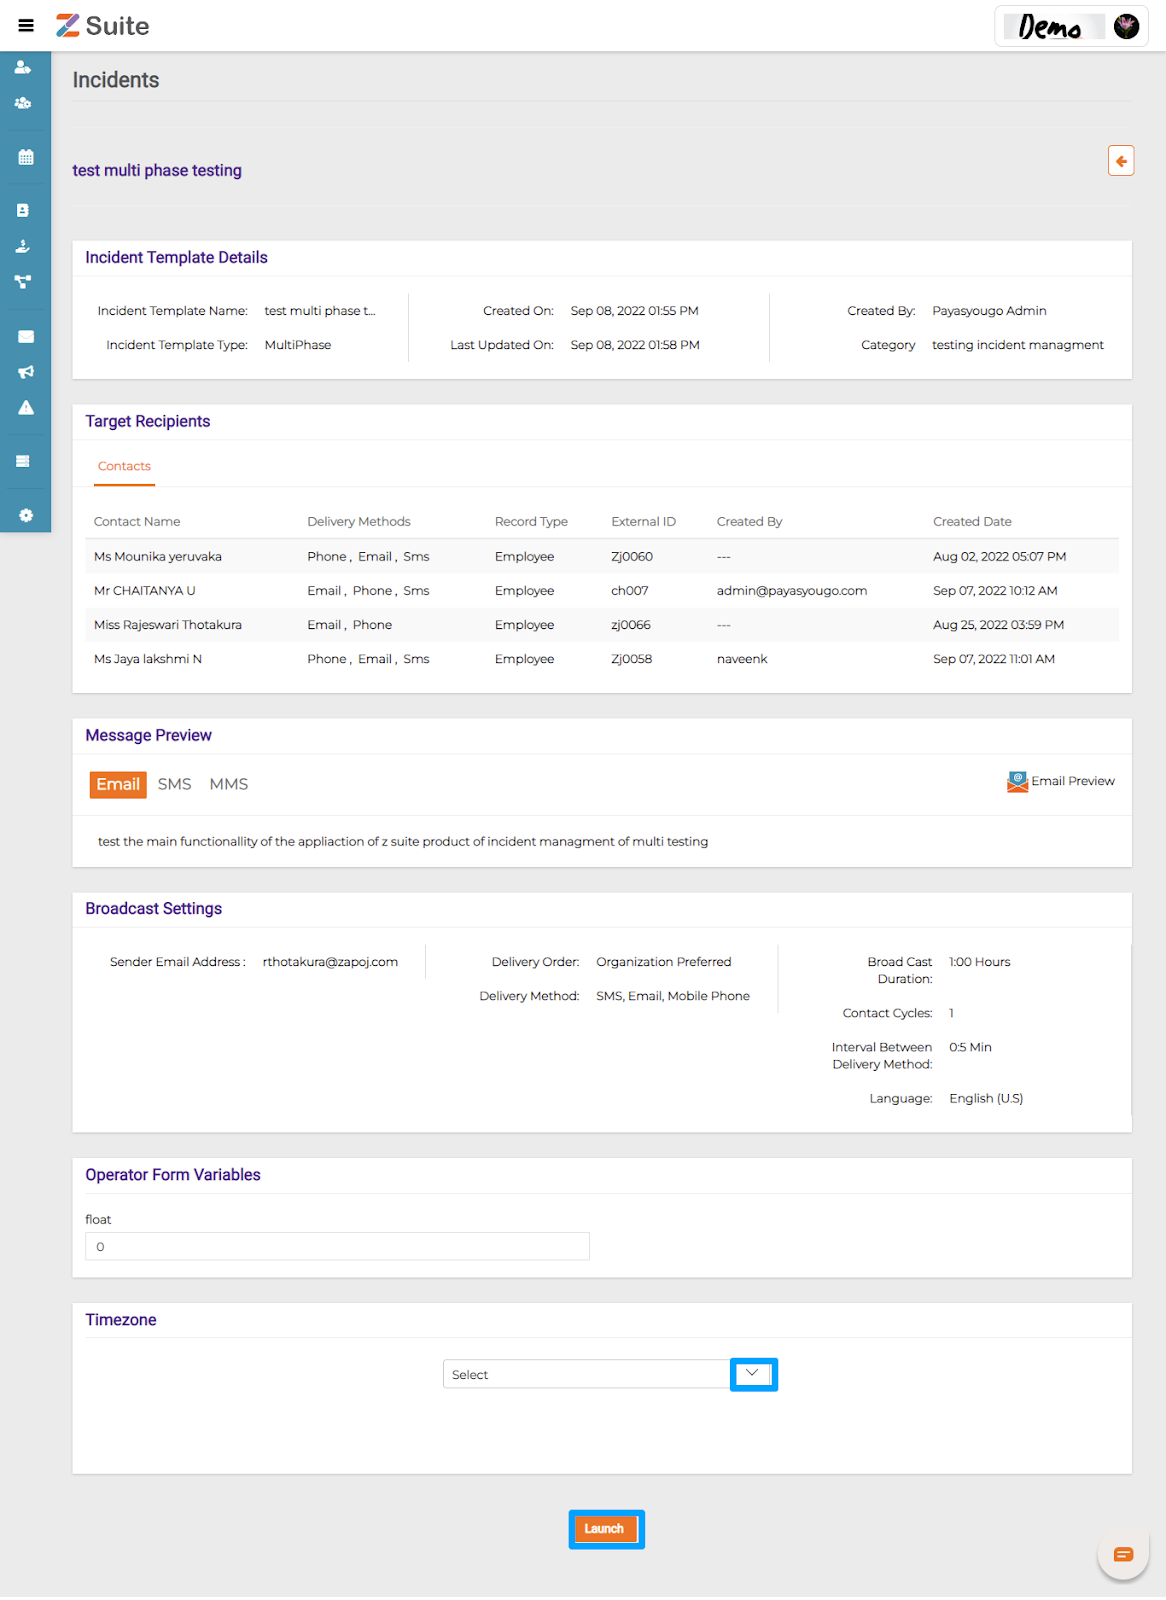
The user will be redirected to the Templates view. Select Timezone from the dropdown, enter operator form field data and click on ”Launch“.
After Launching the Template, the template navigates to the Incident tab.
Click on the ID of the Template
The user will be redirected to the template view and click on Reports, their user can find the details of the Incident Template and Contacts who received the Incident notifications.
View
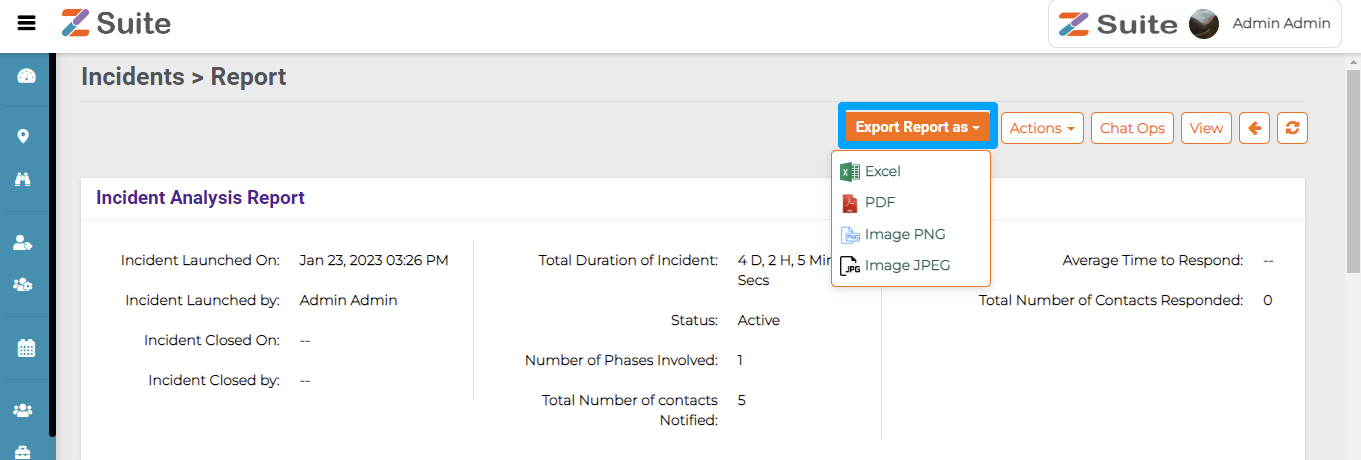
Click on Reports and click Export As to view the Report data as an Image of PNG, JPEG, and PDF.
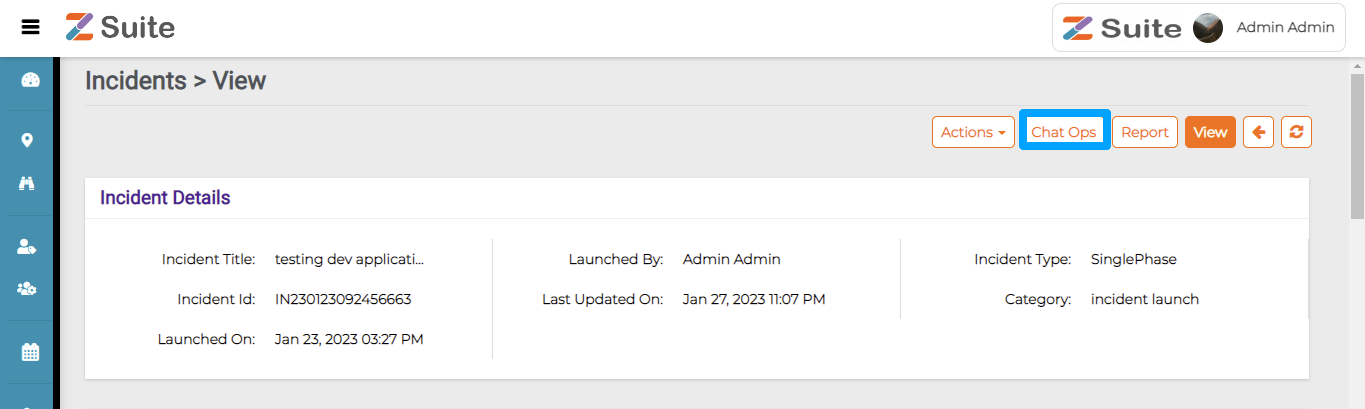
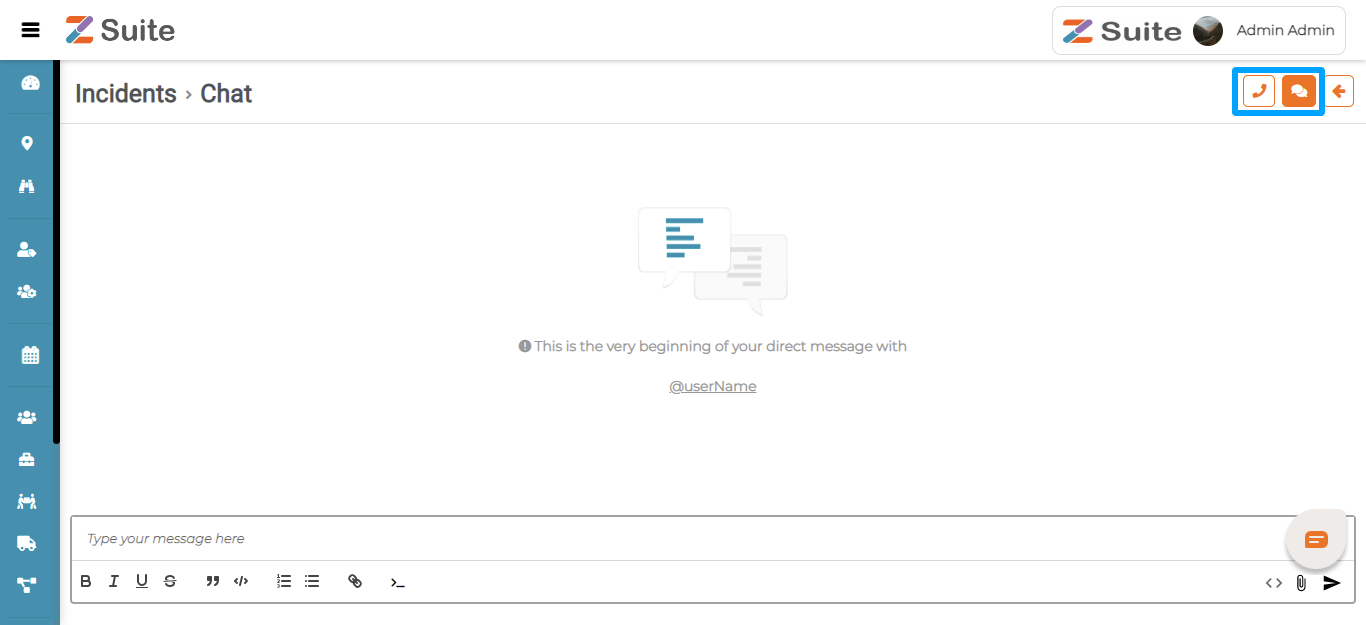
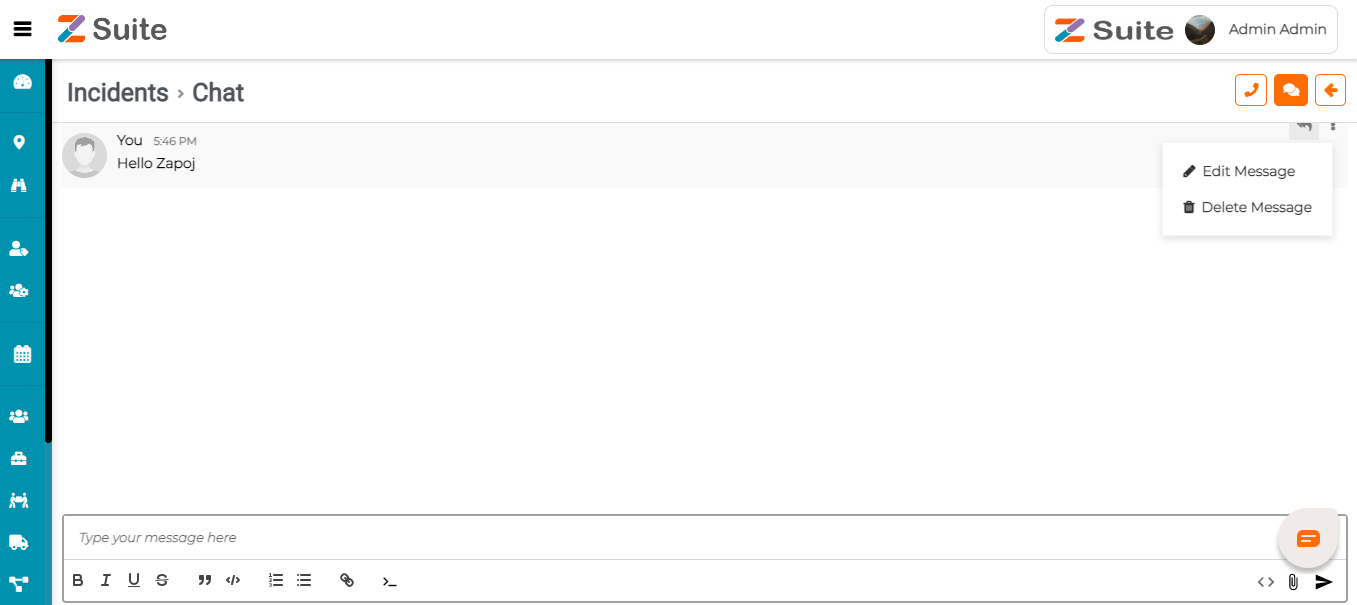
Chat Ops
Click on the Chat Ops Option.
Users can see the calling and messaging options.
Users can send, Edit, and Delete messages and also have Bold, Italic, Underline, Strikethrough, Quotes, Numeric, dots, and insert File options.
Click on the Calling icon.
Analytics
Analytics
Incident analysis is a process for identifying what happened, when and where it happened, why it happened, what can be done to reduce the risk of recurrence through what has been learnt.
Step-by-step process on “How to access analytics of incidents” in Zsuite, Quick and Easy with this video.
Incident Analytics contains aggregated incident statistics with which the user can click and view the data in a variety of graphs in dashboards to analyze the history of your incident response over time.
All the Incident Analytics will be displayed here. You can search between dates to know the respective analytics.
Here you can view the Total number of Incidents Launched, Mean Time to Acknowledge and Mean Time to Resolve those Incidents.
Mean Time to Acknowledge: Mean time to acknowledge is the average time taken from when an alert is triggered to when the work begins on the alert. This metric is useful for tracking alert system’s efficiency and the response team’s responsiveness.
MTTA is calculated by adding up the time between alert and acknowledgement, then dividing by the number of incidents.
For example: If you had 10 incidents and there was a total of 60 minutes of time between alert and acknowledgement for all 10, you divide 60 by 10 and come up with an average of 6 minutes.
Mean Time to Resolve: Mean time to resolve is the average time taken to fully resolve a incident. This includes the time spent detecting the incident, diagnosing, fixing and also ensuring that the incident would not recur again.
It is the difference between extinguishing a fire and fireproofing the vulnerable area post extinguishing.
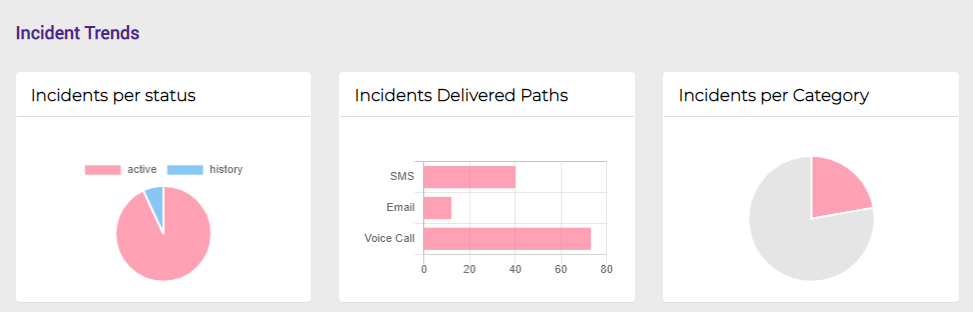
The above graph shows the Incidents Per Status i.e. Active and History, incidents Delivered Paths i.e. Via SMS, Email and Voice Call and Incidents Per Category.
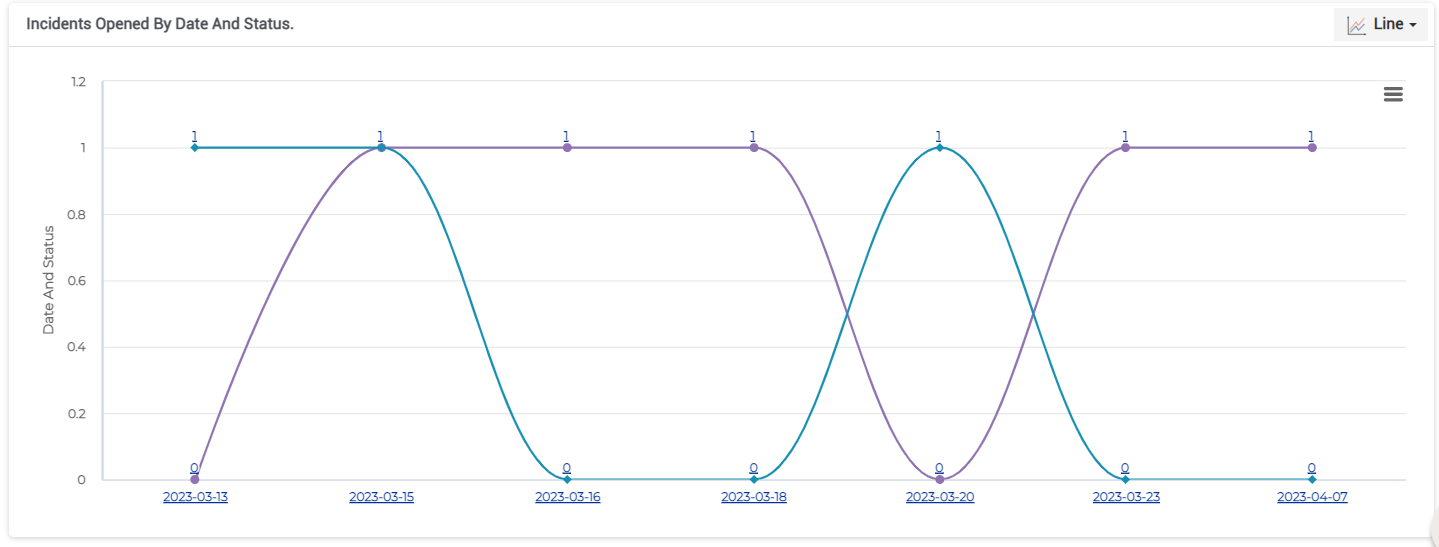
Incidents Opened by Date and Status: The graph shows the Incidents Opened by Date and Status i.e. Active and Inactive.
Incidents Opened by Date and Category: The graph shows the Incidents Opened by Date and Category.
Incidents MTTA Analysis:
MTTA shows how responsive the support teams are to incidents. A lower MTTA means acknowledging and responding to the incidents that impact the critical processes in a timely manner. This results in lesser downtime, fewer disruptions, and happier customers.
A higher MTTA means the support team takes a longer time to acknowledge or that responders are not responding or available when they receive an alert. This could be due to extended shifts or overwhelming alerts.
To solve this, appropriate escalation process can be put in place to offer additional resources, if the first in line responders fail to address in the specified timeframe.
Monitoring MTTA provides insights into how to make long-term improvements to team responsiveness and streamline incident management efforts.
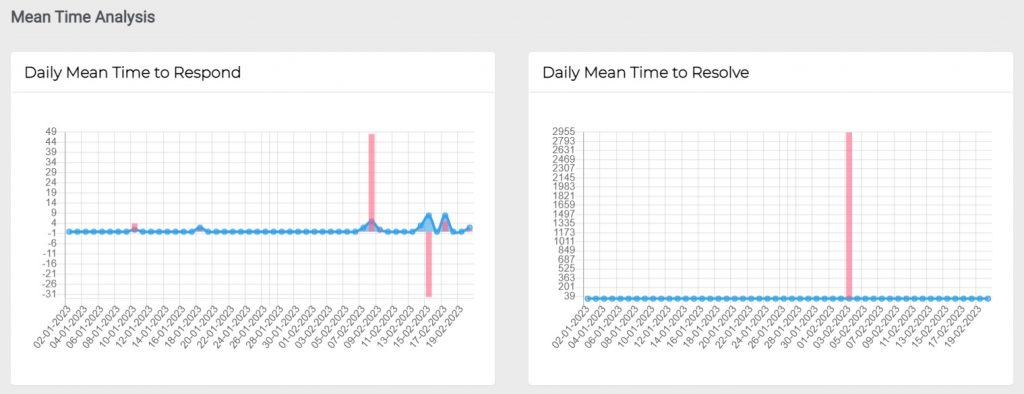
Mean Time Analysis: This graph gives you the details of the Daily Mean Time to Respond and the Daily Mean Time to Resolve.
Daily Mean Time to Respond is the average time (daily) to recover from issue or failure from the time when the first alert received.
Daily Mean Time to Resolve is the average time (daily) it takes to fully resolve a failure. This includes the time spent on detection, diagnosis, resolving and also ensuring that the failure would not recur again.
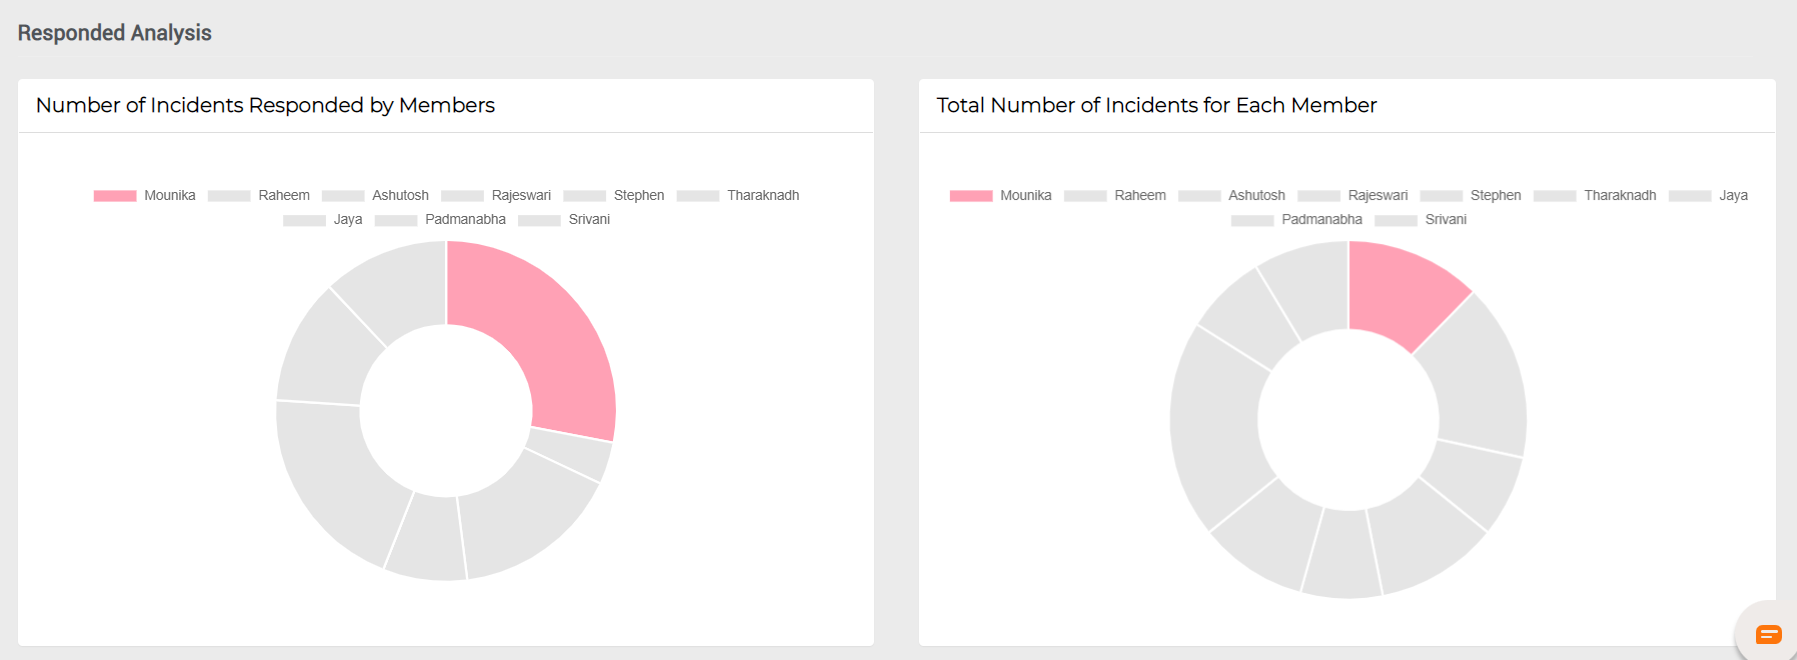
Responded Analysis: This graph gives you the details of the number of incidents that are responded by team and total number of incidents per team.
Form-fields
Form-Fields
Dynamic form fields are fields that change in real-time as user fill them out. They guide the user to easily complete a form. While creating IM templates the user can create dynamic form fields that are data-driven and responsive to user inputs.
Step-by-step process on “how to understand about form fields” in Zsuite, Quick and Easy with this video.
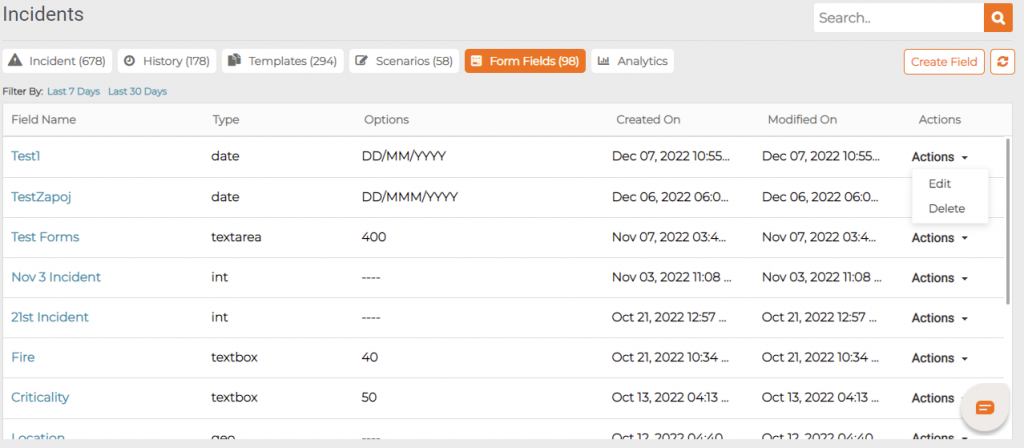
List of Form Fields that are already created are displayed.
Creating a Form Field:
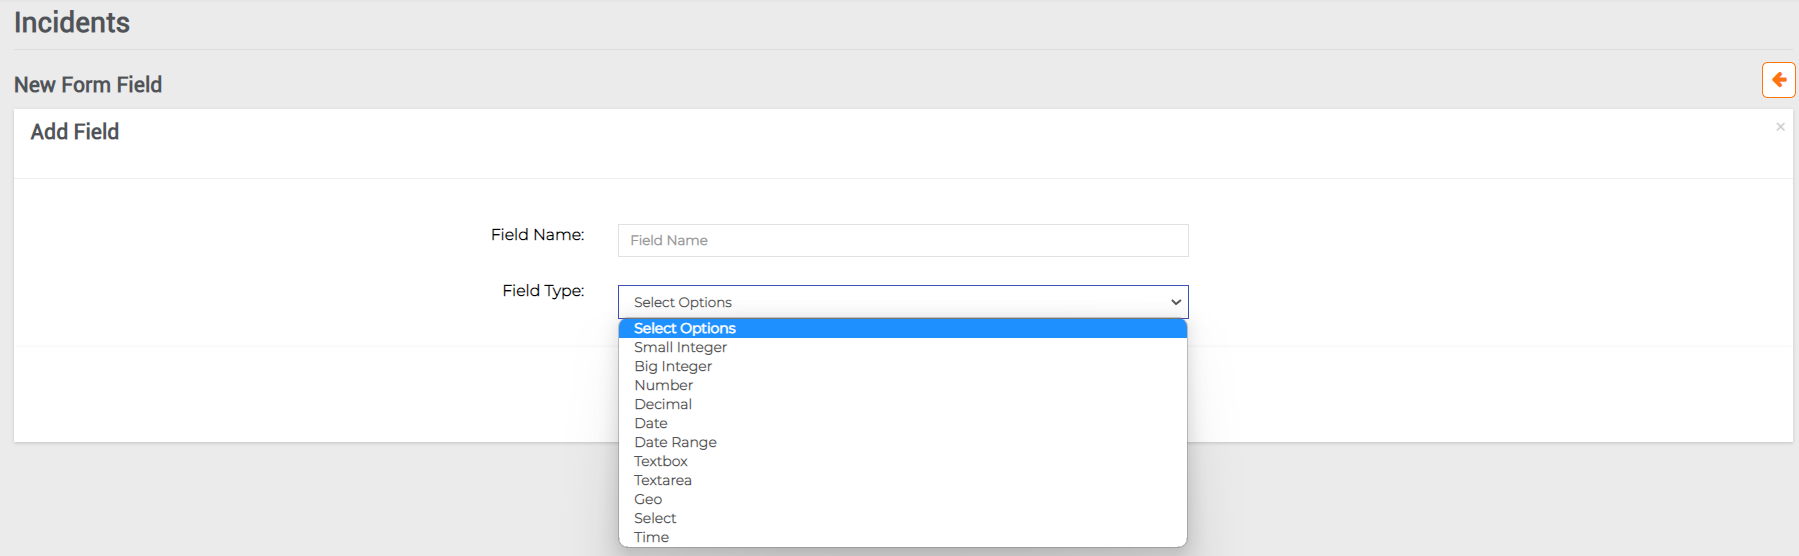
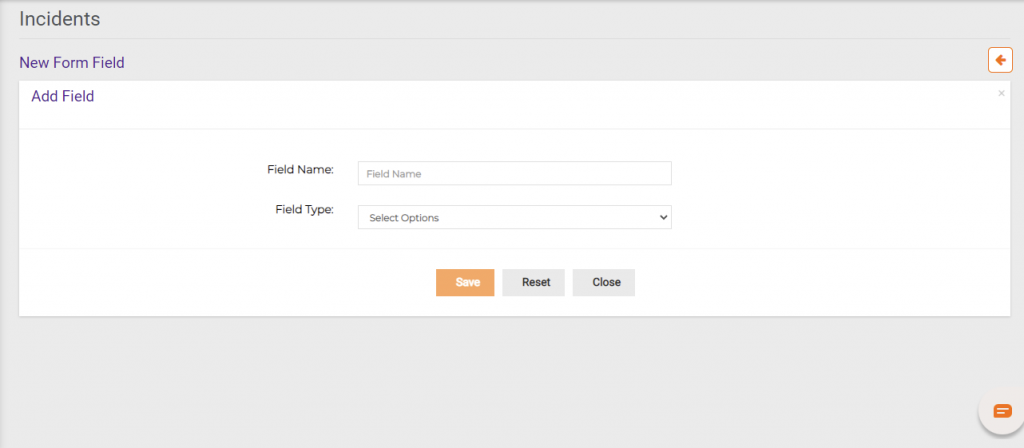
To create a new field, click on Create Field in the right corner.
New Form Field Creation
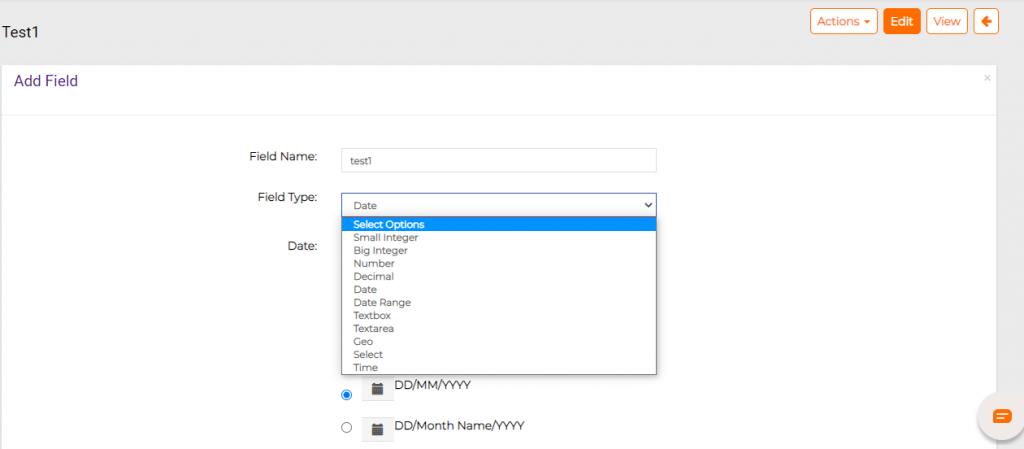
Field Name: Enter the Form Field Name. Example Incident Location, Incident Severity.
Field Type: Select the Form Field Type from the dropdown list. Example: Integer, Text, Date, Etc.,
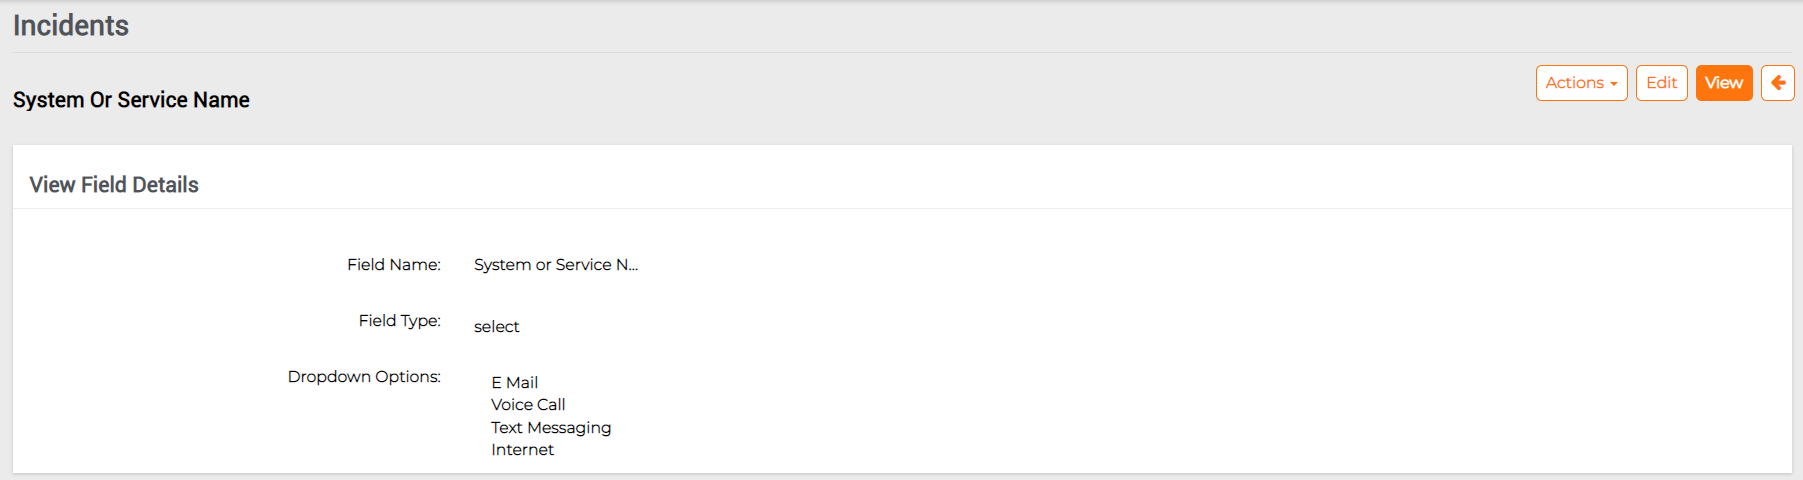
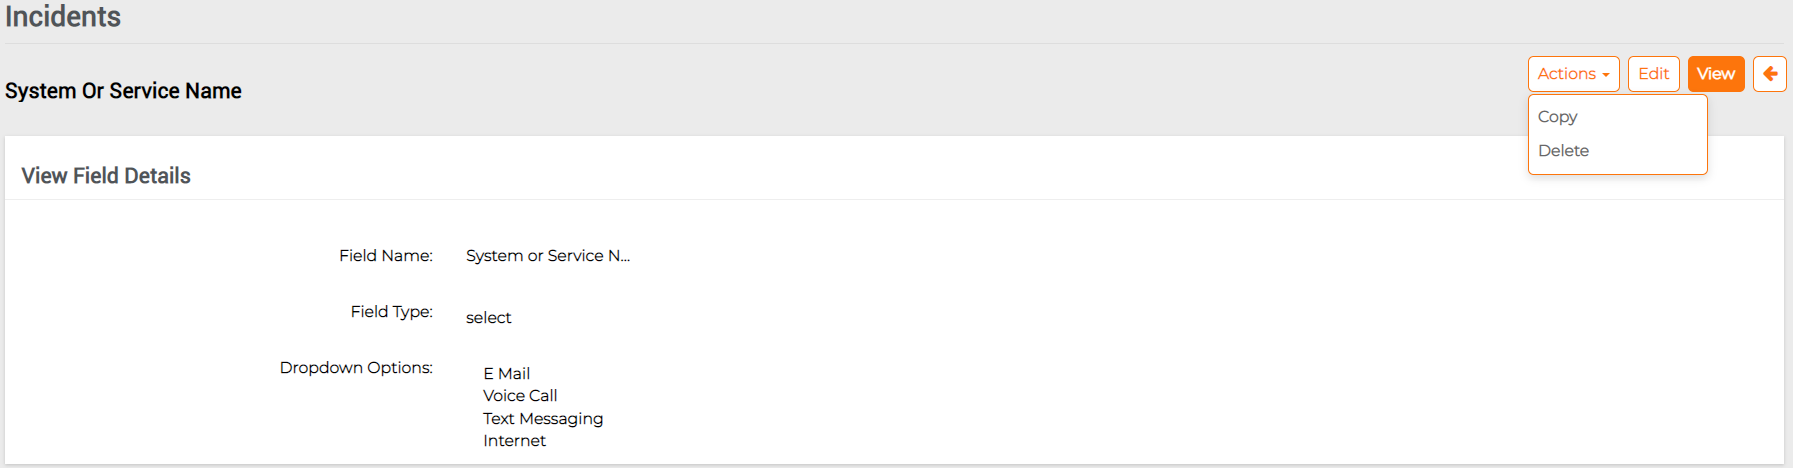
View a Form Field: Click on the Field Name to view it.
Here you will see the details like Field Name and Field type.
Editing a Form Field:
Field name: Field name can be changed.
Field Type: Field Type can also be changed.
Copy a Form Field: Click on Actions and select Copy for copying a Field.
Delete a Form Field: Click on Actions and select Delete for deleting a Field.
Incident Management features
Incident Management features
In Critical Event Management after Message Templates, you would have Incidents, this is useful to send the Incidents happening at the area where the member is living.
And you can see the Incidents graph on the Dashboard.
Overview
Form-fields
These are the fields that are already created.
View a form field: Click on the Field Name to view it.
Here you will see the details like Field Name and Field type.
Editing a field: Click on the Edit button to edit field name and field type.
Field name: Field name can be changed.
Field Type: This can also be changed.
OR
Click on Actions -> Edit
Deleting a Field: Click in Actions for copying or deleting a Field.
OR
Click on Actions -> Delete
Creating a Field:
To create a new field, click on Create Field in the right corner.
Here you have to add field details like Field Name and Field Type.
Templates
Here is how Templates page look like
Creating a Template:
To send a message you have to create a Template. Here you can know how to create a Template. Click on the create template button.
You will be taken to a page to give some details to create a message template. Firstly, you have to fill some Incident details like Incident name and Incident Category.
Phase details and Operator form: These are the Phase details and operator form. There are two phases like single and multiphase. Operator form is where you can drag and drop the fields you have already created in form fields
The above are the Phase details and operator form. There are two phases like single and multiphase. Operator form is where you can drag and drop the fields you have already created in form fields.
Message: Here you have to give the message you wanted to make a Template.
If you click on Include a separate message for Email notifications, there opens an Email box so that you can give your message there.
Speech: This is the voice message you wanted to make a Template. There are Text to Speech, use a voice recording and None.
Text to Speech: This converts your given message to Speech.
Use a voice recording: Here you can select an audio clip or record an audio to send a message.
If you select None, no audio will be sent.
Select contacts: Here you have options to select contacts; like you can select Individual contacts, select from groups, select from zones i.e., based on locations and also Staff scheduling.
Individuals: Click on “Individuals” tab to select the contacts you want by giving their name.
Groups: This is used to send messages to Groups that are already created. Click on “Groups” tab so that it will display all the groups present in the Organisation. Select the preferred group.
Zones: This is used to select the zone i.e specific place, so that the message reaches the Users present in that area.
Staff Scheduling
Here you have to select from a calendar where the schedules of the staff are present.
Settings: Here are some of the settings you can do for the Template. These are some of the mandatory fields.
Select Email Format: Here you can find some formats available for the Email, you can select from them.
Sender Email Address: Give the email address of the sender here.
Sender Caller ID: Give caller id here.
Delivery Order: Here you can see the options for Delivery order that are already given by the management. Select from them.
Delivery Method: Here are 4 delivery methods like SMS devices, Email Address, Mobile Phone and Landline.
Broadcast Duration: Select the options for the duration of the message broadcast.
Contact cycles: You can select contact cycles here. There are up to 20 cycles available.
Interval between Delivery Method: There is an interval from 5 min to 55 min.
Language: English (USA), English (U.K), Hindi are available. Select your preferred language.
Viewing a Template: Click on the view button to view a Template. Below are the Template details.
Below are the Template details.
Incident Template Details: Here you can view the details like Template Name, Template type, created on, updated on, Created by and Category.
Target Recipients: This gives us the details of the recipients like Contact name, Delivery methods like Email, SMS etc, Record type like Employee, Manager etc, External Id is employee code, created by is the person who created and created date is the date when it is created.
Message Preview: This part of the details shows you the preview of the message that is sent.
Broadcast settings: The details you can see here are sender email id, sender caller Id, Delivery order type, Delivery methods, Broadcast duration, Interval between delivery methods and the language in which message is sent.
Editing a Template:
You can Edit a Template by clicking on the edit button.
You will find the same options like in the Creating a Template. Same process as that.
Deleting a Template:
Click on Actions -> Delete.
You can also copy the Template.
Form Fields:
While launching a notification, we need to fill the form fields which were selected.
Launching a Template:
By clicking on Actions on the main screen. Actions – > Launch Now
On the new window opened, review the details and select the required Time zone from the dropdown and then click on Launch Button present on the bottom.
Scenarios
Scenarios is the option where we can create a new notification format and save them for the further use. We can create N number of notifications samples for every scenario.
Creating a Scenario:
Scenario is a combination of Templates. Here we will add different Templates and make them a Scenario. Click on Create Scenario to create it.
To start with creating a Scenario you have to fill some details like Scenario details, select Templates.
Scenario details: You should give Scenario Title, Scenario Description. These are the mandatory (*) details to be filled.
Select Templates:
Viewing a Scenario:
Click on Name of the Scenario to view it. Here are the Details you find there like Template Details, Incident Template Details.
Incident Template details: Here you can see scenario template name, scenario description, created on, updated on, created by.
Incident Template: Here you will have a look on the templates combined to form this particular scenario.
You can see the particular details of each Template like, Target Recipients, Message Preview, Broadcast Settings, Form fields.
Editing a Scenario:
Click on edit to edit a Scenario, all the options you have seen while creating a scenario can be seen. Edit as per your requirement.
Deleting a Scenario:
Click on Actions -> delete. Same like previous deletions.
Incidents
Here you can see the Incidents that are already created.
Viewing an Incident:
Click on view for Viewing details of an Incident.
Closing an Incident:
OR
Report of an Incident:
This shows the total report of the Incident. You will see Incident analysis report, Delivery paths and Recipients.
Report is segmented in to multiple blocks or sections. Every block show the respective details. Such as, in the below block it shows details related to incident creation and launching date and time.
In this block, it shows the details related to delivery paths and delivery status in a pictorial representation.
In this block, it shows the details related to recipients used for notification and their respective delivery method, sent time and confirmed time.
History:
Here you will find all the previous Incidents.
Every detail you see in the Incident will be seen here also.
Analytics
All the Incident Analytics will be seen here. You can search with dates to know the analytics.
The above one shows the number of Incidents launched, Incidents per status i.e active and history.
The above are the details about Incident services and Incidents per Category. Incident services says about SMS, Email, Voice call numbers in the form of a chart and Incidents per category are categories given to the Incidents before.
Incidents opened by Date and status: This graph gives you the Incidents by date and status i.e., active and inactive.
Incidents opened by Date and Category:
Incidents MTTA Analysis:
Responded Analysis: This gives you the details of the number of incidents that are responded by team and total number of incidents per team.
Filter By:
You can manage the Incidents by using filters present here i.e. Last 7 days, Last 30 days.