Users with the roles of Organization Admin, IT Incident Manager, Mass Notification Manager and its Dispatcher, HR, Incident Operator, Staff Schedule Manager, Contact Managers and Contact Organizers can access these features in the tool to create contacts in the organization and manage the same.
Facilities
Facilities
Overview
Facility Managers develop and implement the asset management strategy for all support processes of the primary business or organization activity
Who can access these features?
Users with the roles of Organization Admin, IT Incident Manager, Mass Notification Manager and its Dispatcher, HR, Incident Operator, Staff Schedule Manager, Contact Managers and Contact Organizers can access these features in the tool to create contacts in the organization and manage the same.
Feature details of Facilities
The main Facilities page:
This is how the main “ Facility “ page looks like
Add asset:
If the user wants to create an asset .To create an individual asset ,click on the “Add asset”
button displayed on the top right.
Create an individual asset:
Click on the “Add Asset” button displayed in the top right
The user will be navigated to the” New Asset” page
For Creating a new asset ,users need to fill in the information like Asset information and address of the asset that needs to be created.
Add Information :
Fill in the details that are mandatory i.e Assettype, category, external id, name and integration key
Address Details:
For adding a new asset users have to give the address of the asset to be created.one address is mandatory.every detail here is mandatory here except the “apartment/suite”.
after filling the details,the map is located
Click on the “Save” button after filling in the details
Now User can see this asset details on the assets tab of the assets page
Editing Individual Assets:
There are Two options for editing the assets
1. If the user wants to edit the asset details Click on the First Name on assets page
The user will be redirected to the Asset details page . click on the edit button .
2. By clicking on the actions drop down button the user has two options Edit and Delete .
Edit button will edit the asset .
the user will be redirected to Asset details page .Edit the preferred details and save
Deleting the Individual Assets:
There are Two options for deleting the assets
1. If the user wants to delete the asset details Click on the First Name on assets page
2. The user will be redirected to the Asset details page . click on the delete button .
Equipment
Introduction:
Reducing the frequency and severity of critical equipment failures or down time or degradation helps.Criticality of asset management is undeniable where in thousands of critical equipment that lies underneath.so need end to end visibility to monitor equipment performance in real time.
The main equipment page:
This is how the main “ equipment “ page looks like
Add asset:
If the user wants to create an asset .To create an individual asset ,click on the “Add asset”
button displayed on the top right.
Create an individual asset:
Click on the “Add Asset” button displayed in the top right
The user will be navigated to the” New Asset” page
For Creating a new asset ,users need to fill in the information like Asset information and address of the asset that needs to be created.
Add Information :
Fill in the details that are mandatory i.e Assettype, category, external id, name and integration key
Address Details:
For adding a new asset users have to give the address of the asset to be created.one address is mandatory.every detail here is mandatory here except the “apartment/suite”.
after filling the details,the map is located
Click on the “Save” button after filling in the details
Now User can see this asset details on the assets tab of the assets page
Editing Individual Assets:
There are Two options for editing the assets
1. If the user wants to edit the asset details Click on the First Name on assets page
The user will be redirected to the Asset details page . click on the edit button .
2. By clicking on the actions drop down button the user has two options Edit and Delete .
Edit button will edit the asset .
the user will be redirected to Asset details page .Edit the preferred details and save
Deleting the Individual Assets:
There are Two options for deleting the assets
1. If the user wants to delete the asset details Click on the First Name on assets page
2. The user will be redirected to the Asset details page . click on the delete button .
Supply Chain
Introduction:
Asset management enables the organization to trace the products accurately in different locations.brings more efficiency to the supply chain operations by enabling businesses to analyze the assets closely.
The main Supply chain page:
This is how the main “ Supply Chain “ page looks like
Add asset:
If the user wants to create an asset .To create an individual asset ,click on the “Add asset”
button displayed on the top right.
Create an individual asset:
Click on the “Add Asset” button displayed in the top right
The user will be navigated to the” New Asset” page
For Creating a new asset ,users need to fill in the information like Asset information and address of the asset that needs to be created.
Add Information :
Fill in the details that are mandatory i.e Assettype, category, external id, name and integration key
Address Details:
For adding a new asset users have to give the address of the asset to be created.one address is mandatory.every detail here is mandatory here except the “apartment/suite”.
after filling the details,the map is located
Click on the “Save” button after filling in the details
Now User can see this asset details on the assets tab of the assets page
Editing Individual Assets:
There are Two options for editing the assets
1. If the user wants to edit the asset details Click on the First Name on assets page
The user will be redirected to the Asset details page . click on the edit button .
2. By clicking on the actions drop down button the user has two options Edit and Delete .
Edit button will edit the asset .
the user will be redirected to Asset details page .Edit the preferred details and save
Deleting the Individual Assets:
There are Two options for deleting the assets
1. If the user wants to delete the asset details Click on the First Name on assets page
2. The user will be redirected to the Asset details page . click on the delete button .
Overview
IT CM
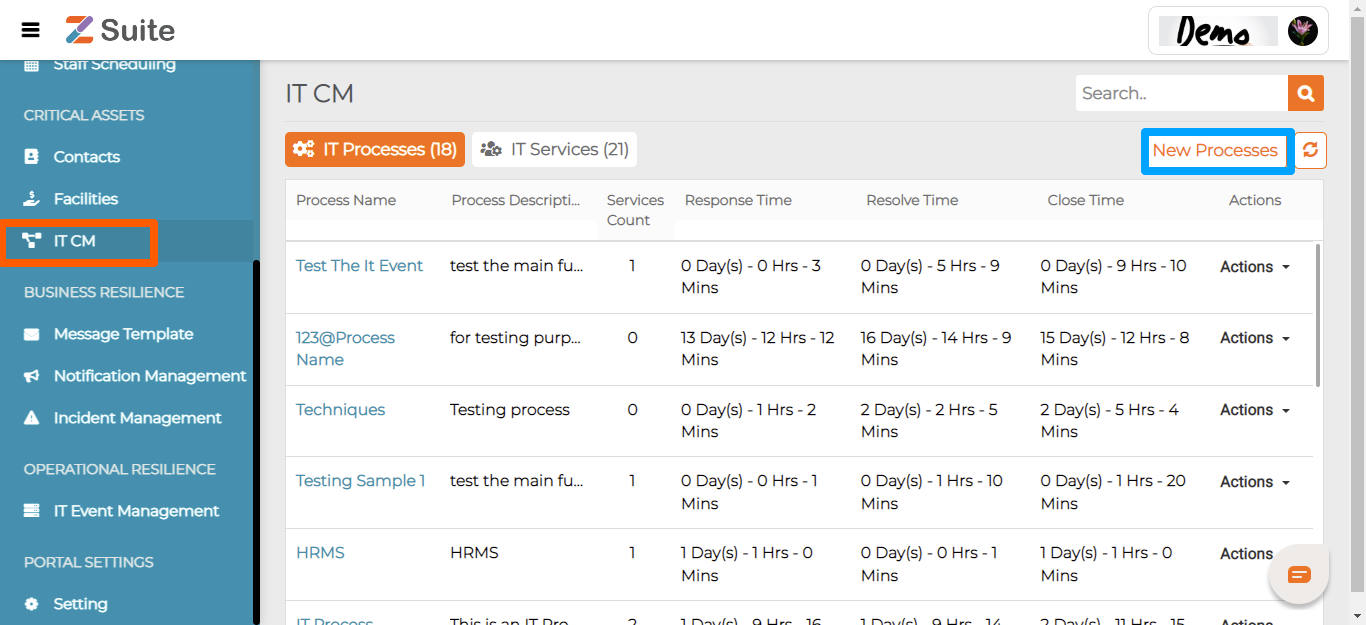
IT Process
There are various IT process and they generally involve access management, network configurations, business communication, software deployment, etc., Click on Name of the IT Process to view it. Here are the Details you find there like Process Name, Process Description, Services Count, Response Time, Resolve Time, Close Time, Actions.
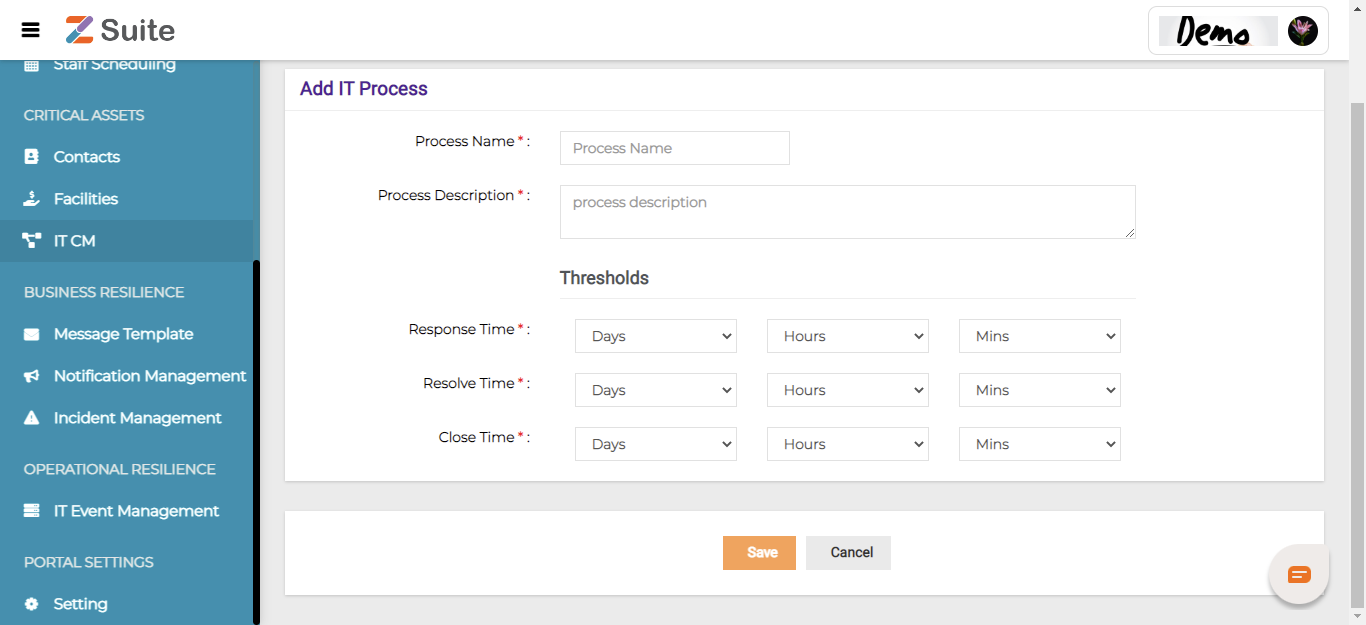
The user will be directed to a “New Process” page. Fill the Process Name, Process Description, Response Time, Resolve Time, Close Time for creating a new process.
Note: Latest list of IT processes can be refreshed on the screen using the Refresh button next to New Processes.
On “New Processes”, the user needs to fill in the details of Process Name, Process Description, Response Time, Resolve Time, and Close Time.
New Process Creation:
Process Name: Enter the Process Name. Example: Business Communication Process.
Process Description: Enter the Process Description.
Response Time: The response time is the elapsed time between an inquiry on a system and the response to that inquiry. Example: Response time 4 hours means the wait time is up to 4 hours to receive a response for a query.
If there is a disruption, select the expected Response time from the dropdown list.
Resolve Time: The Resolution Time is the amount of time that it takes to resolve an end user’s service request, concern or question.
If there is a disruption, select the expected Resolution time from the dropdown list.
Close Time: Once the issue is resolved the respective issue or request status is Closed and cannot be reopened or updated further.
If there is a disruption, select the expected Closure time from the dropdown list.
Click on “Save” after filling in all the mandatory data.
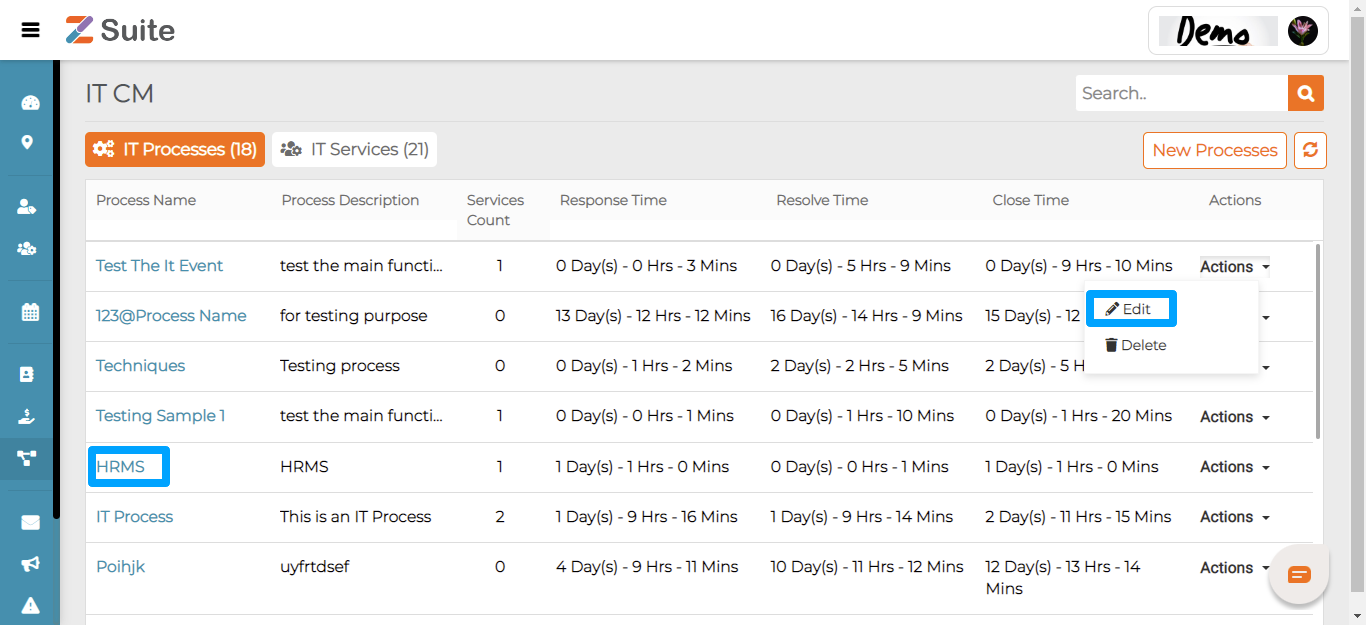
Edit IT Process
Click on “Process Name” or on the “Actions” dropdown and click “Edit”.
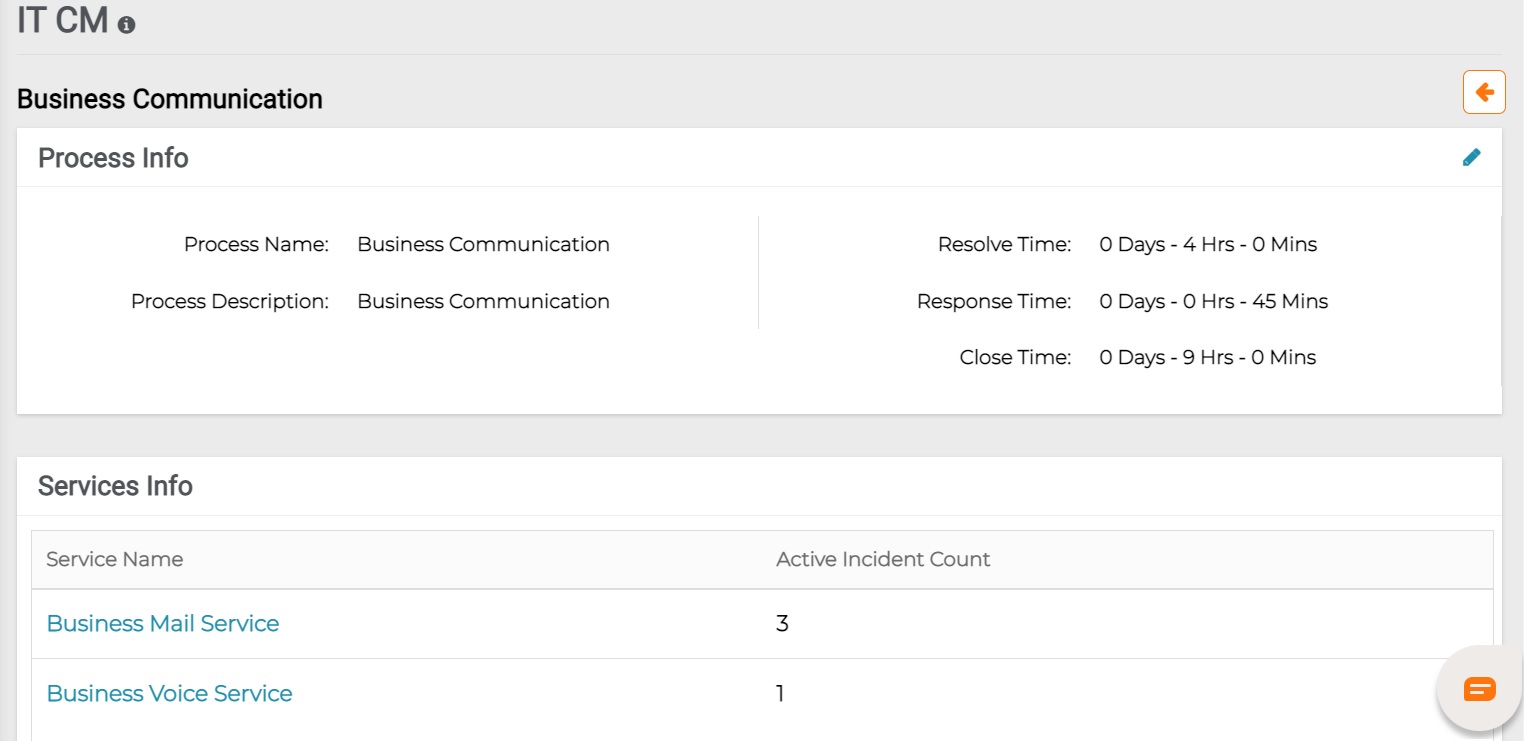
The user will be redirected to the “Process details” page.
The user can Edit the details and click on the “Save” button.
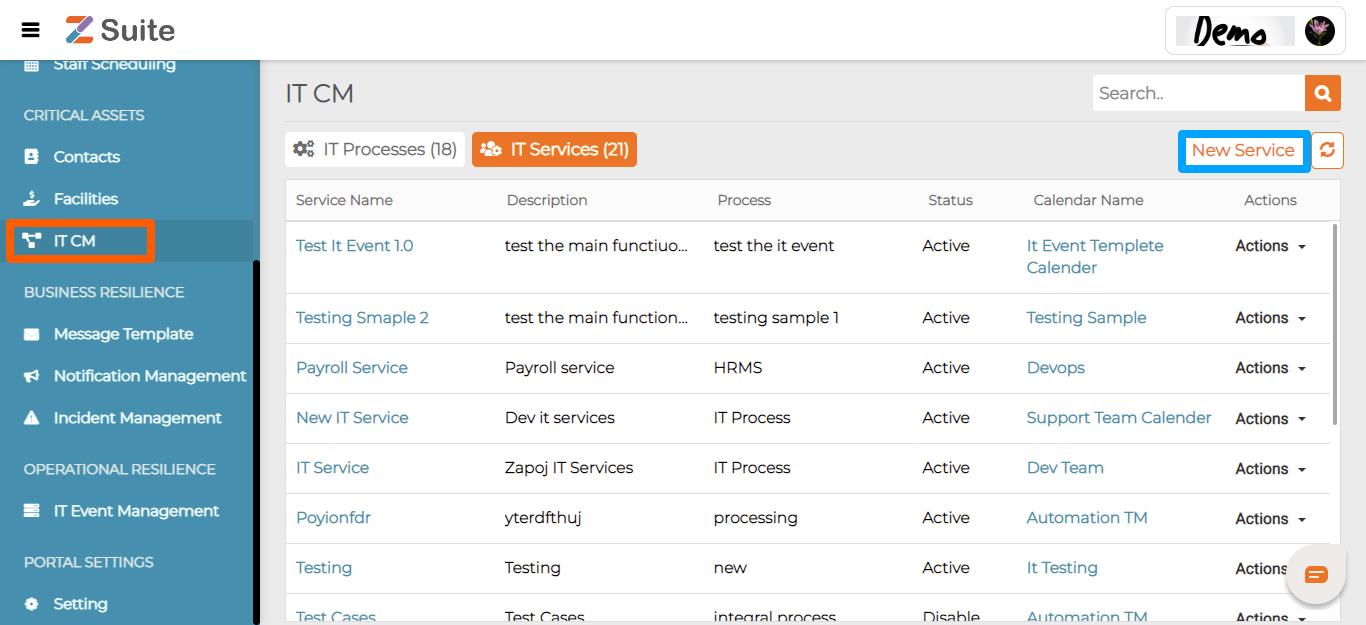
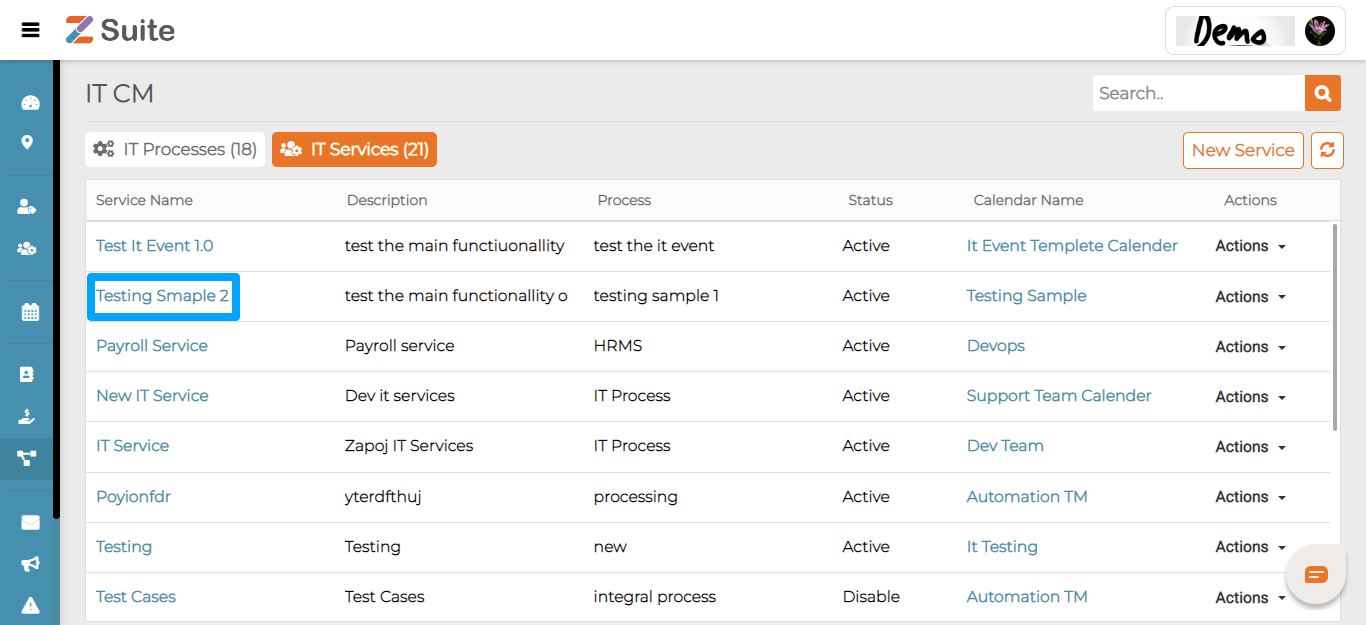
IT Services Creation
The IT Services include Cloud Services, Backup and Disaster Recovery, Help Desk Support. Managed Print Services, Training, etc.,
IT Services can be created by clicking on “New Services” on the top right.
Note: Latest list of IT Services can be refreshed on the screen using the Refresh button next to New Services.
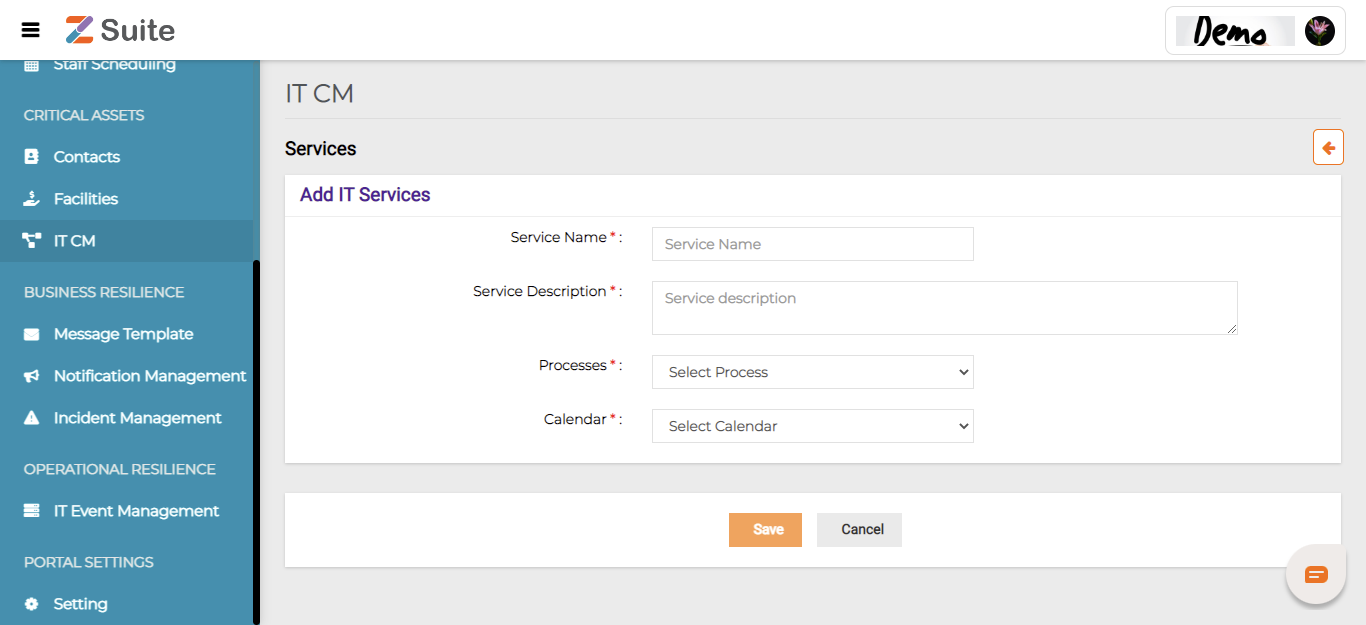
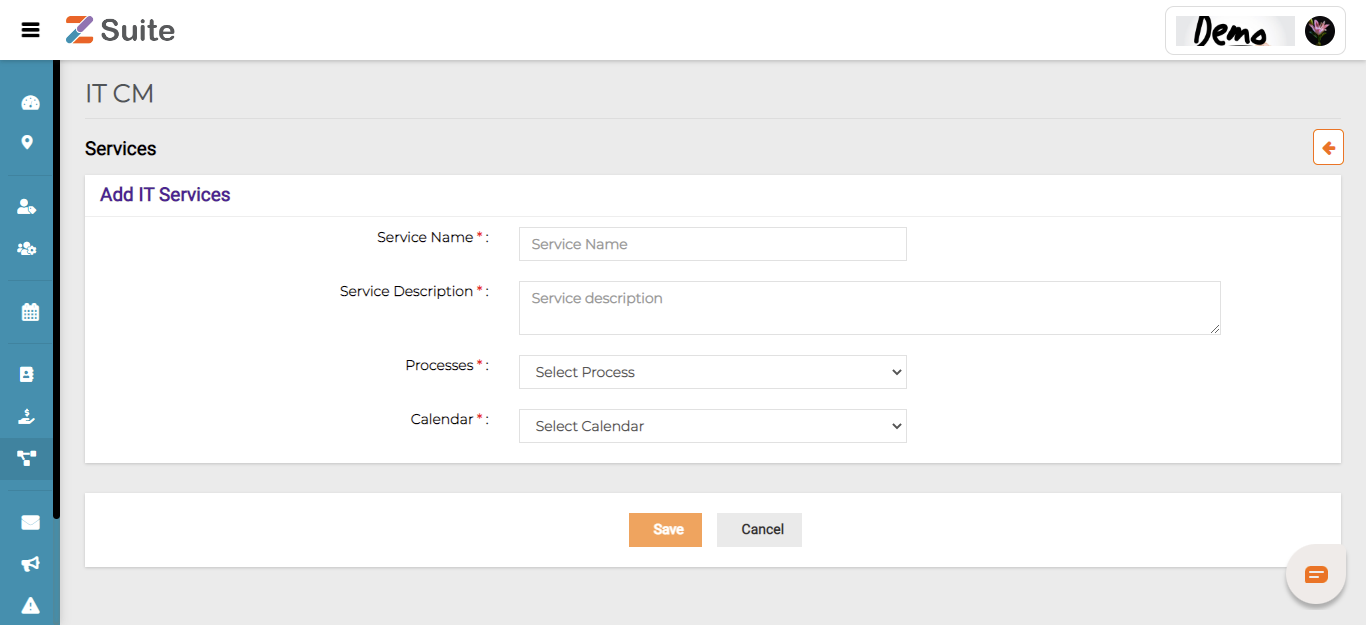
On “New Services”, the user needs to fill in the details of Services Name, Service Description, processes, and Calendar.
Click on “Save” after filling in all the mandatory data.
New Services Creation:
Service Name: Enter the Service Name. Example: Voice Services
Service Description: Enter the Service Description.
Processes: Select the Process from the dropdown list for the Service created.
Calendar: Select the Calendar for the service from the dropdown list.
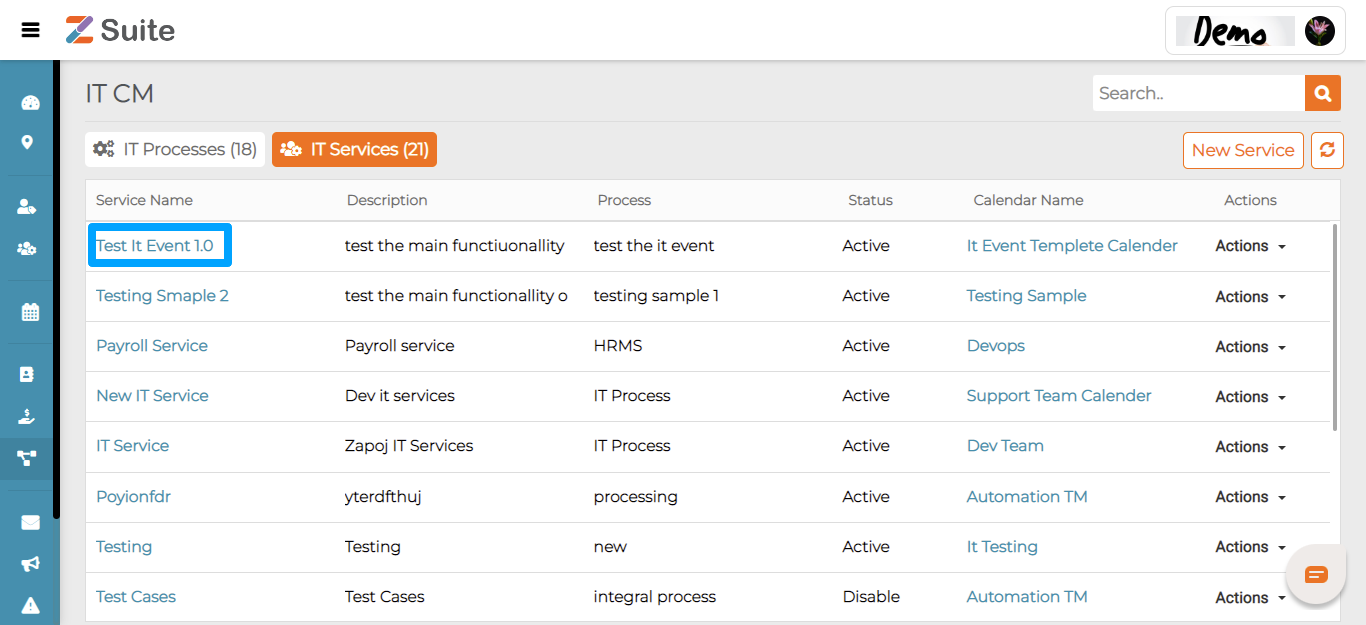
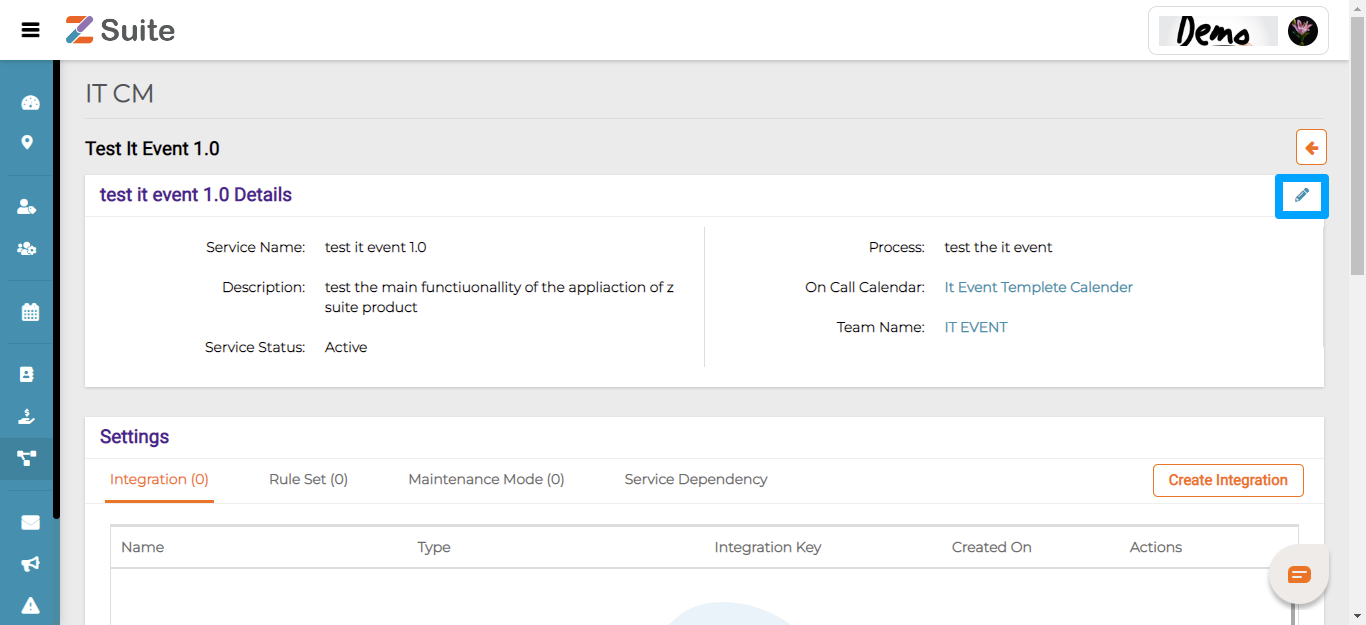
Edit Services
Click on the Services name and click on the edit icon.
The user will be redirected to the “IT Services details” page.
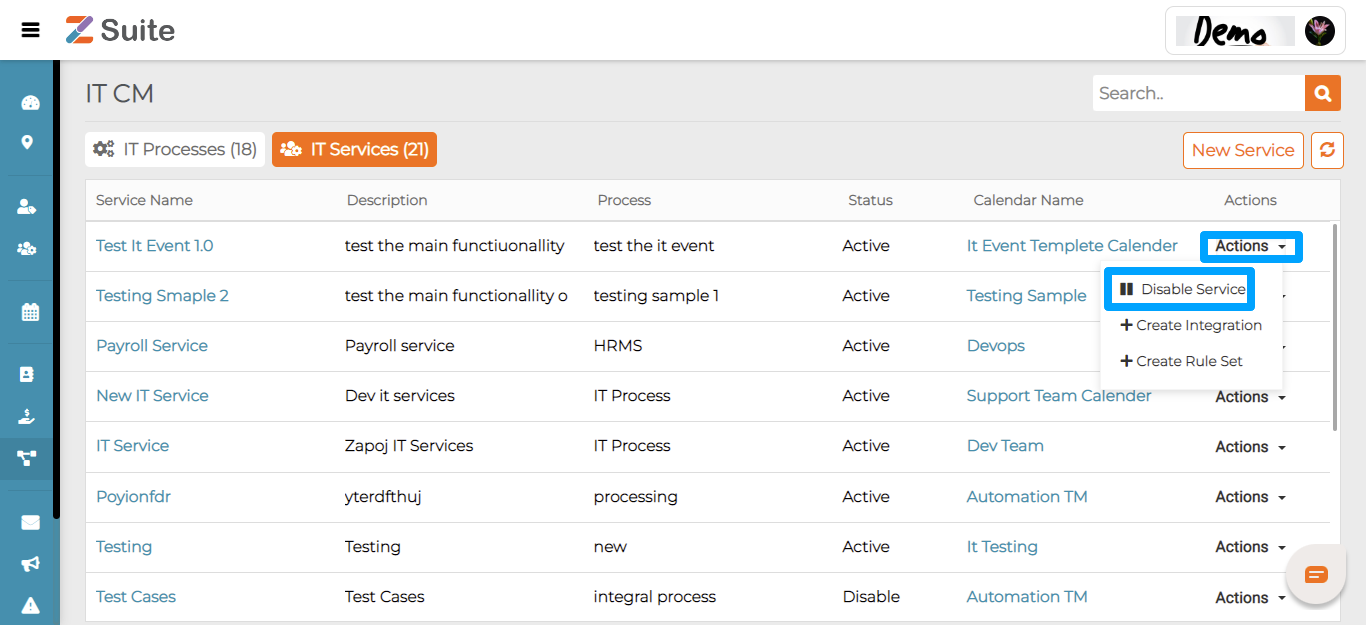
Disable Service
After Creating IT Services, the user can also Disable and Enable that Services. Click on Actions and Click on Disable Service
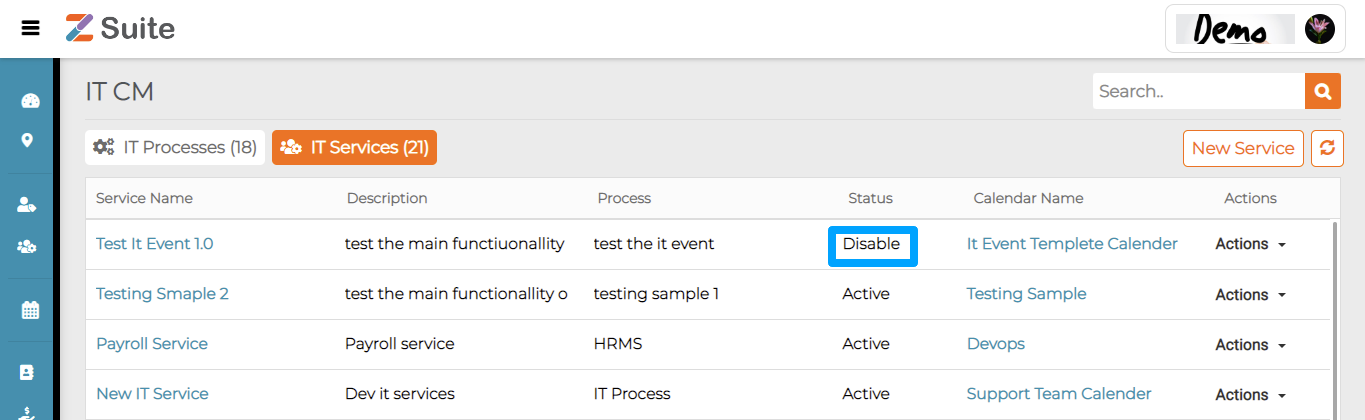
After Clicking on Disable Service the status changes from “Active to Disable”.
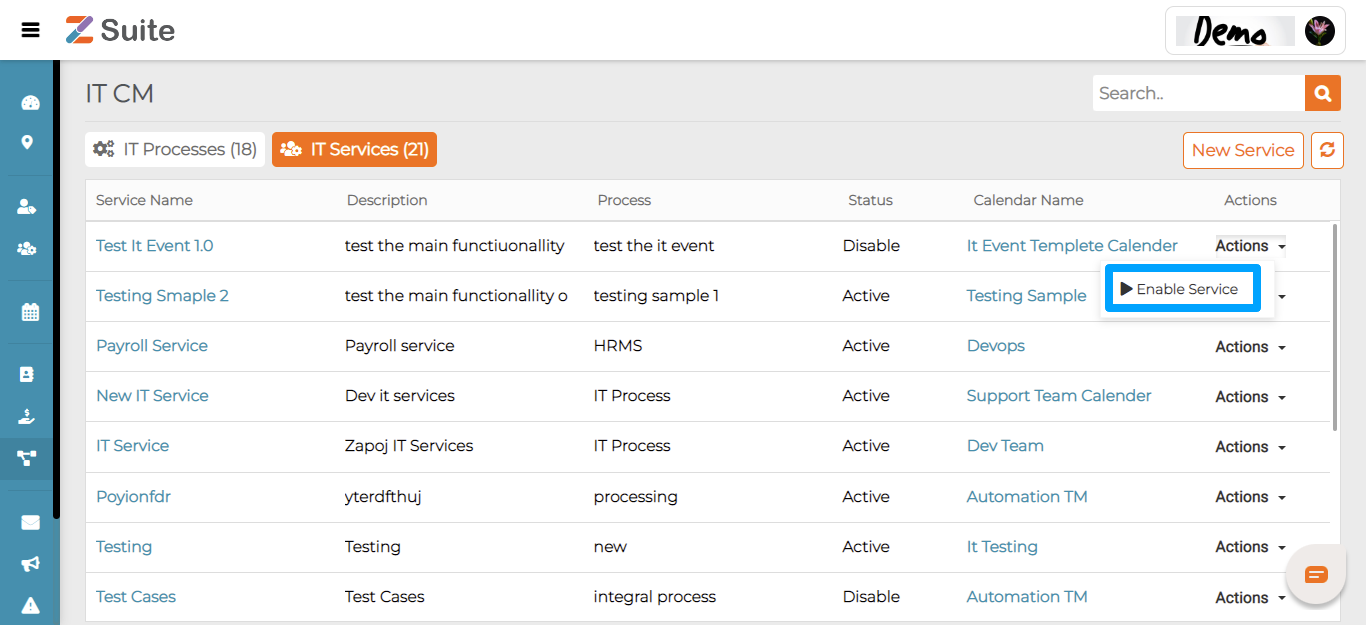
Again click on Actions and click on Enable Services to change the status from “ Disable to Active”.
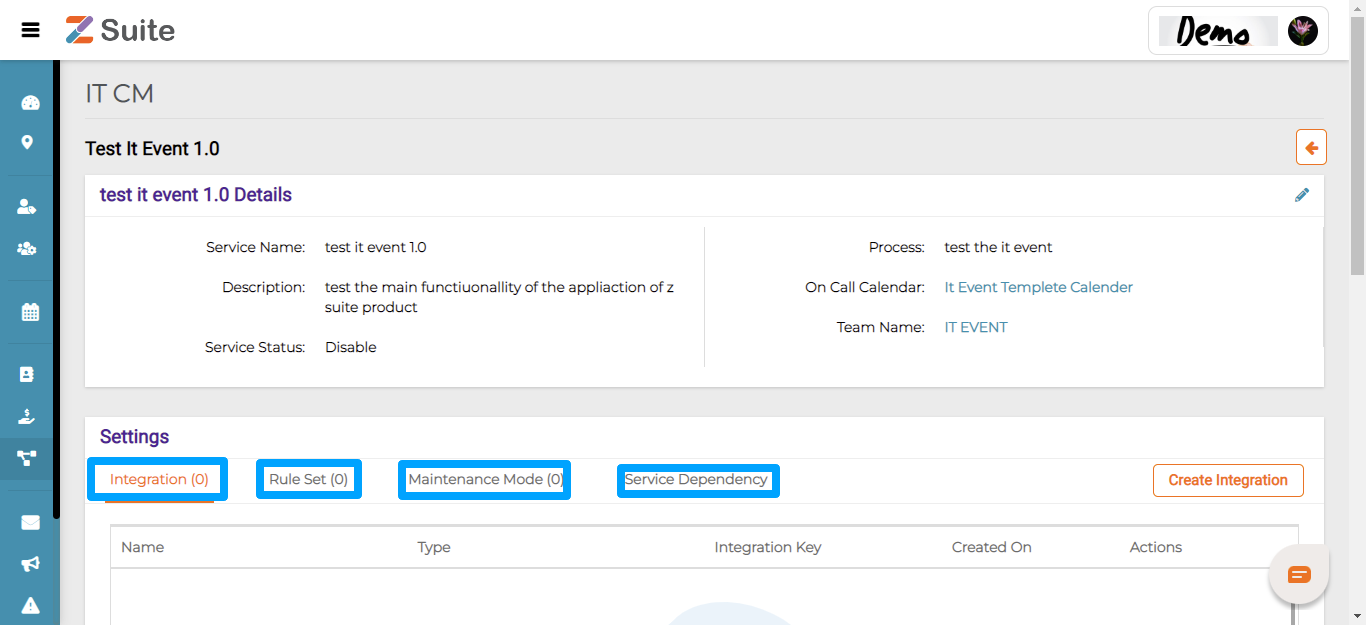
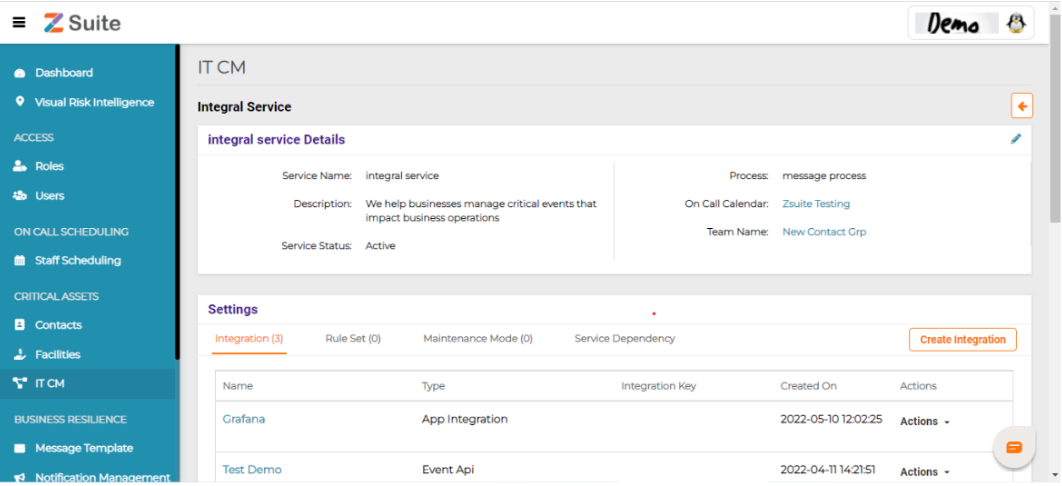
Settings: To create Integrations, Rulesets, Maintenance, and Service Dependency click on the Service name, then it redirects to the services view of settings
Integration Creation:
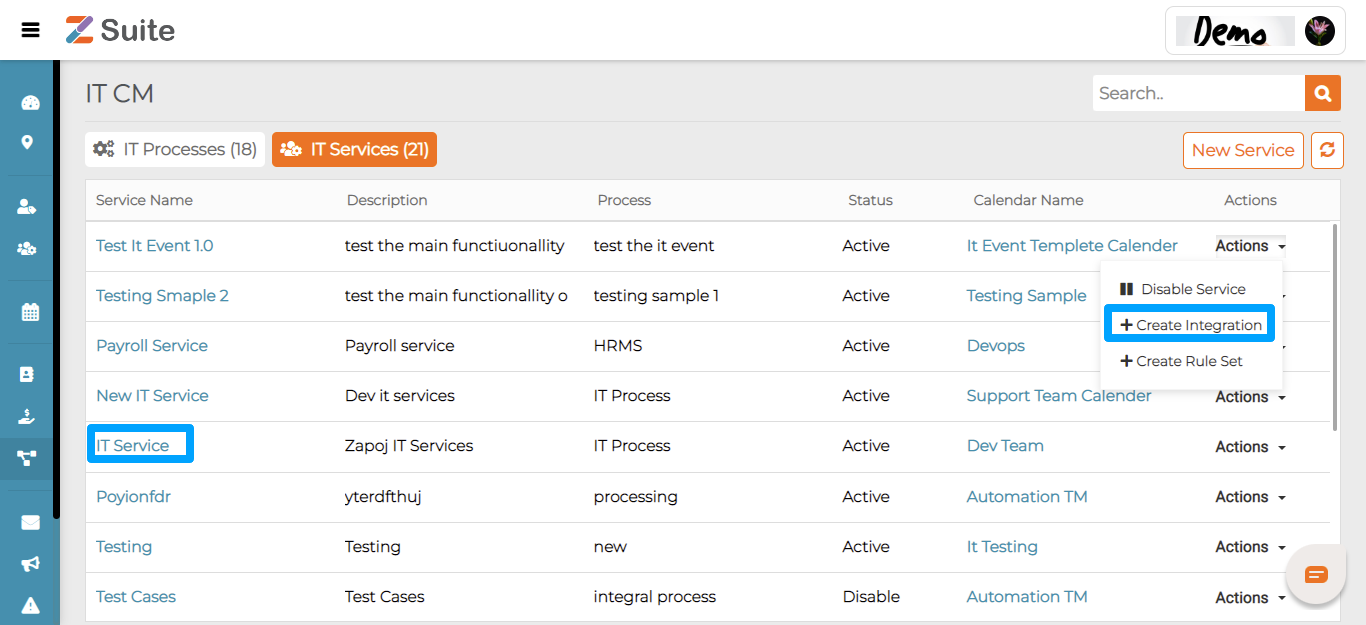
Click on the Service name or on the “Actions” and click on “Create Integration”.
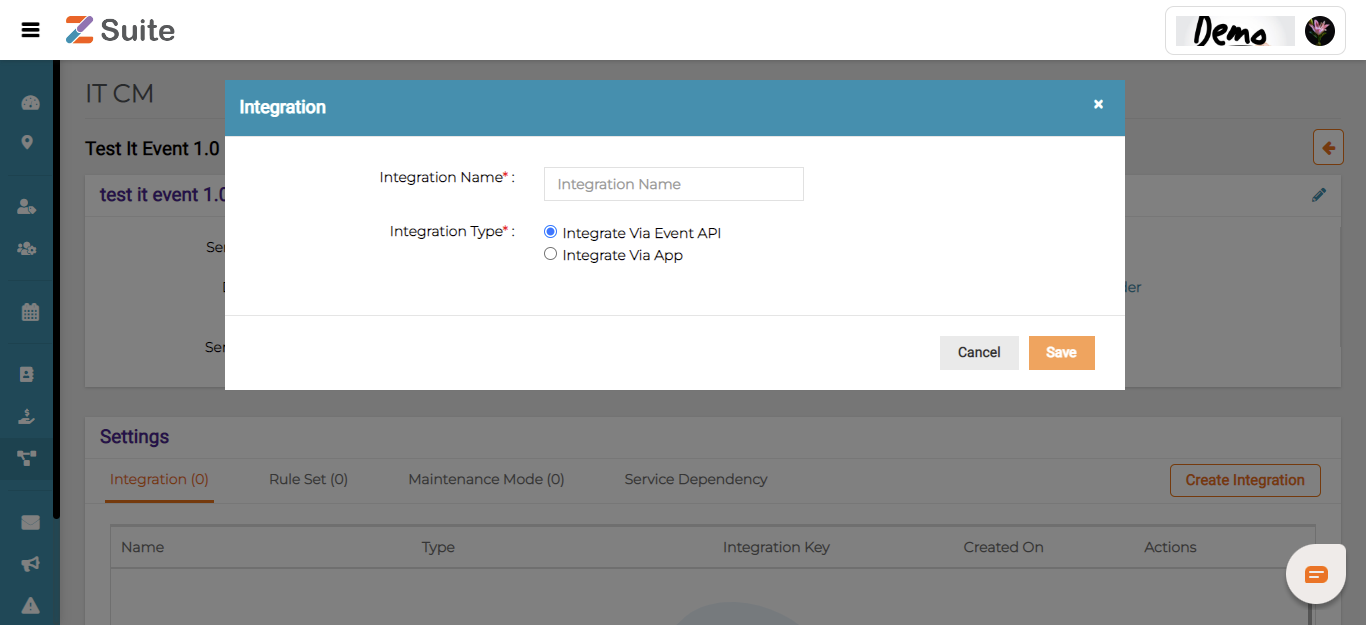
On “Create Integration”, the user needs to fill in the Integration Name and Integration Type from the Radio buttons list “Integrate Via Event API” or “Integrate via App”.
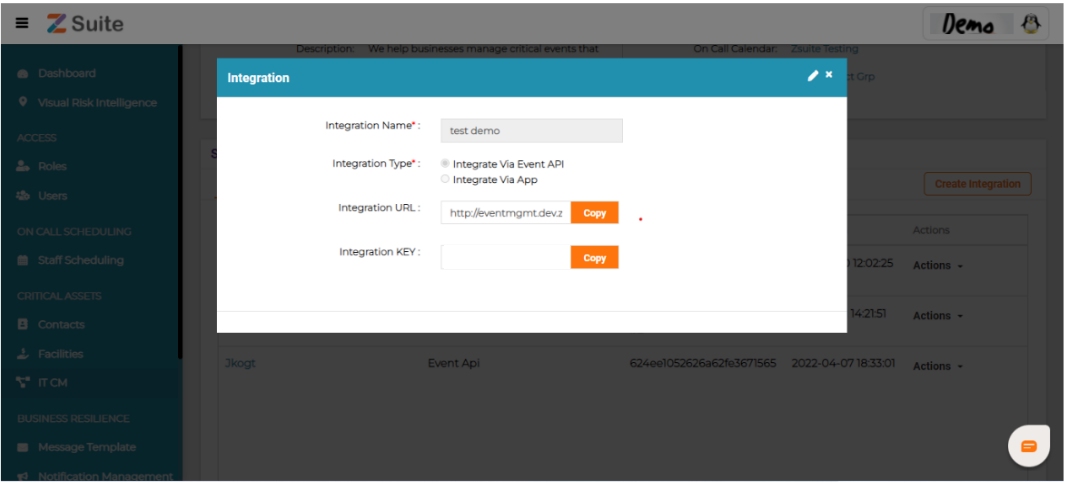
Edit Integration
Click on the Integration Name.
The User will be redirected to the “Integration details” page and click on the “Edit icon”.
The user can Edit the details and click on the “Save” button.
Delete Integration
Click on the “Actions” dropdown and click on “Delete”.
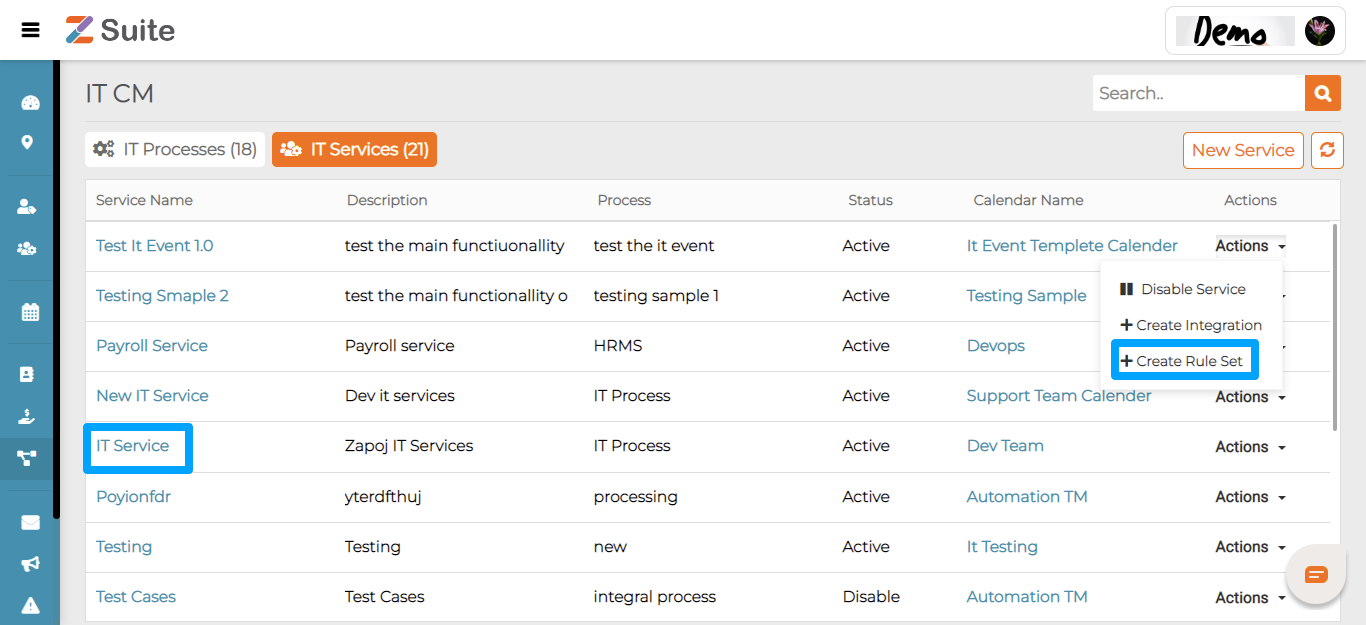
Ruleset Creation:
Click on the Services Name or click on the ‘Actions “ dropdown and click on “Create Rule set “.
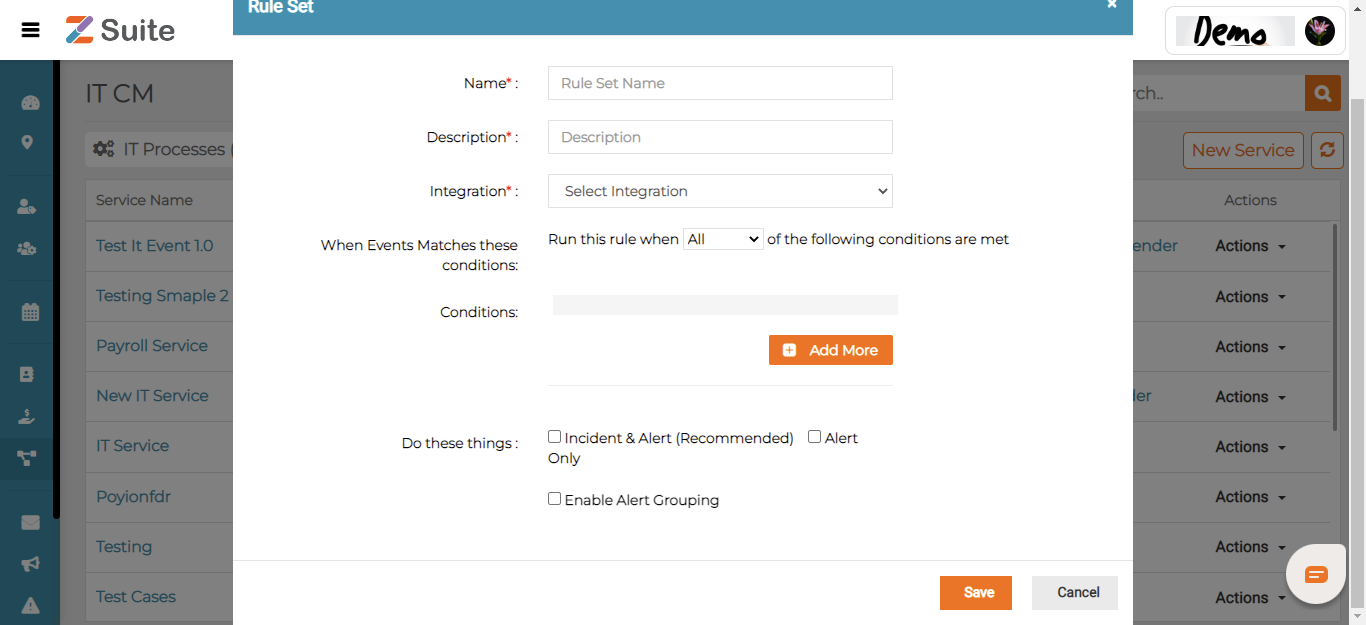
On ” Create Ruleset” the user needs to fill in the Name, Description, Integration, Event matches conditions,Conditions, and Do these things.
Ruleset
Name: Enter the name of the ruleset.
Description: Enter the Description of the ruleset.
Integration: Select the Integration from the dropdown list
Event Matches Conditions: Select the condition as All / Anyone from the dropdown list
Conditions: Add conditions by clicking on Add More option and selecting payload and operator from the dropdown list.
Do these things: Select the To Do Action from the checkboxes.
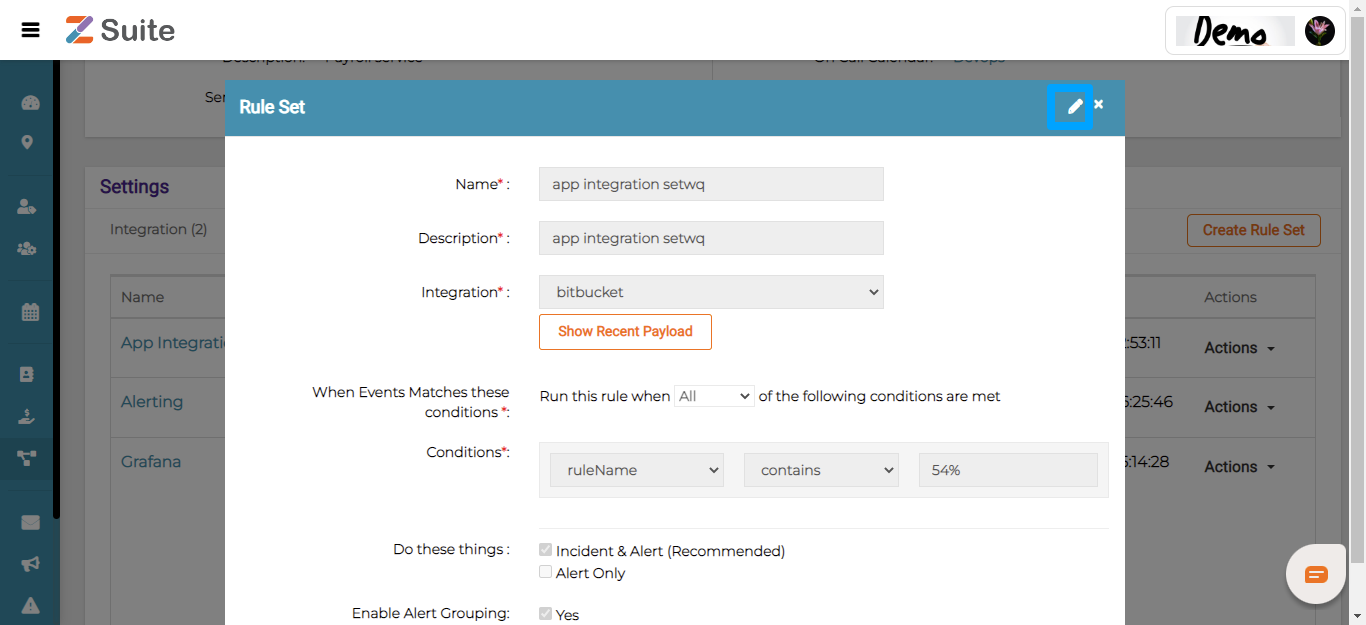
Edit Ruleset
Click on the Integration Name.
The User will be redirected to the “Ruleset details” page and click on the “Edit icon”.
The user can Edit the details and click on the “Save” button.
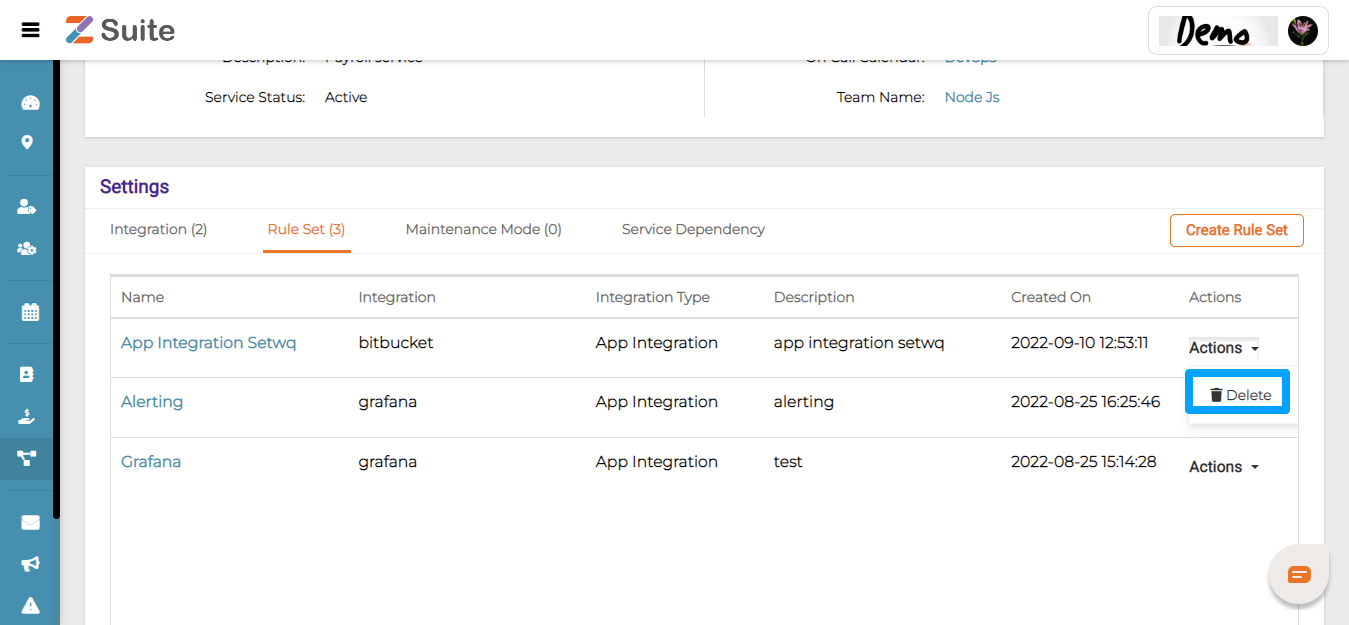
Delete Ruleset
Click on the “Actions” dropdown and click on “Delete”.
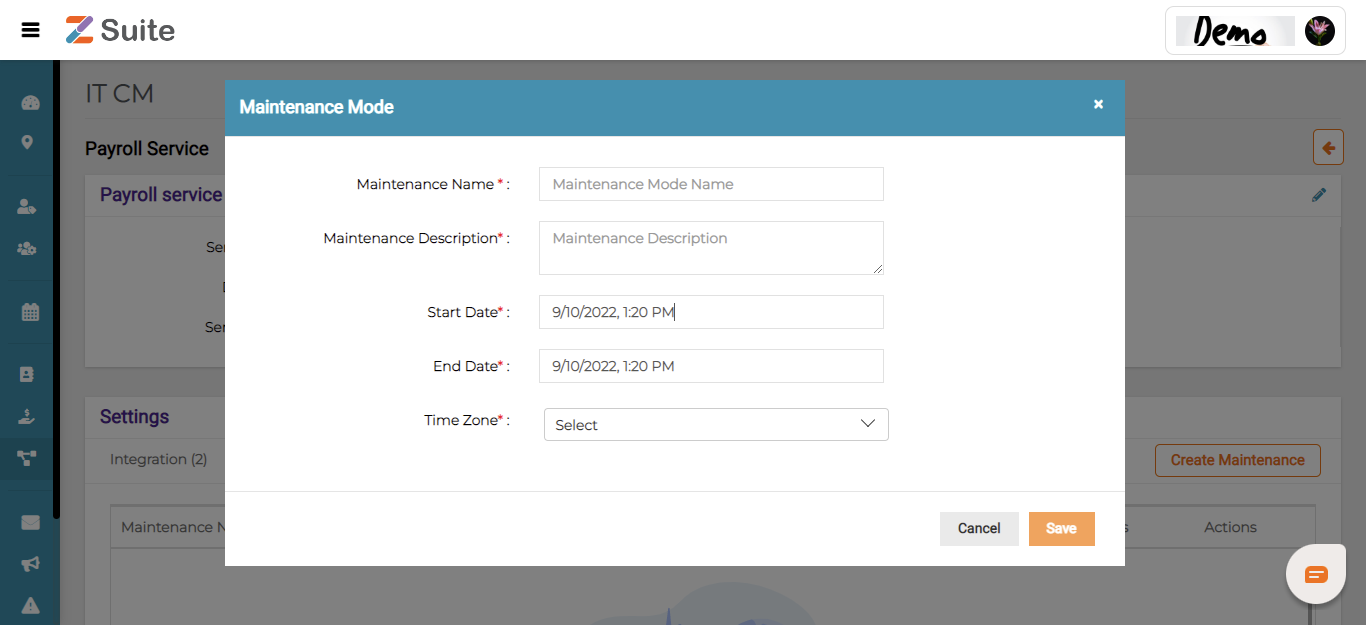
Maintenance Mode Creation:
Click on the Service Name and click on “Create Maintenance”.
On “Create Maintenance” the user needs to fill in the Maintenance Name, Maintenance Description, Start Time, End Time, and Timezone.
Maintenance Mode Creation:
Maintenance Name: Enter the Maintenance Mode name
Maintenance Description: Enter the Description of the Maintenance Mode
Start Time: Select the Start Date and Time
End Time: Select End Date and Time.
Timezone: Select Timezone from the dropdown list.
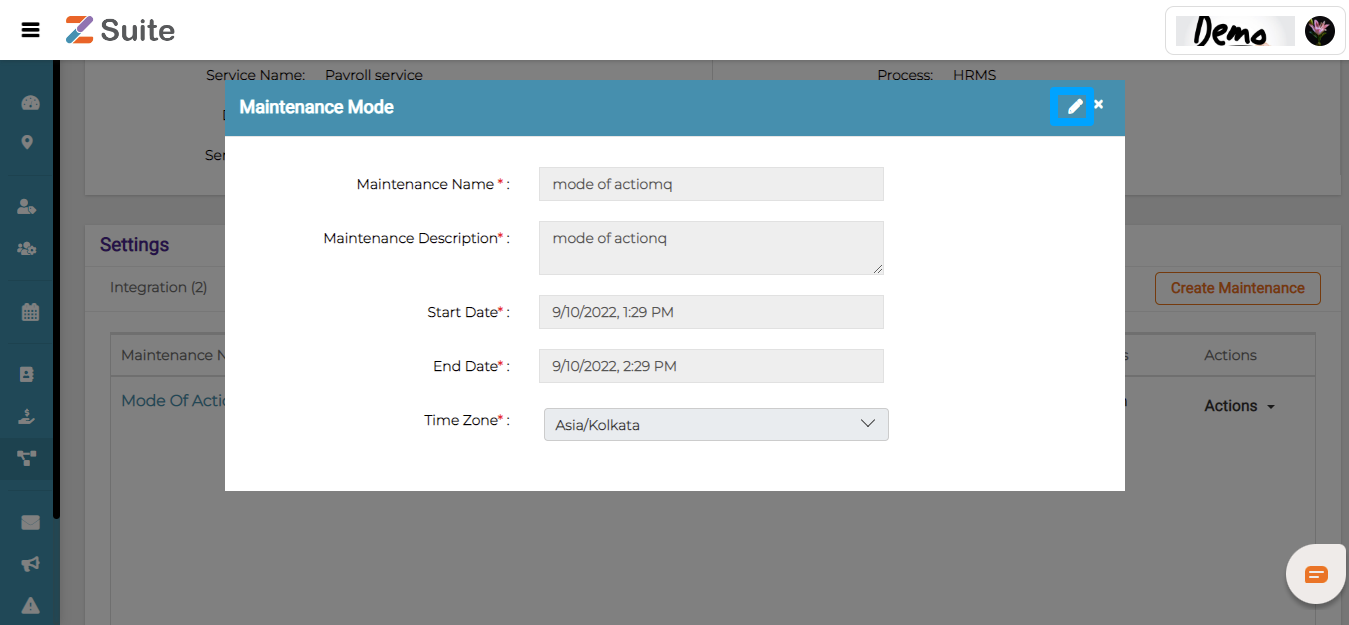
Edit Maintenance Mode
Click on the Maintenance Mode name
The user will be redirected to the “Maintenance mode details “ page.Click “Edit” icon.
The user can Edit the details and click on the “Save” button.
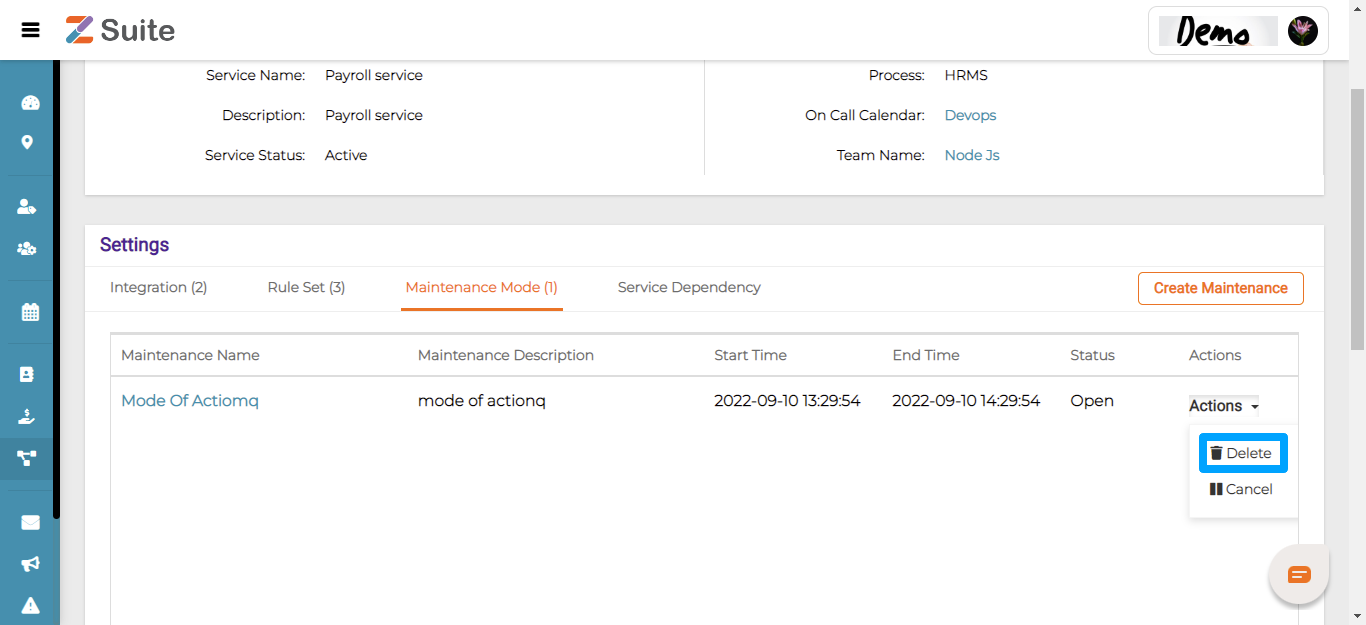
Delete Maintenance Mode:
Click on the “Actions” dropdown and click on “Delete”.
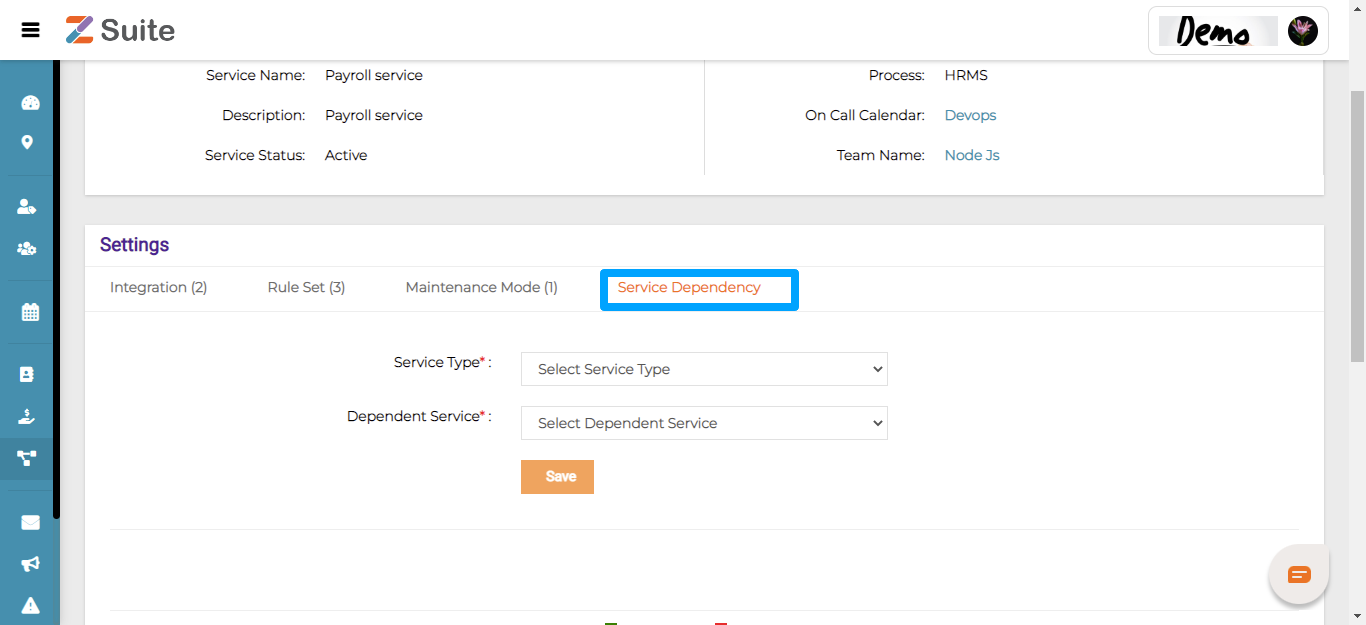
Service Dependency Creation:
Click on the Service Dependency
On “Service Dependency” the user needs to fill in the Service Type and Dependent Services
Service Dependency
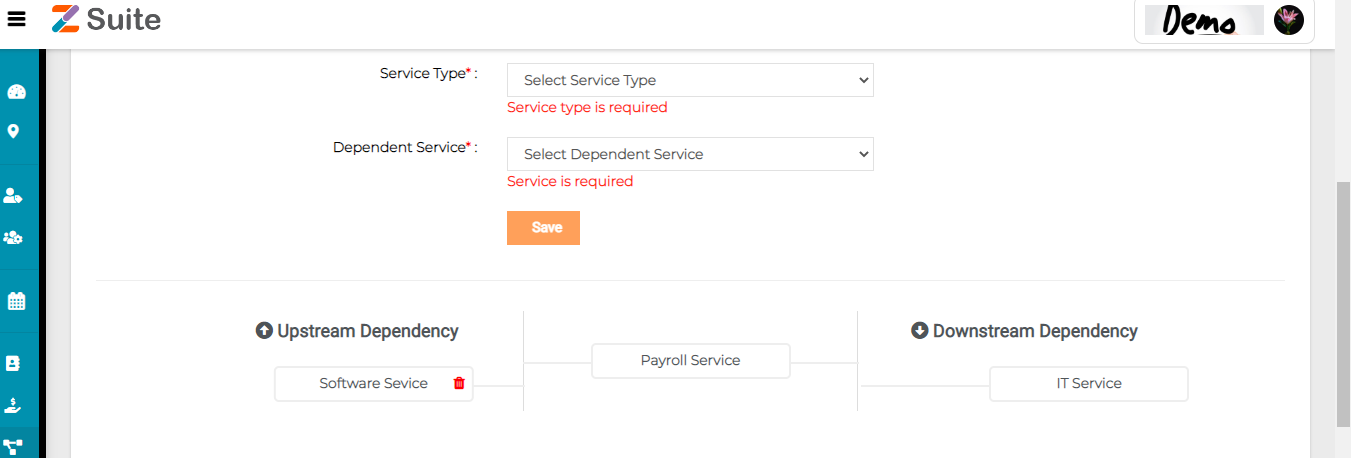
Service Type: Select the Service Type from the dropdown list
Dependent Service: Select Dependent Service from the dropdown list.
Based on selection both the upstream and downstream service dependencies are mapped.
Delete Service Dependency
Click on the “Delete” icon to delete the respective Service dependency.
Critical Assets Overview
Critical Assets Overview
Critical assets are the organizational resources vital to maintain operations and achieve the objectives. Critical assets can include human resources, facilities, technical and technological infra, data, supply chain, etc.,
A critical asset when fails or disrupted will impact the organization’s business operations.
pilihan bermain game online paling banyak digemari masyarakat indonesia dengan permainan game slot online terbaik saat ini adalah mengunjungi link https://fokusparlemen.id/ daftar sekarang juga dan dapatkan kemenangan bermain slot gacor hari ini dengan minimum deposit 10K