IT Process
There are various IT process and they generally involve access management, network configurations, business communication, software deployment, etc.,
Click on Name of the IT Process to view it. Here are the Details you find there like Process Name, Process Description, Services Count, Response Time, Resolve Time, Close Time, Actions.
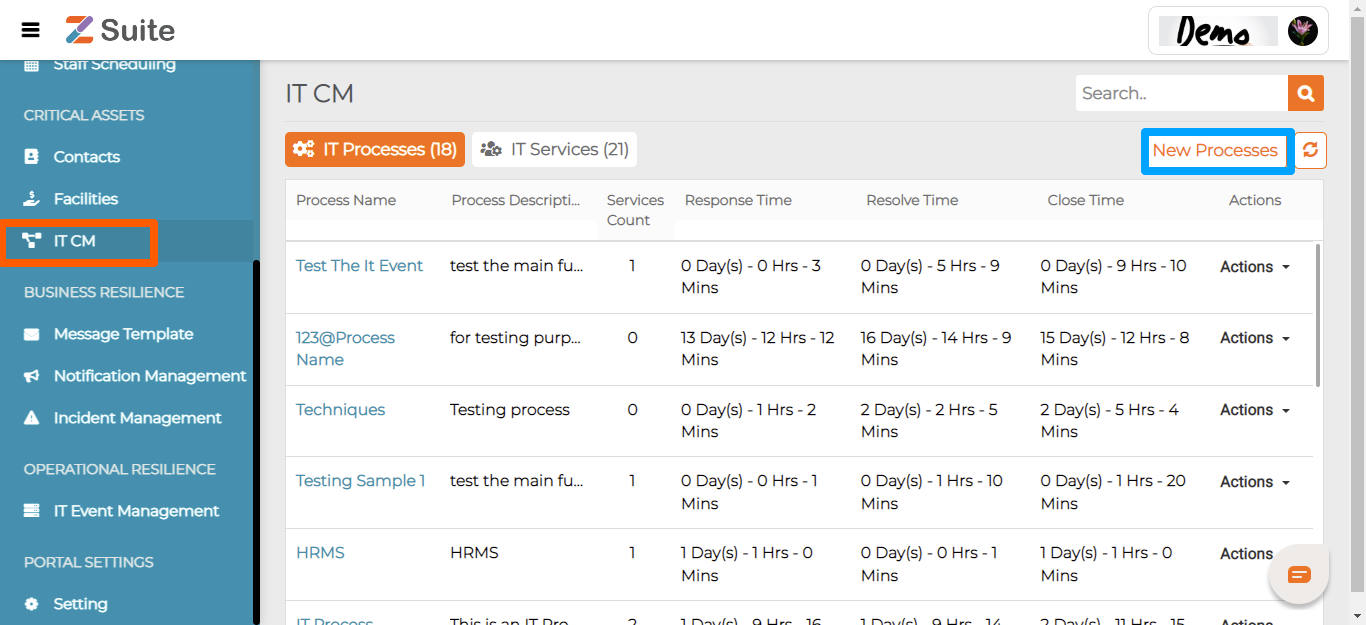
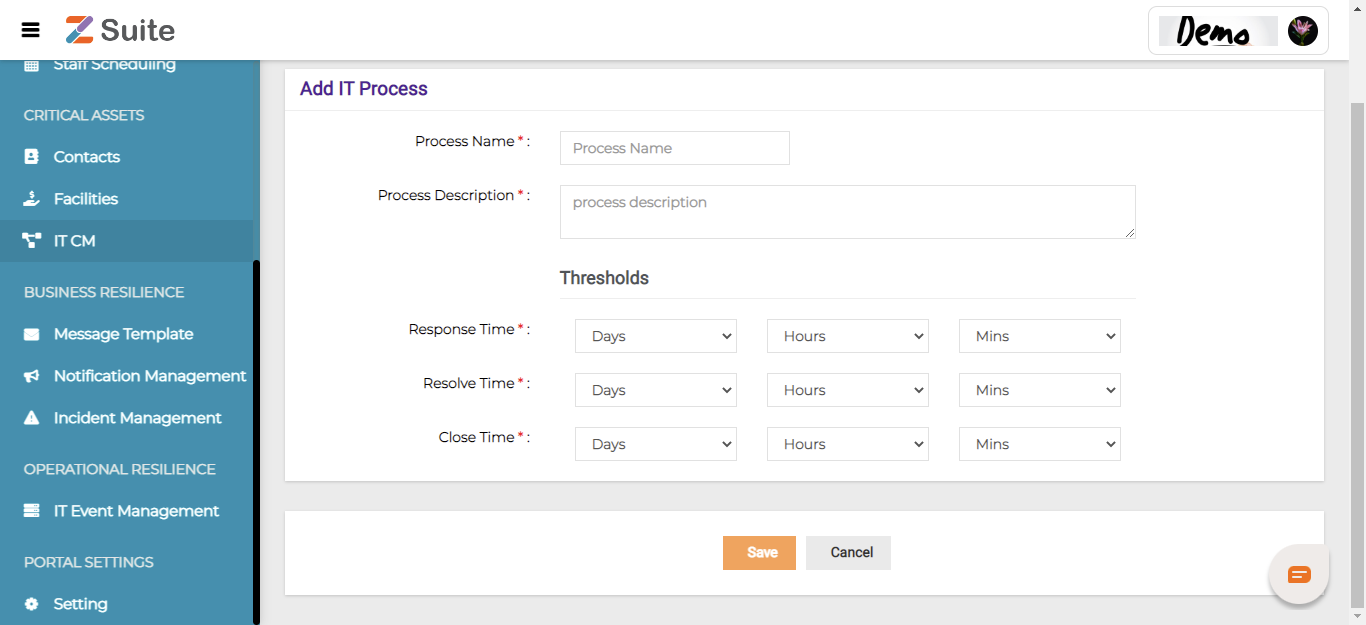
The user will be directed to a “New Process” page. Fill the Process Name, Process Description, Response Time, Resolve Time, Close Time for creating a new process.
Note: Latest list of IT processes can be refreshed on the screen using the Refresh button next to New Processes.
On “New Processes”, the user needs to fill in the details of Process Name, Process Description, Response Time, Resolve Time, and Close Time.
New Process Creation:
Process Name: Enter the Process Name. Example: Business Communication Process.
Process Description: Enter the Process Description.
Response Time: The response time is the elapsed time between an inquiry on a system and the response to that inquiry. Example: Response time 4 hours means the wait time is up to 4 hours to receive a response for a query.
If there is a disruption, select the expected Response time from the dropdown list.
Resolve Time: The Resolution Time is the amount of time that it takes to resolve an end user’s service request, concern or question.
If there is a disruption, select the expected Resolution time from the dropdown list.
Close Time: Once the issue is resolved the respective issue or request status is Closed and cannot be reopened or updated further.
If there is a disruption, select the expected Closure time from the dropdown list.
Click on “Save” after filling in all the mandatory data.
Edit IT Process
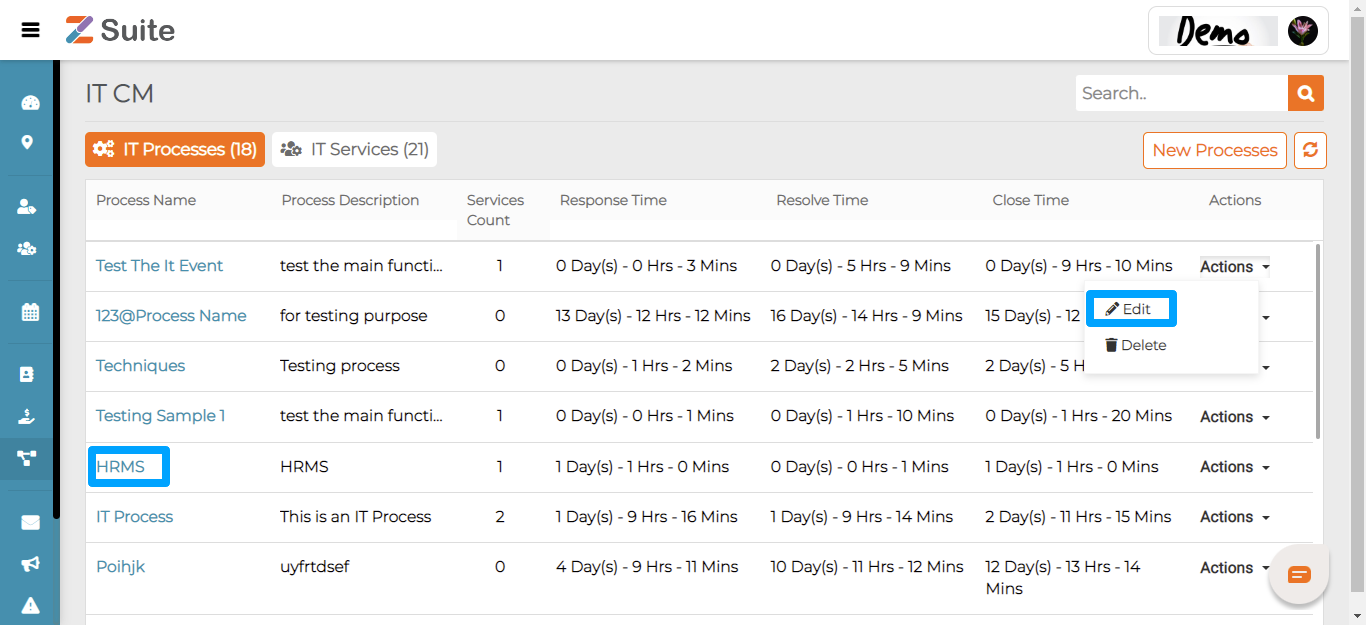
Click on “Process Name” or on the “Actions” dropdown and click “Edit”.
The user will be redirected to the “Process details” page.
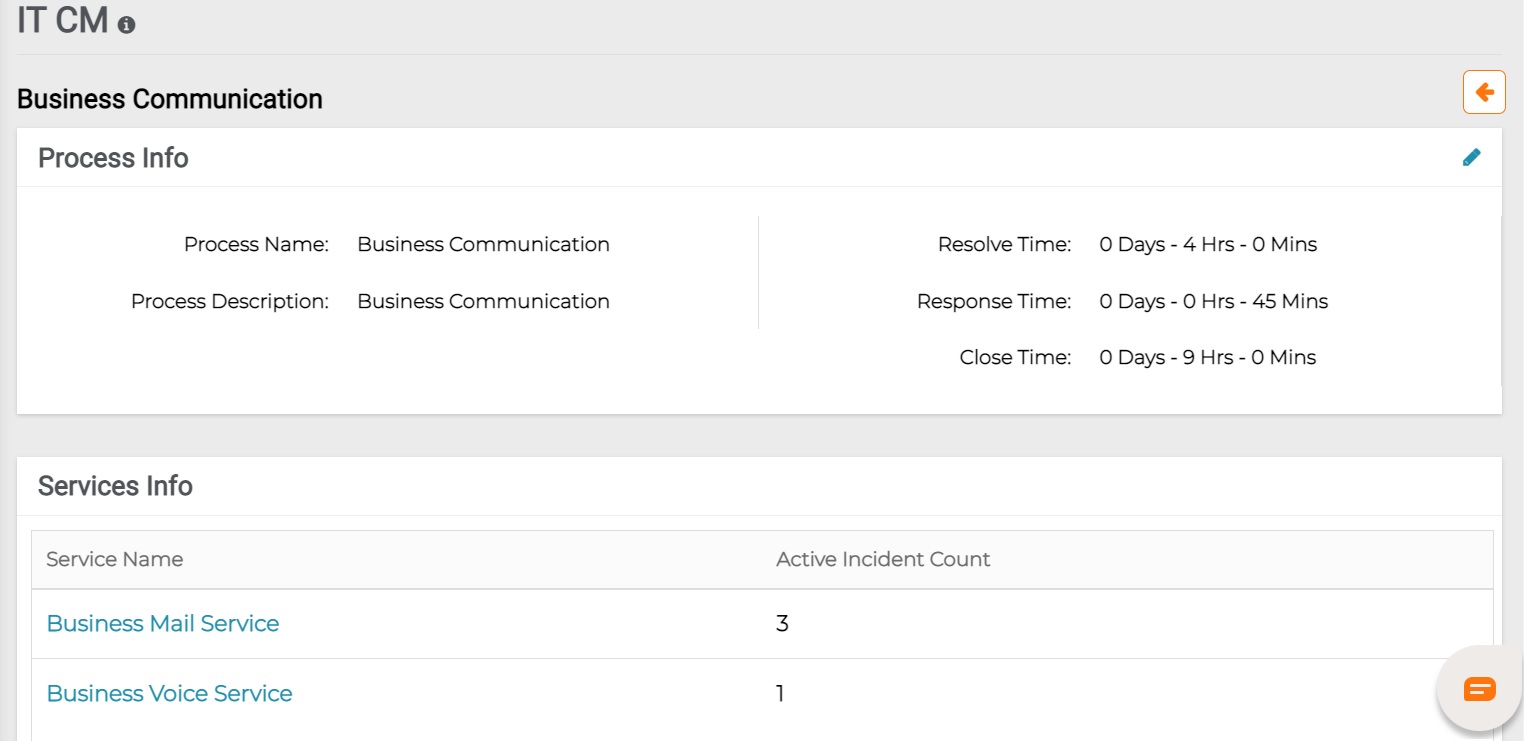
The user can Edit the details and click on the “Save” button.
IT Services Creation
The IT Services include Cloud Services, Backup and Disaster Recovery, Help Desk Support. Managed Print Services, Training, etc.,
IT Services can be created by clicking on “New Services” on the top right.
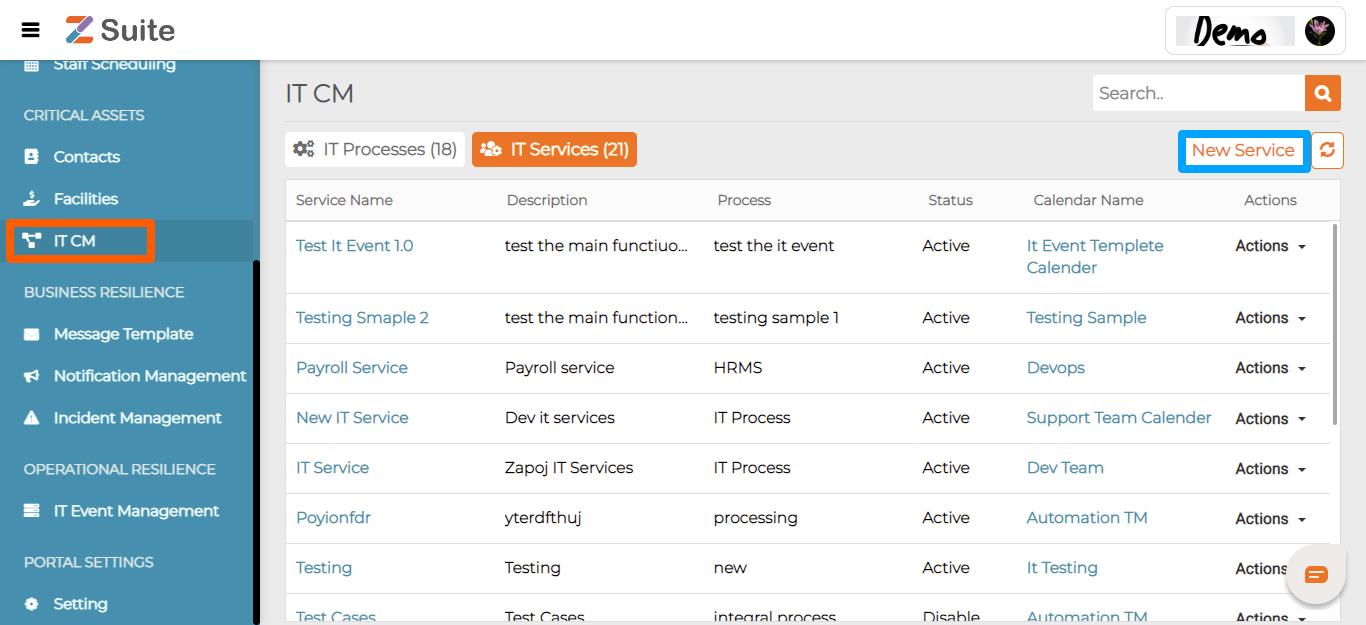
Note: Latest list of IT Services can be refreshed on the screen using the Refresh button next to New Services.
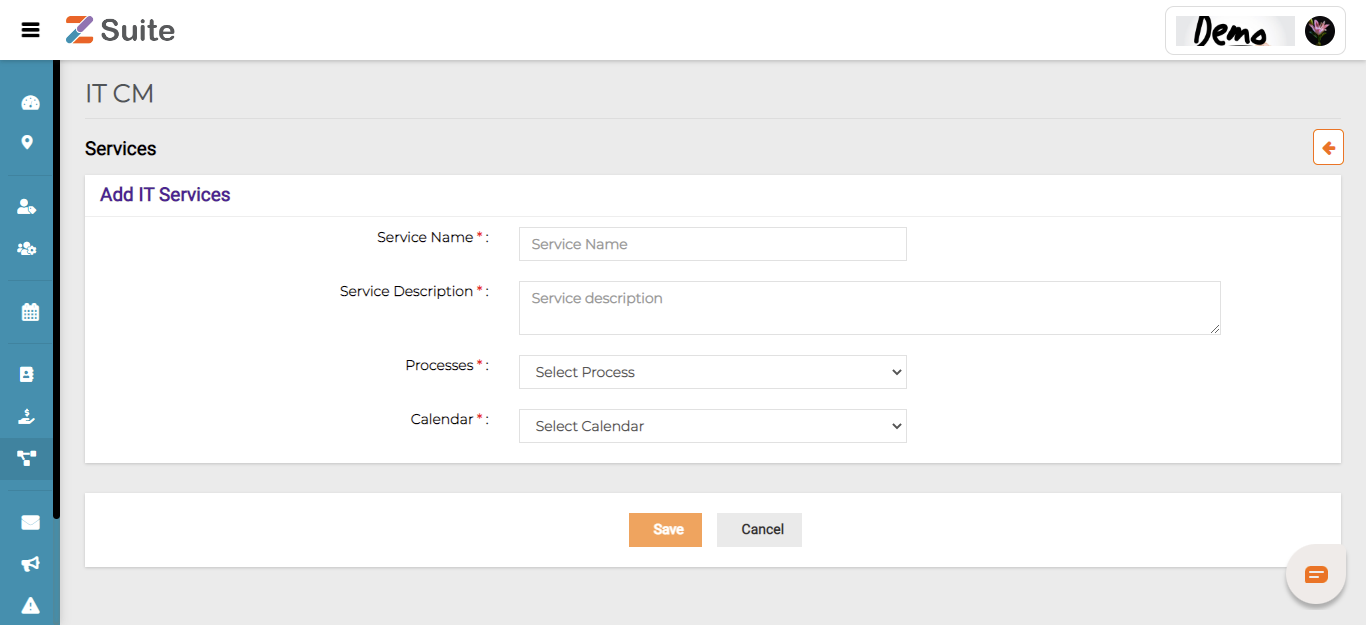
On “New Services”, the user needs to fill in the details of Services Name, Service Description, processes, and Calendar.
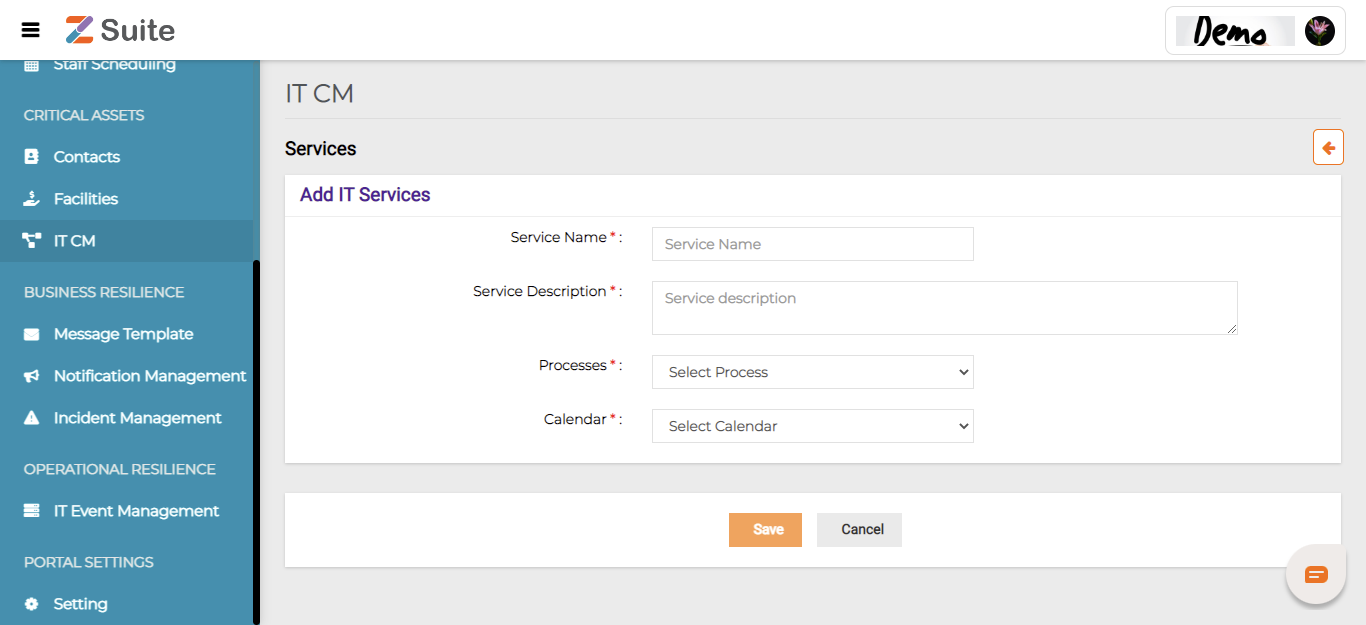
Click on “Save” after filling in all the mandatory data.
New Services Creation:
Service Name: Enter the Service Name. Example: Voice Services
Service Description: Enter the Service Description.
Processes: Select the Process from the dropdown list for the Service created.
Calendar: Select the Calendar for the service from the dropdown list.
Edit Services
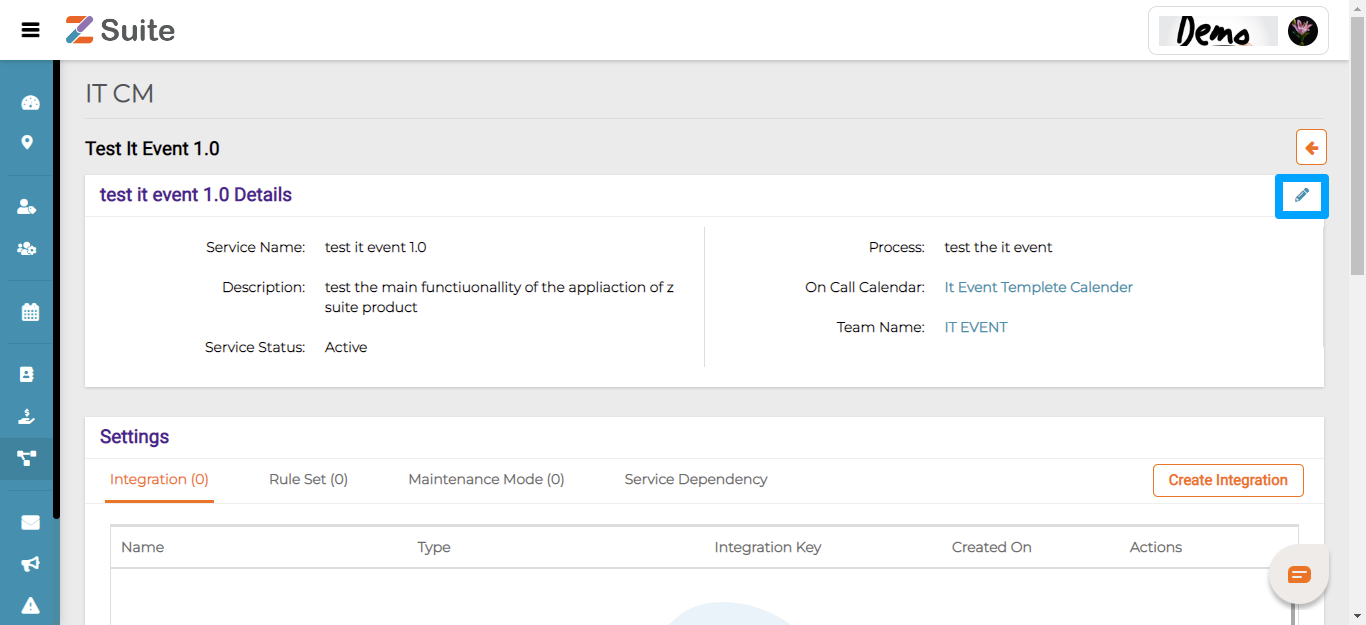
Click on the Services name and click on the edit icon.
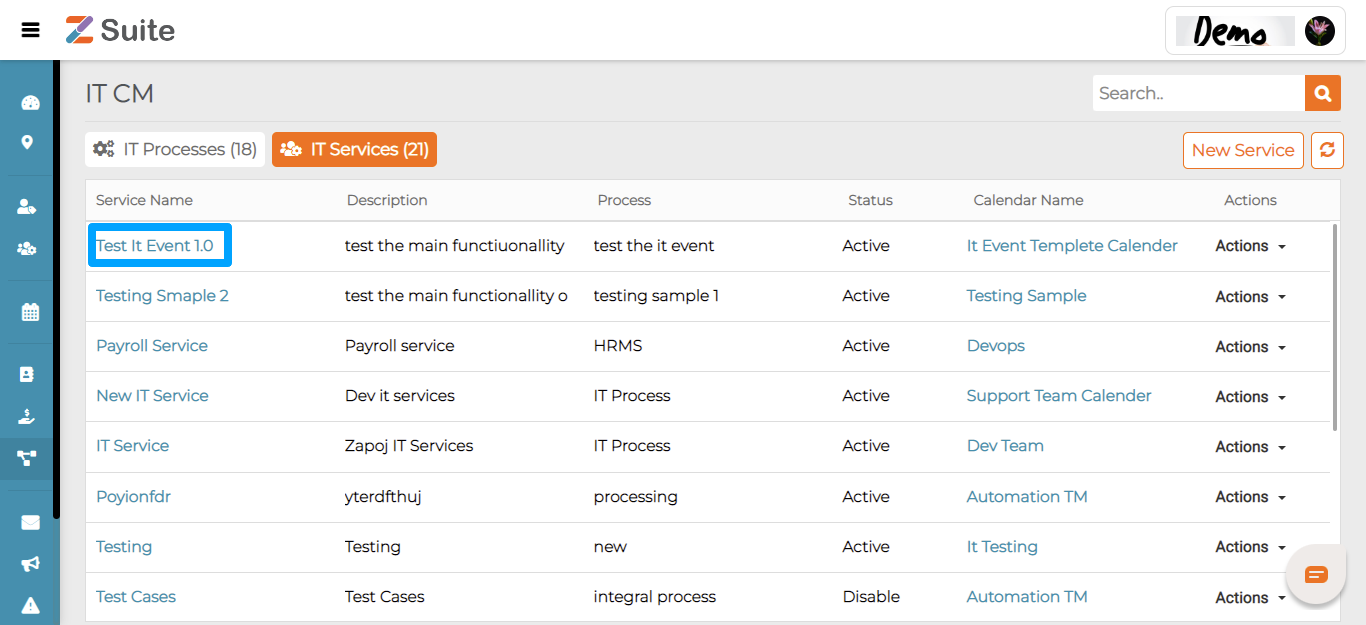
The user will be redirected to the “IT Services details” page.
Disable Service
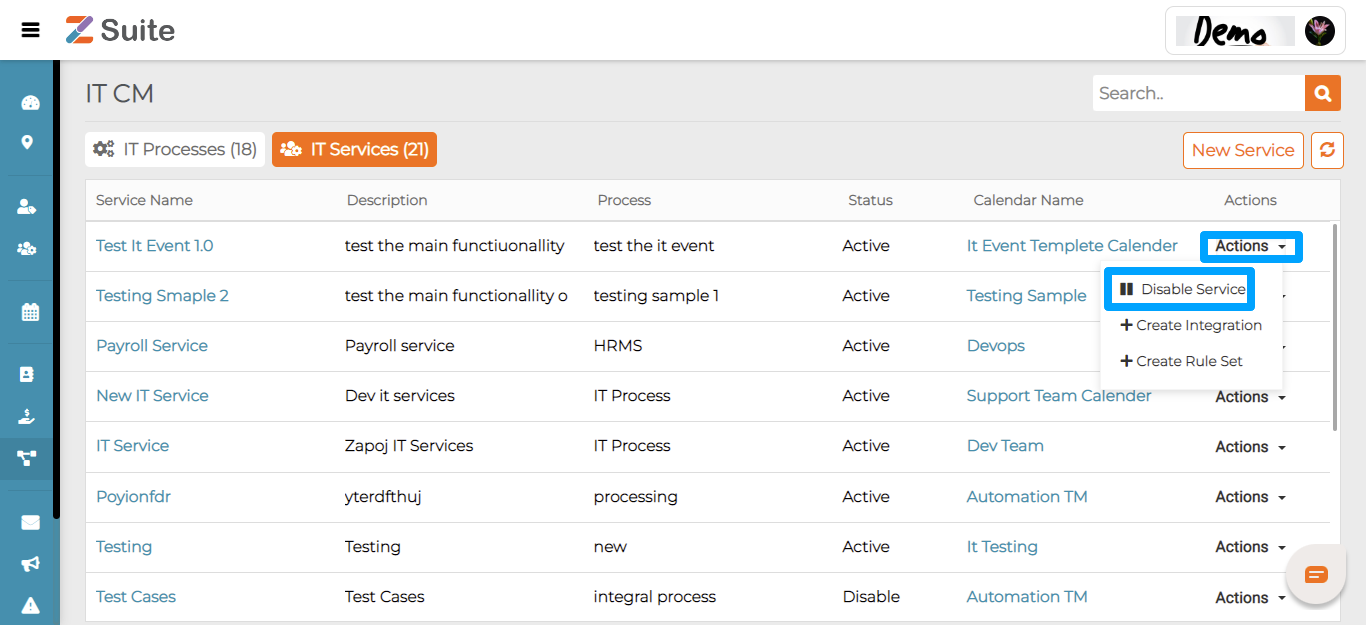
After Creating IT Services, the user can also Disable and Enable that Services. Click on Actions and Click on Disable Service
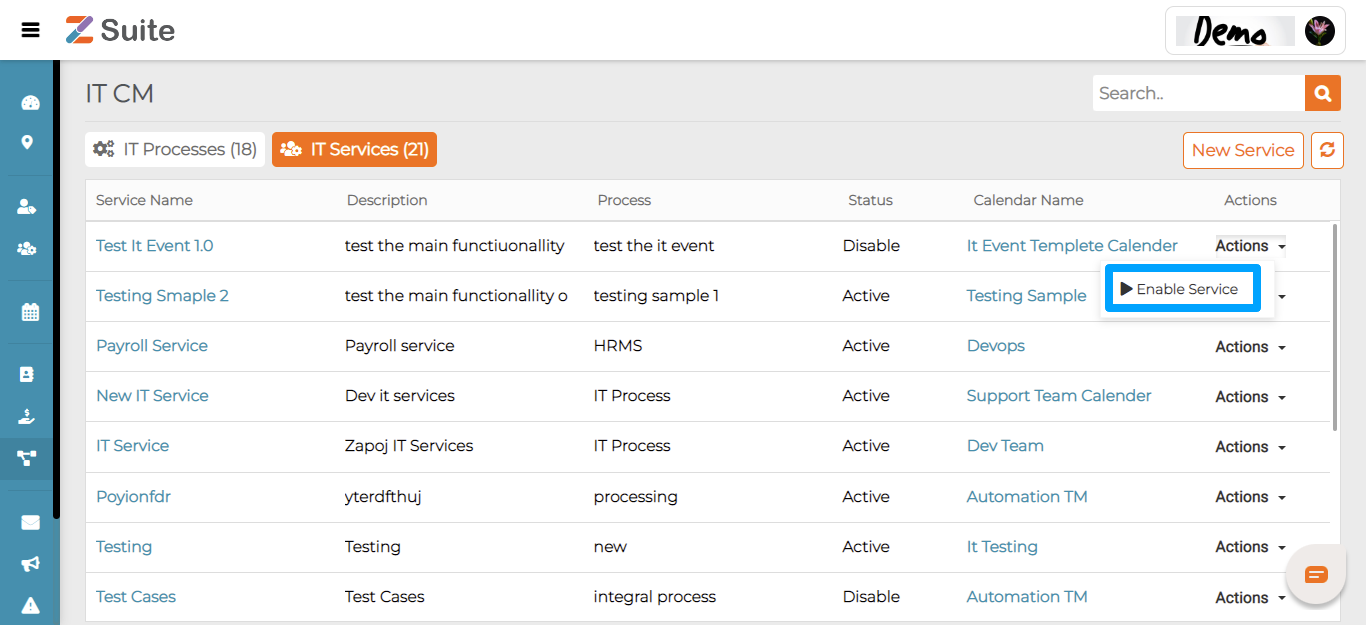
After Clicking on Disable Service the status changes from “Active to Disable”.

Again click on Actions and click on Enable Services to change the status from “ Disable to Active”.
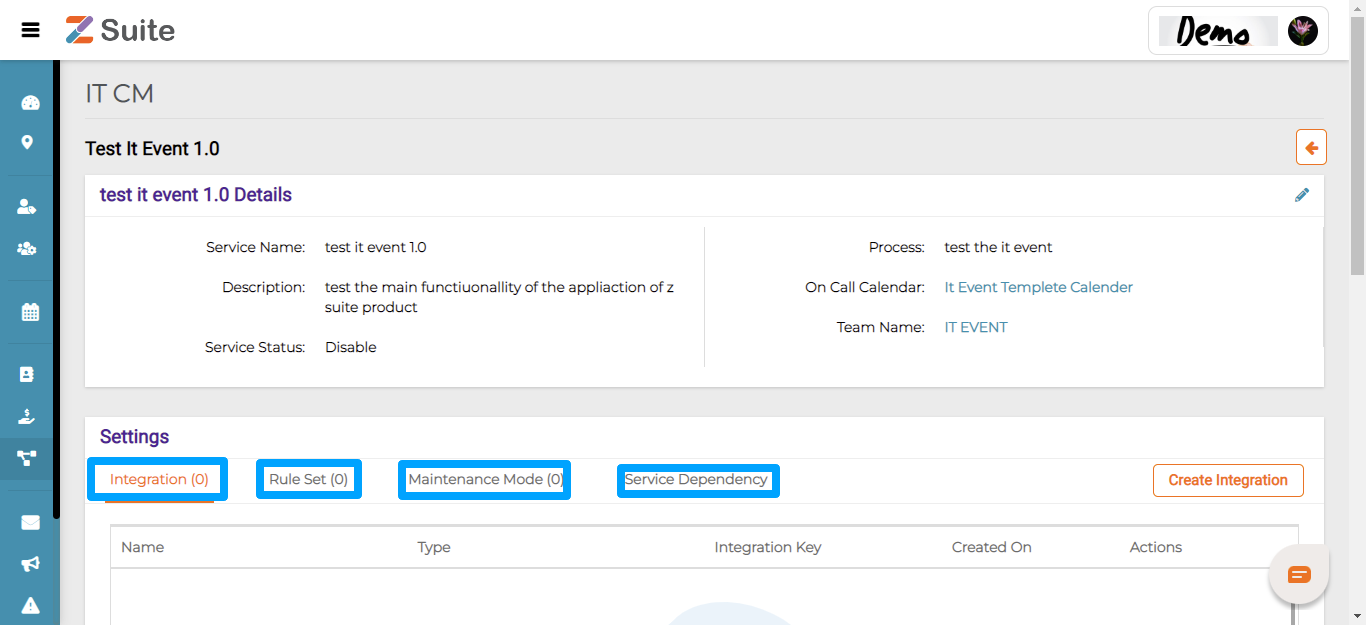
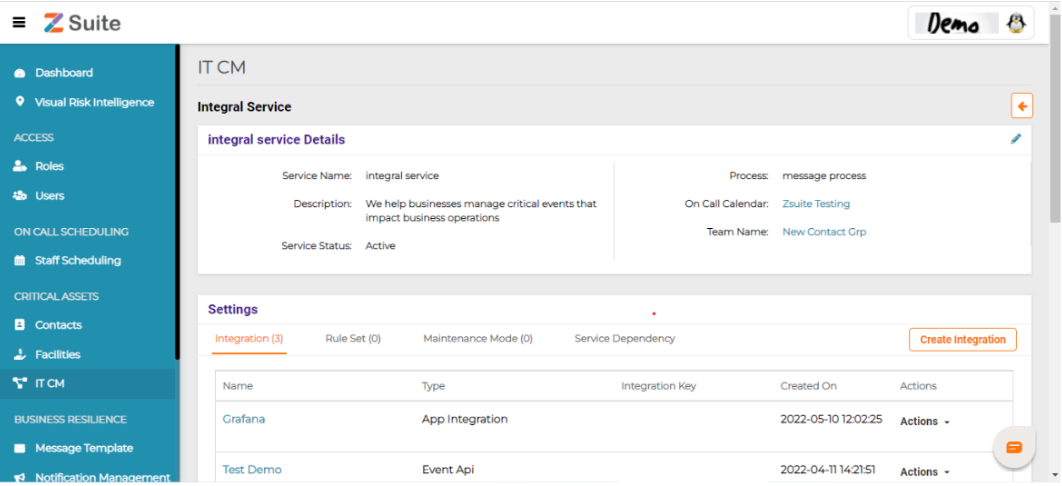
Settings: To create Integrations, Rulesets, Maintenance, and Service Dependency click on the Service name, then it redirects to the services view of settings
Integration Creation:
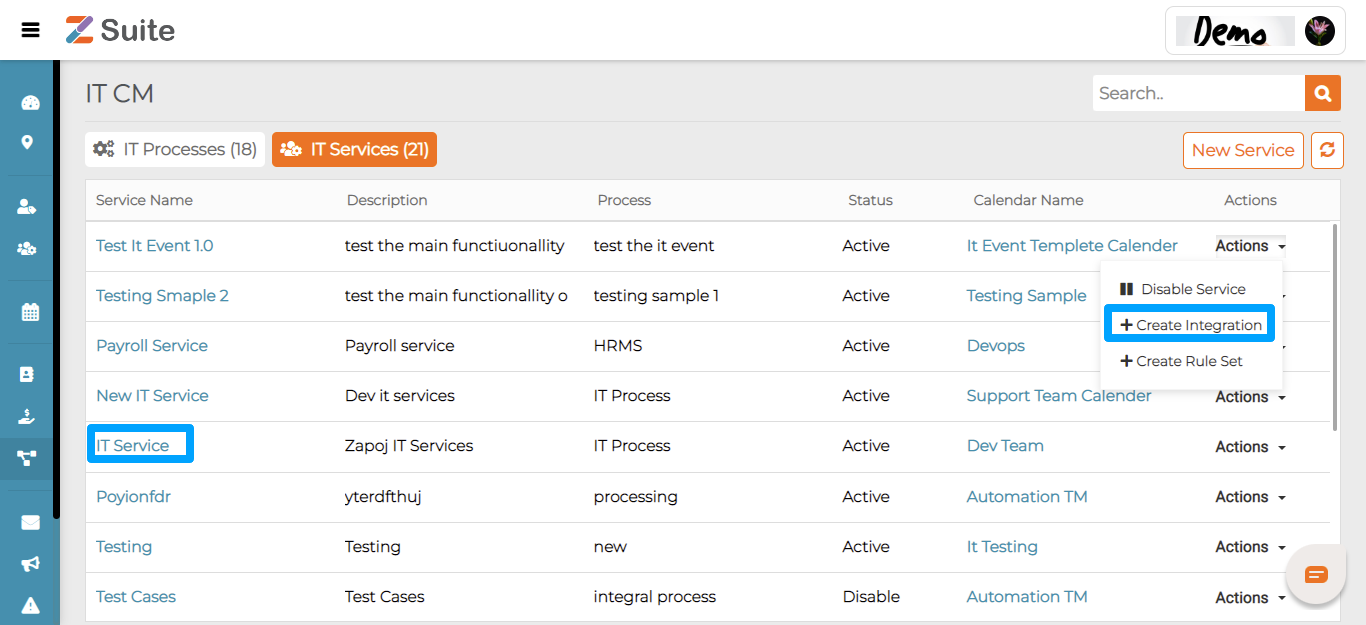
Click on the Service name or on the “Actions” and click on “Create Integration”.
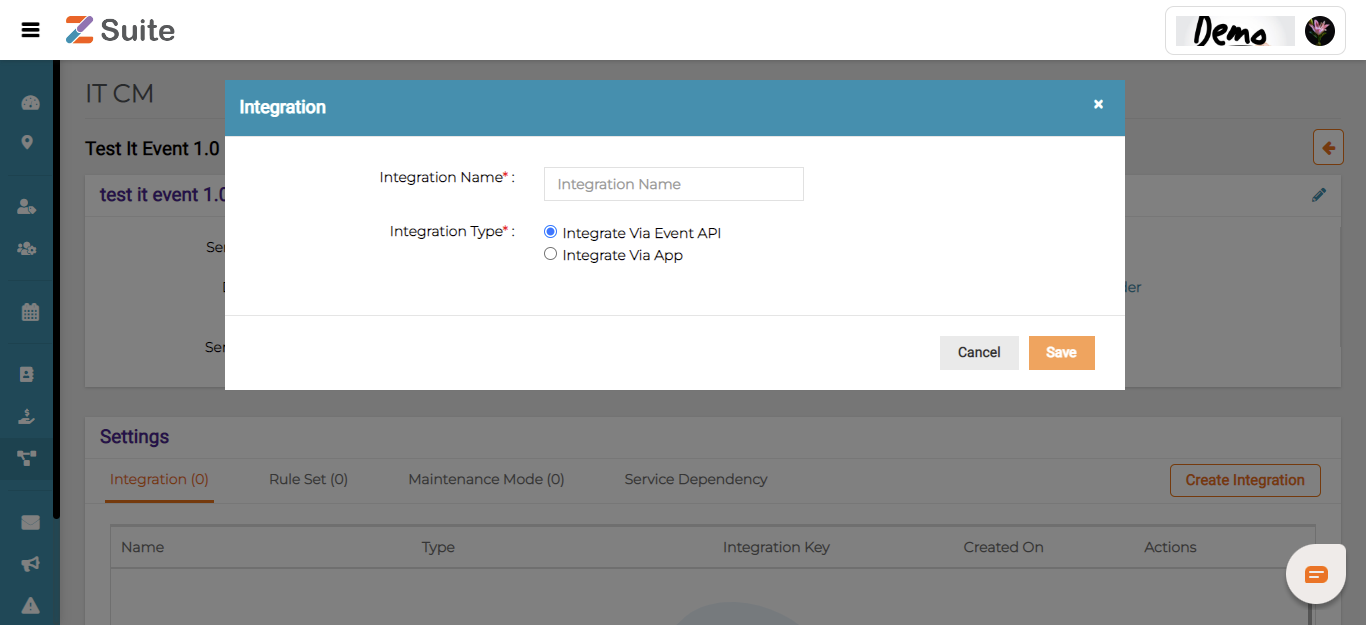
On “Create Integration”, the user needs to fill in the Integration Name and Integration Type from the Radio buttons list “Integrate Via Event API” or “Integrate via App”.
Edit Integration
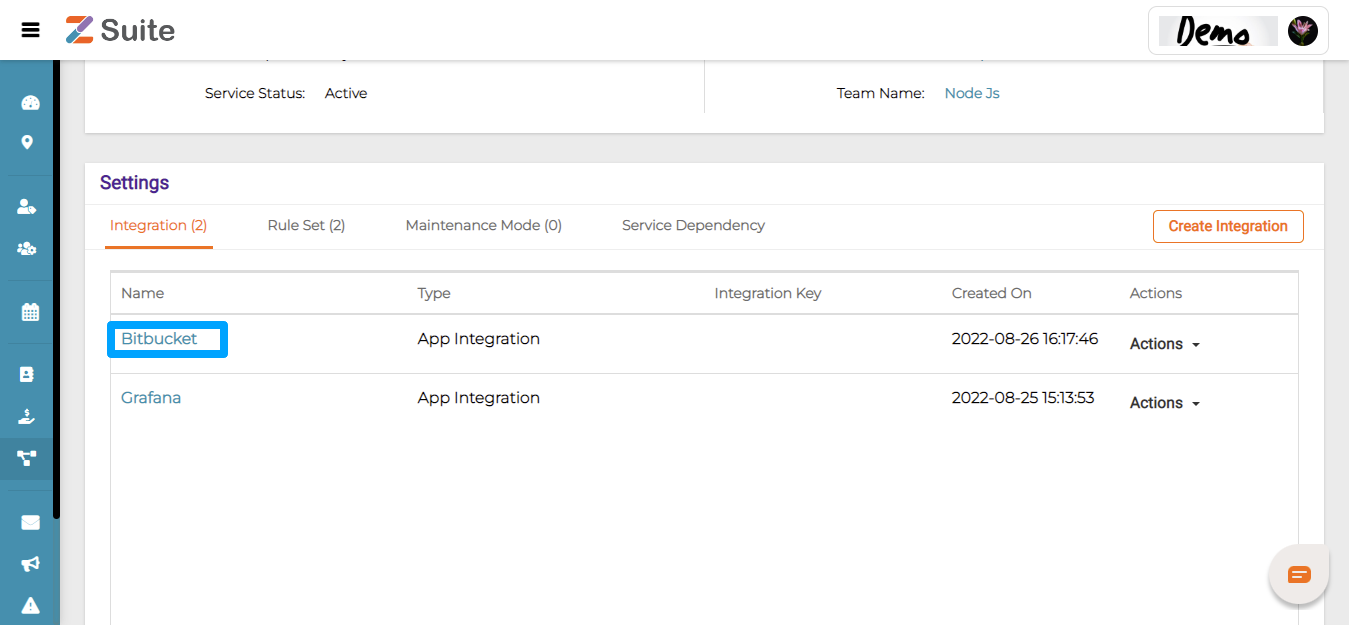
Click on the Integration Name.
The User will be redirected to the “Integration details” page and click on the “Edit icon”.
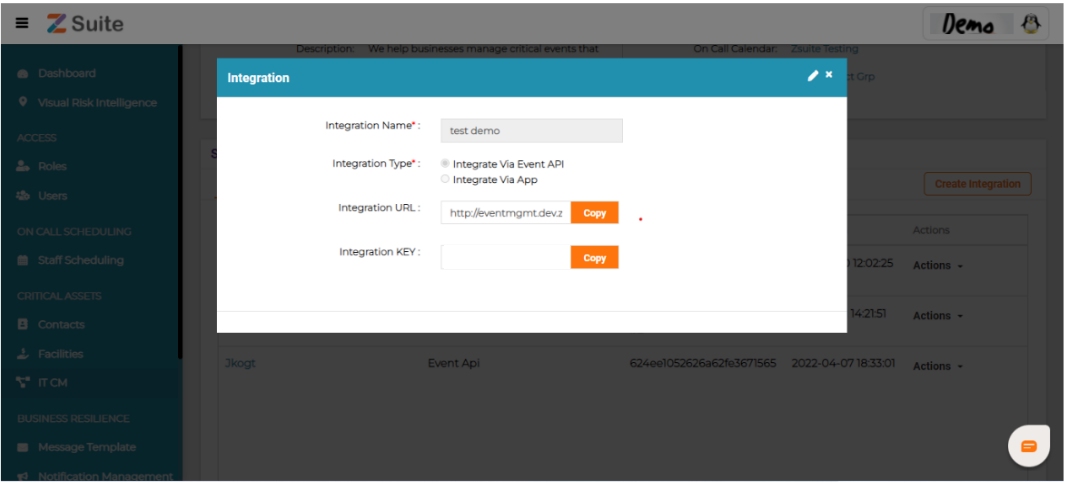
The user can Edit the details and click on the “Save” button.
Delete Integration
Click on the “Actions” dropdown and click on “Delete”.
Ruleset Creation:
Click on the Services Name or click on the ‘Actions “ dropdown and click on “Create Rule set “.
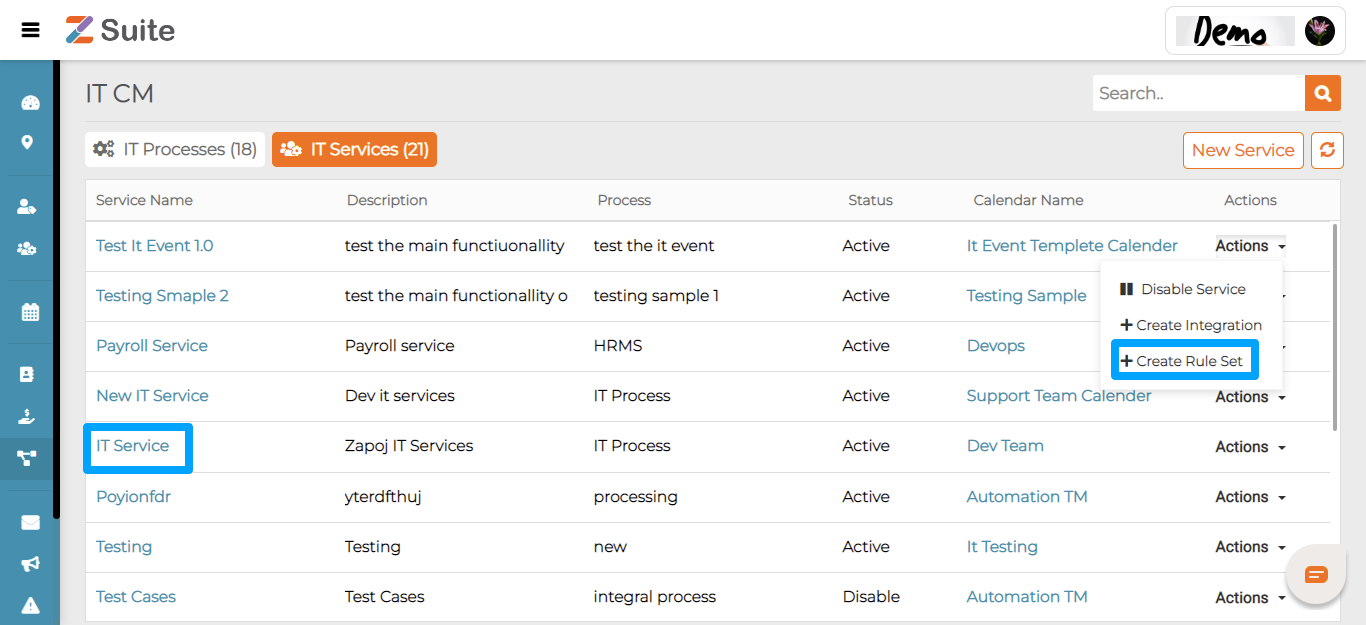
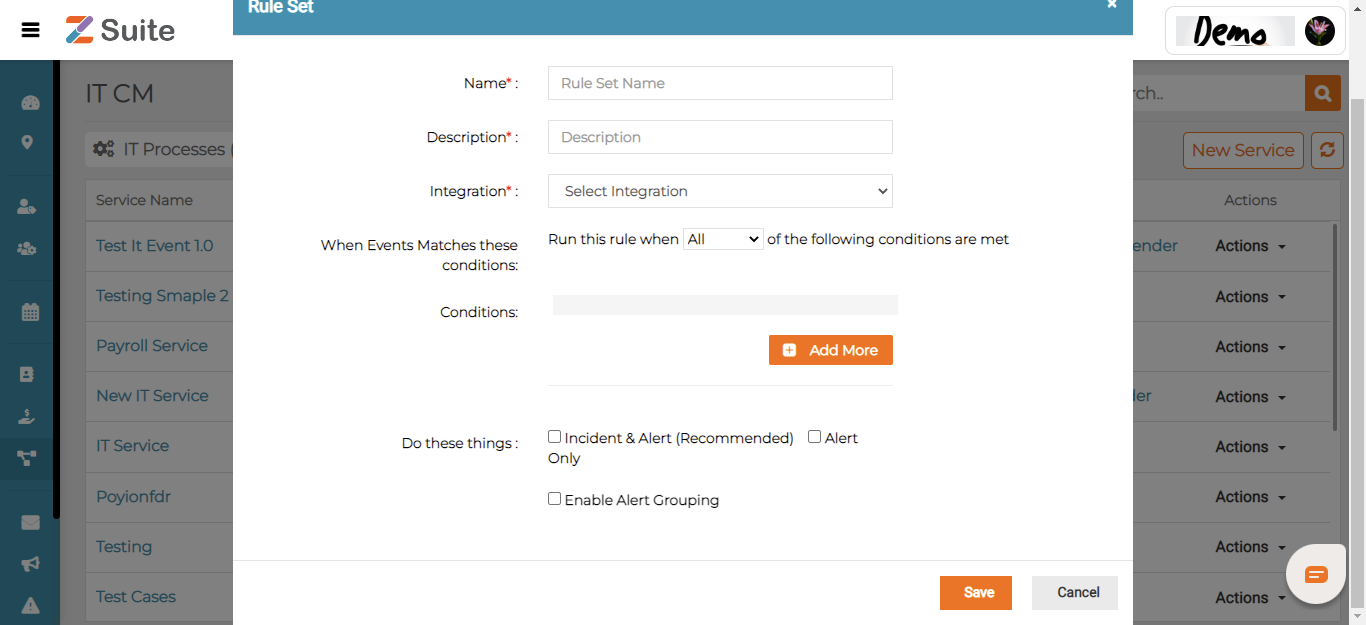
On ” Create Ruleset” the user needs to fill in the Name, Description, Integration, Event matches conditions,Conditions, and Do these things.
Ruleset
Name: Enter the name of the ruleset.
Description: Enter the Description of the ruleset.
Integration: Select the Integration from the dropdown list
Event Matches Conditions: Select the condition as All / Anyone from the dropdown list
Conditions: Add conditions by clicking on Add More option and selecting payload and operator from the dropdown list.
Do these things: Select the To Do Action from the checkboxes.
Edit Ruleset
Click on the Integration Name.
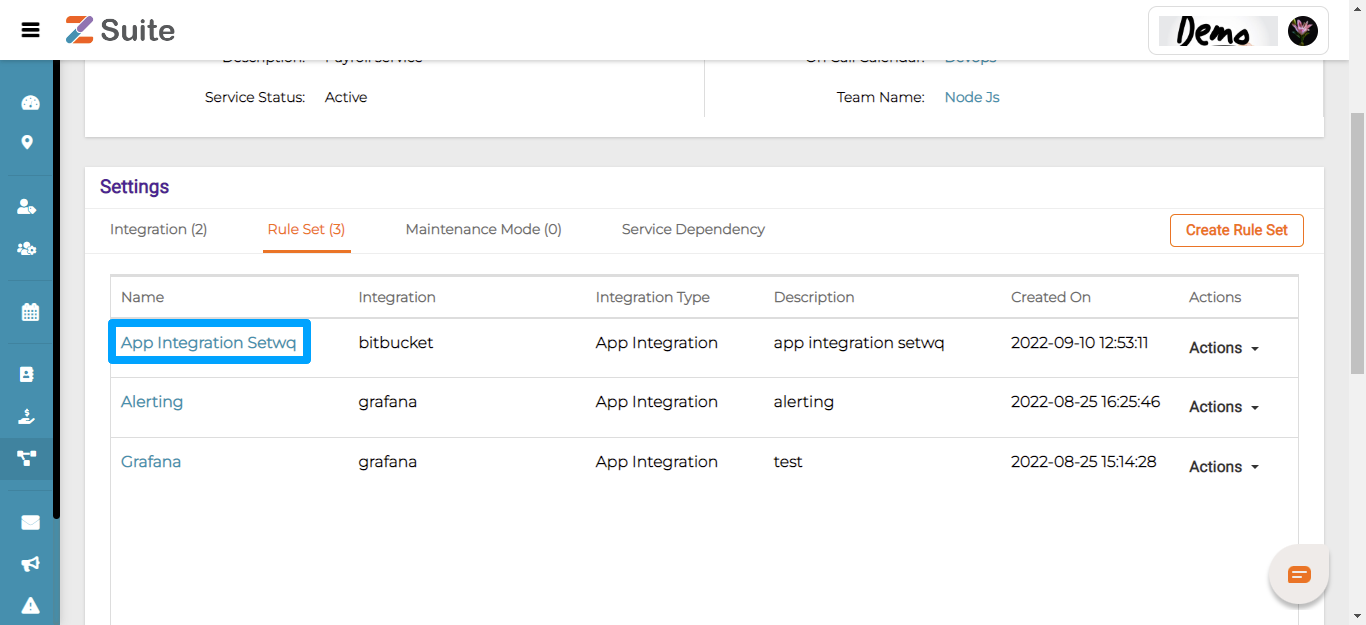
The User will be redirected to the “Ruleset details” page and click on the “Edit icon”.
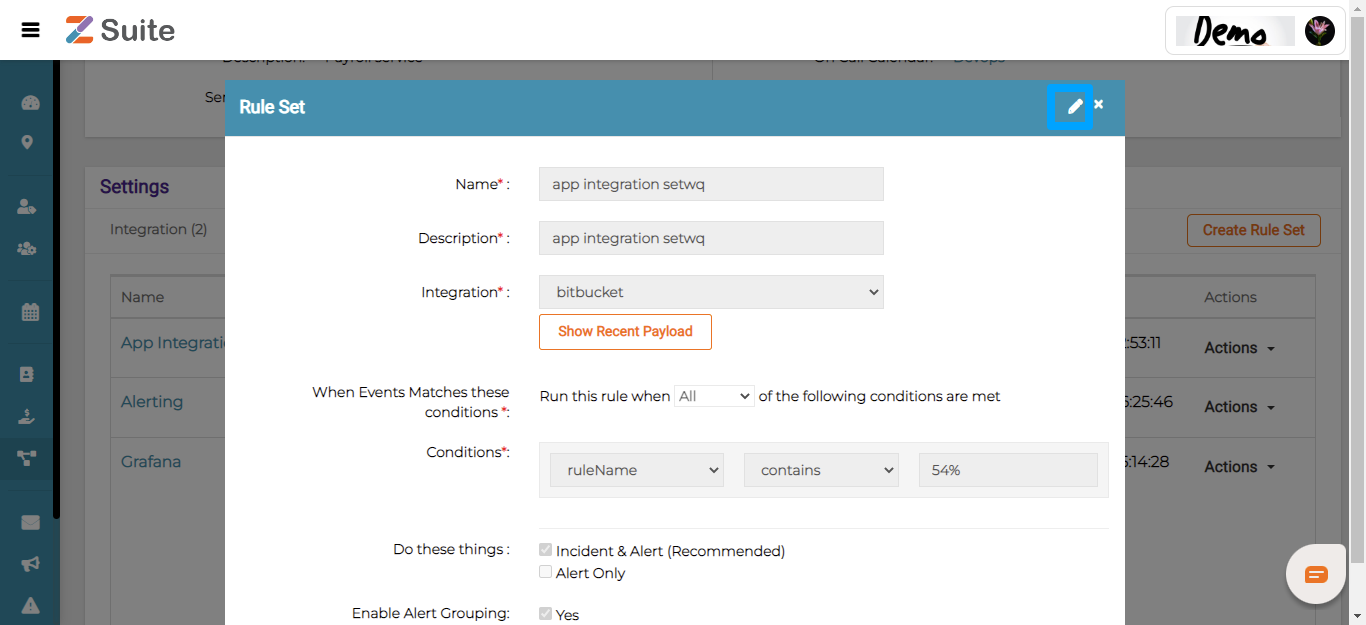
The user can Edit the details and click on the “Save” button.
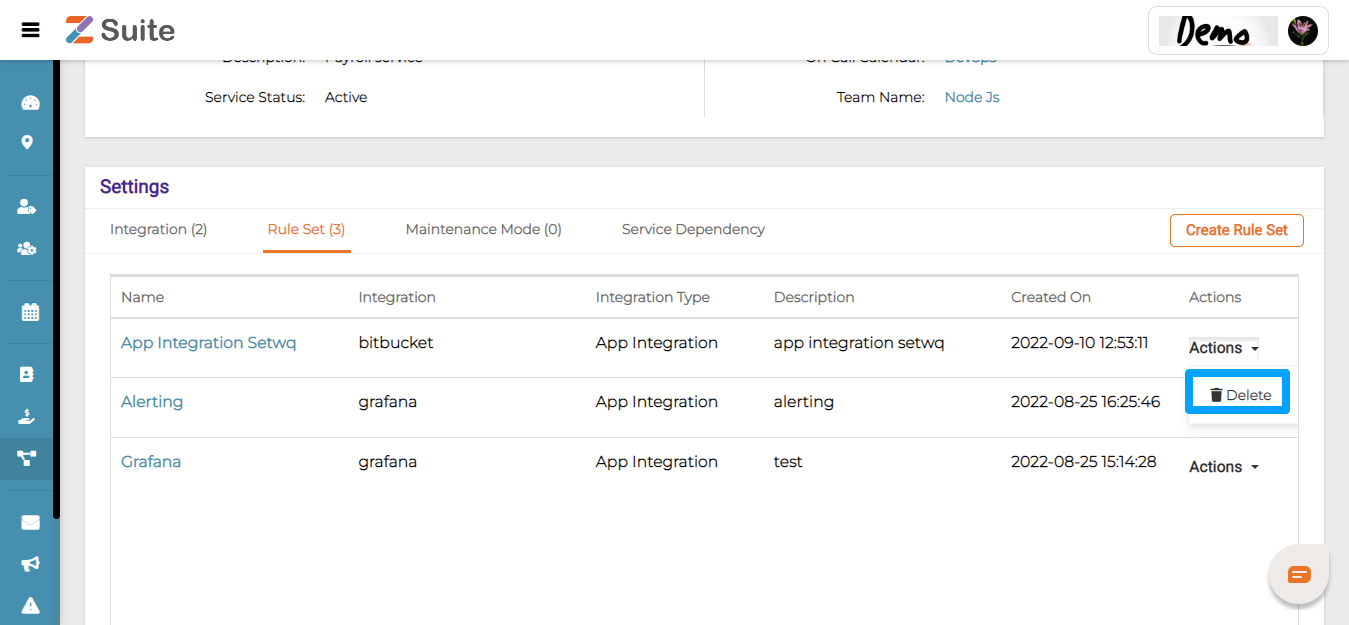
Delete Ruleset
Click on the “Actions” dropdown and click on “Delete”.
Maintenance Mode Creation:
Click on the Service Name and click on “Create Maintenance”.
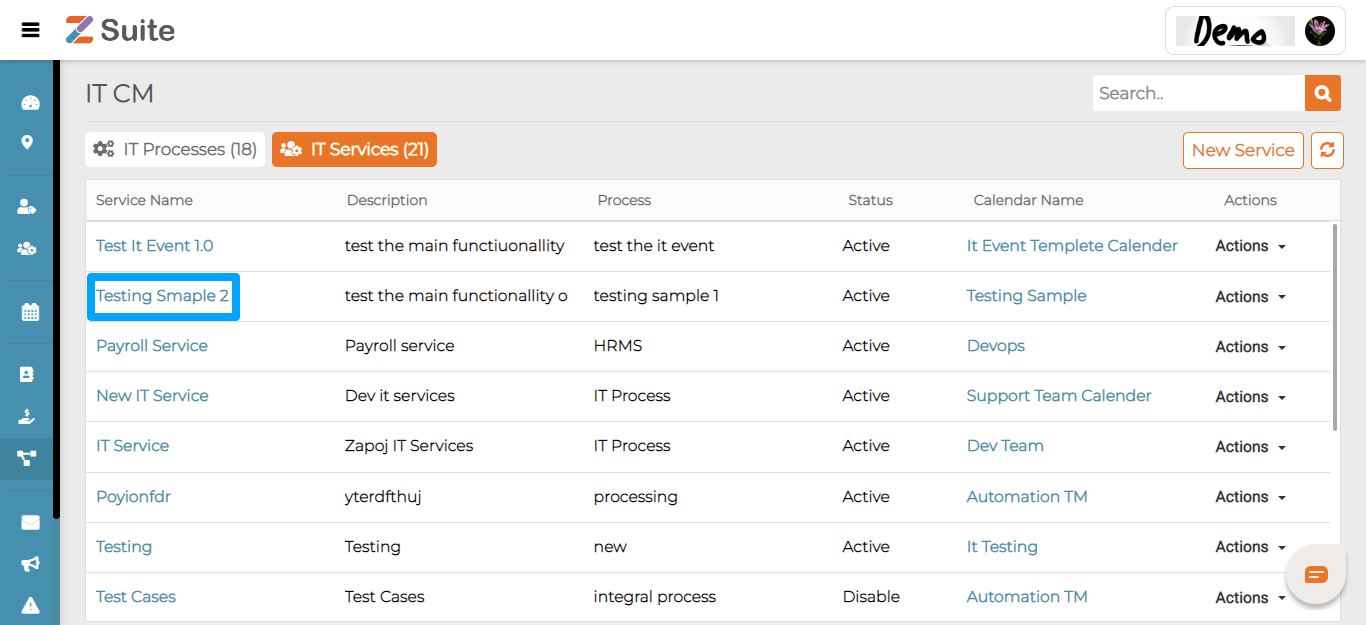
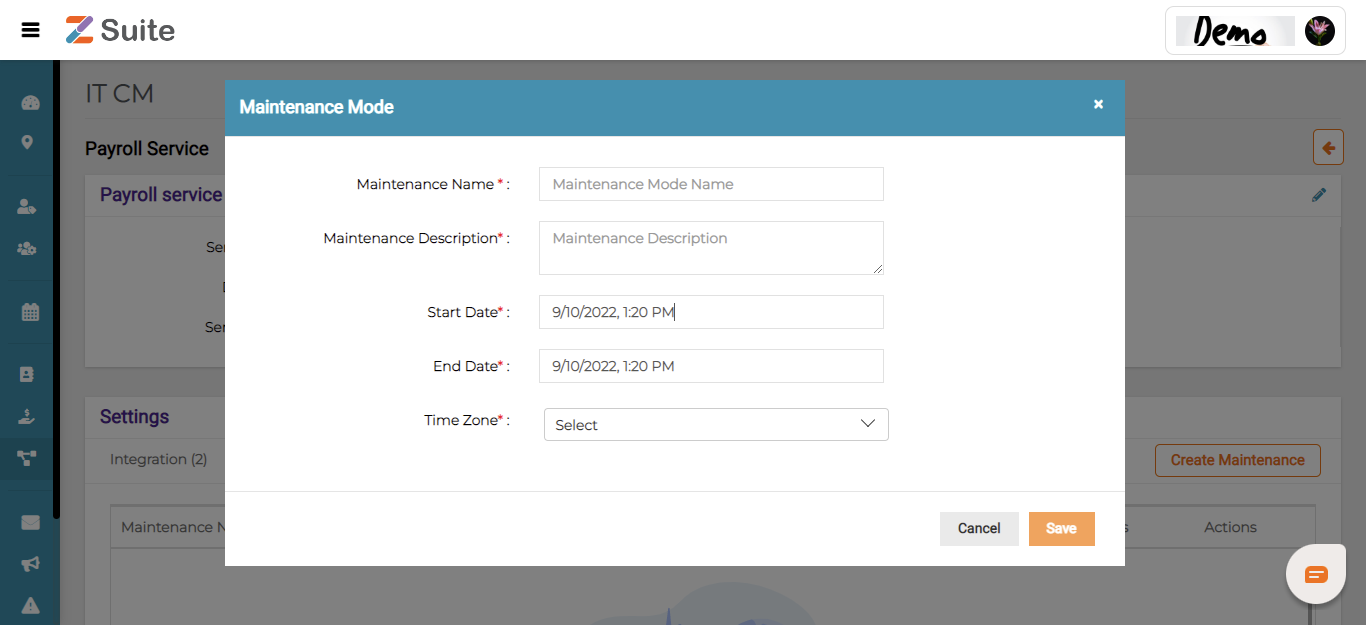
On “Create Maintenance” the user needs to fill in the Maintenance Name, Maintenance Description, Start Time, End Time, and Timezone.
Maintenance Mode Creation:
Maintenance Name: Enter the Maintenance Mode name
Maintenance Description: Enter the Description of the Maintenance Mode
Start Time: Select the Start Date and Time
End Time: Select End Date and Time.
Timezone: Select Timezone from the dropdown list.

Edit Maintenance Mode
Click on the Maintenance Mode name
The user will be redirected to the “Maintenance mode details “ page.Click “Edit” icon.
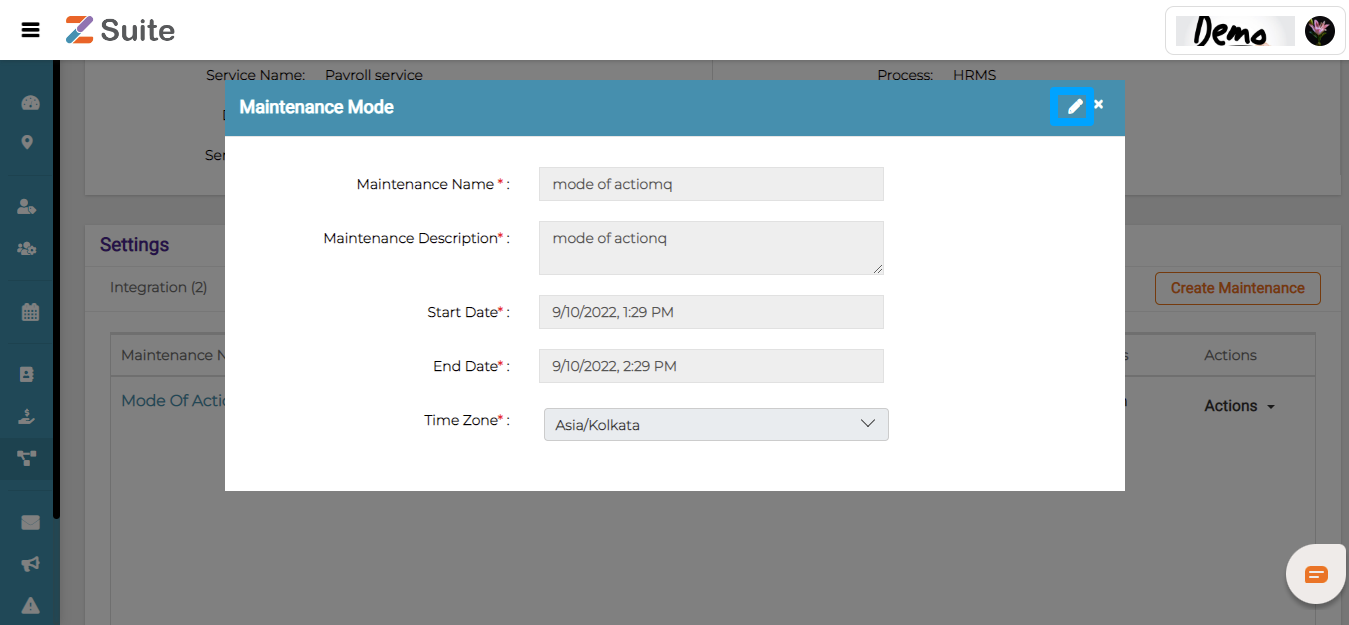
The user can Edit the details and click on the “Save” button.
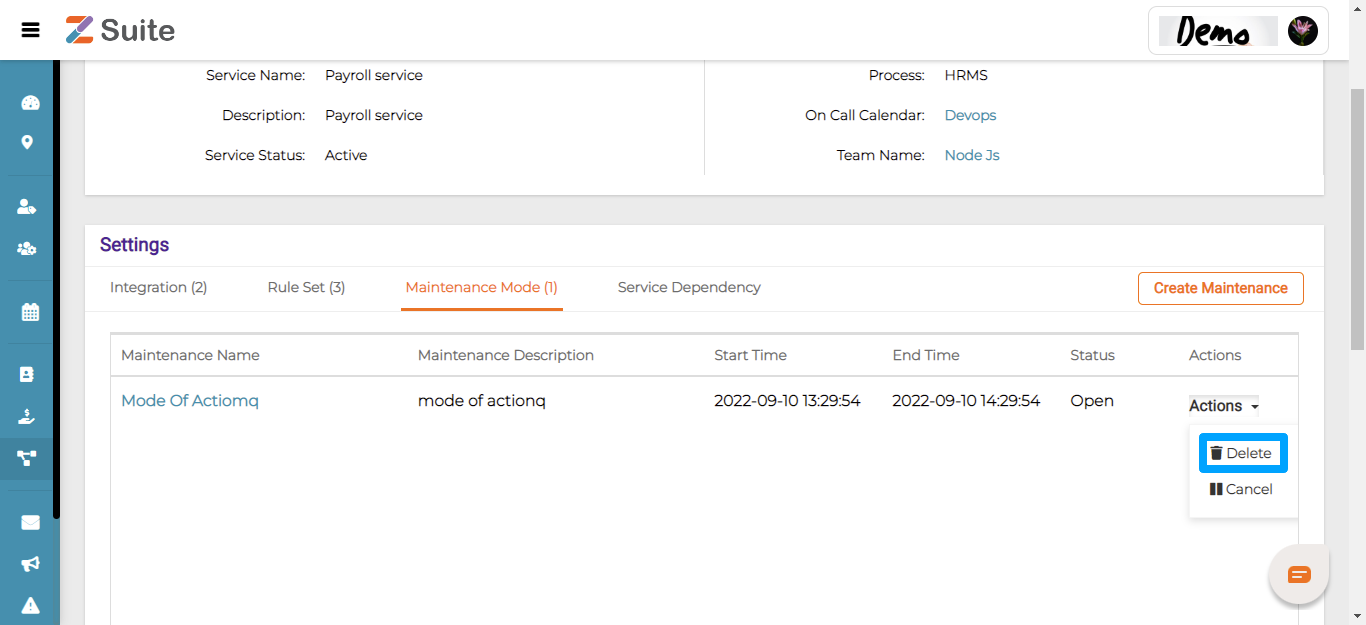
Delete Maintenance Mode:
Click on the “Actions” dropdown and click on “Delete”.
Service Dependency Creation:
Click on the Service Dependency
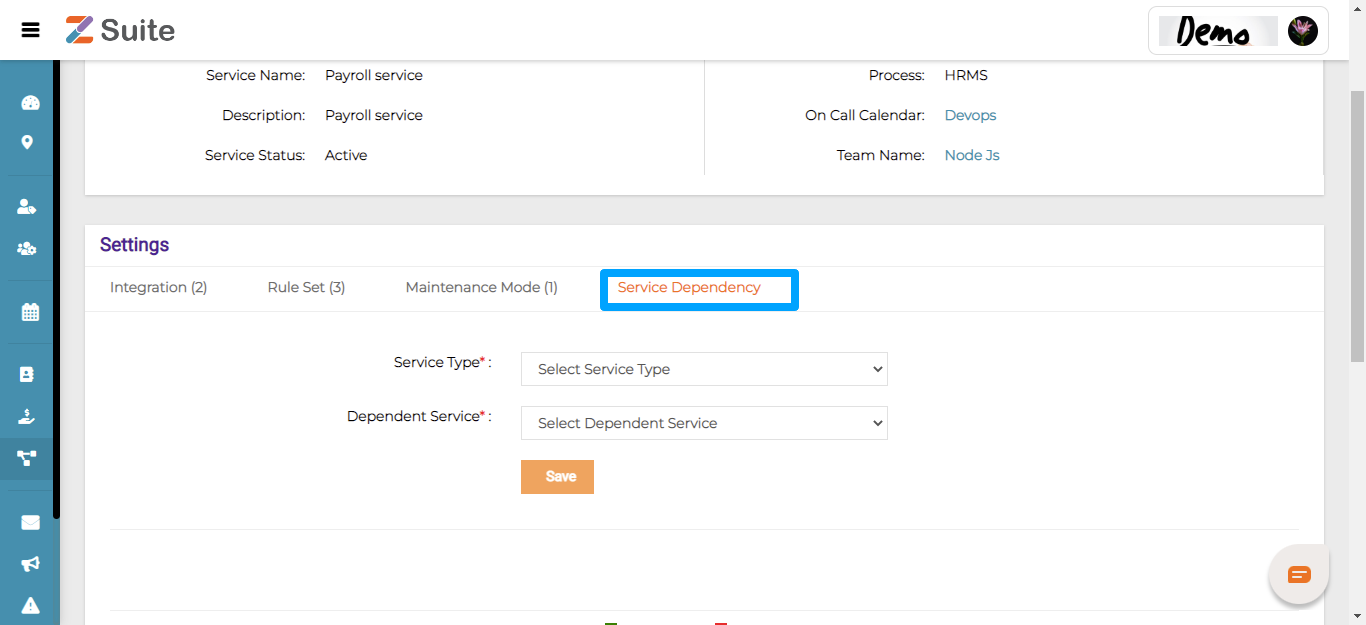
On “Service Dependency” the user needs to fill in the Service Type and Dependent Services
Service Dependency
Service Type: Select the Service Type from the dropdown list
Dependent Service: Select Dependent Service from the dropdown list.
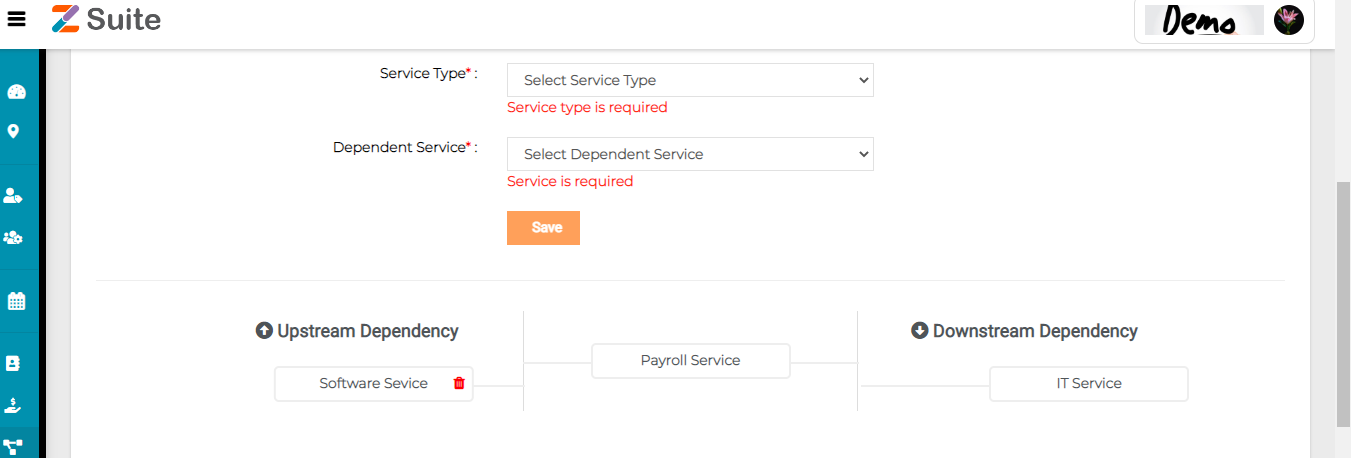
Based on selection both the upstream and downstream service dependencies are mapped.
Delete Service Dependency
Click on the “Delete” icon to delete the respective Service dependency.


